|
|
|

|
|
| Search | Car Forums | Gallery | Articles | Helper | AF 350Z | IgorSushko.com | Corporate |
|
| Latest | 0 Rplys |
|
|||||||
| WIP - Motorsports Post topics for any "Work In Process" motorsports vehicles in this sub-forum. |
 |
 Show Printable Version | Show Printable Version |  Email this Page | Email this Page |  Subscribe to this Thread
|
|
|
Thread Tools |
 08-26-2007, 07:01 AM
|
#1 | |
|
AF Regular

Join Date: Jul 2003
Location: Lynchburg, Virginia
Posts: 410
Thanks: 0
Thanked 0 Times in 0 Posts
|
Wip: 2007 Mp4/22
I needed to take a break on the Ferrari F1-2000 so I thought I would get working on this beautiful car.
This is just the mock up to see how the parts fit and get the pieces in the right spot. First off let me just say that the white metal is the best Studio 27 white metal to date. The pieces are not bent and are actually a much harder mold. They are also thinner than most of the older Studio kits I have see/built. Very smooth resin with little marks or cleanup needed. to the body. All white metal pieces were sanded with Tamiya sand paper. There are a few pieces that need some putty to clean up some holes in them. I know there are a lot of people that dont like Studio kits because they are not 100% accurate but I would rather have them as a starting point and have the option to put in a little extra effort than not have anything at all. So enough with that...on to the build.  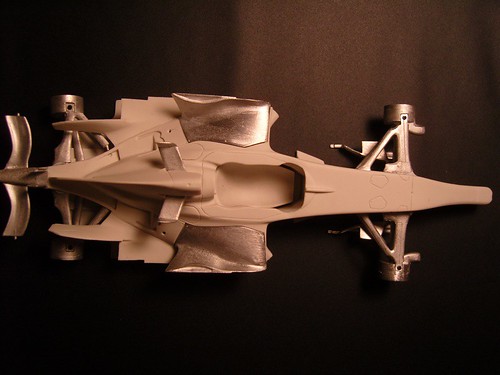  I will have another update later today and will keep the Ferrari going at the same time as this kit. Overall I am very pleased with this kit and it looks like it with a little extra work it will build a very nice replica of the early 2007 Mclaren. Thanks for looking! Chris |
|

|

|
|
08-26-2007, 07:43 AM
|
#2 | |
|
AF Regular

Join Date: Aug 2007
Location: Niagara Falls
Posts: 205
Thanks: 0
Thanked 0 Times in 0 Posts
|
Re: Wip: 2007 Mp4/22
Looking good. I will sure follow this post. Can't wait to see some more progress.
Zubski. |
|
|
|
|
|
08-26-2007, 09:00 PM
|
#3 | |
|
AF Regular
Thread starter
Join Date: Jul 2003
Location: Lynchburg, Virginia
Posts: 410
Thanks: 0
Thanked 0 Times in 0 Posts
|
Re: Wip: 2007 Mp4/22
Another update.
I started using CF decals on the suspension. The hard part is Studio molds everything together in once piece. Templates were made using tape and used on various Scale Motorsport carbon decals as well as Slixx carbon. Thanks to billypee for help getting better pictures as well. Thanks again for the tip! Enjoy the pics.  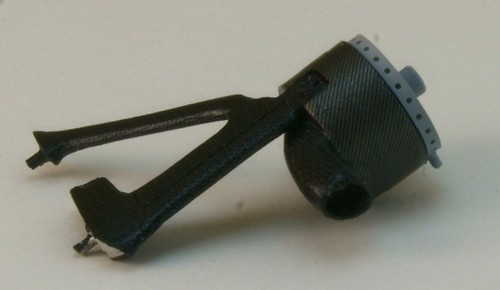 I am going to replace the kit brakes with a set of Top Studio F1-2000 brakes set. They fit perfect and look great on the car. Still working on the panel lines at this point, lots of work to do on them! Chris |
|
|
|
|
|
08-26-2007, 09:14 PM
|
#4 | |
|
AF Enthusiast

Join Date: Feb 2004
Location: Brisbane
Posts: 751
Thanks: 0
Thanked 9 Times in 9 Posts
|
Re: Wip: 2007 Mp4/22
Great start! What silver paint do you plan on using?
And make sure to keep lots of pics coming.
__________________
 
|
|
|
|
|
|
08-27-2007, 08:28 AM
|
#5 | |
|
AF Regular
Thread starter
Join Date: Jul 2003
Location: Lynchburg, Virginia
Posts: 410
Thanks: 0
Thanked 0 Times in 0 Posts
|
Re: Wip: 2007 Mp4/22
Captain Mark - I will be using Motochrome paint. I'm getting all the parts ready and I will paint them this week.
Chris |
|
|
|
|
|
08-27-2007, 08:31 AM
|
#6 | |
|
AF Regular
 Join Date: Jul 2007
Location: Sydney
Posts: 255
Thanks: 0
Thanked 0 Times in 0 Posts
|
Re: Wip: 2007 Mp4/22
Good start, nice CF work. Look forward to seeing how the paint turns out.
|
|
|
|
|
|
08-27-2007, 02:46 PM
|
#7 | |
|
AF Enthusiast

Join Date: Feb 2003
Location: F1...
Posts: 1,410
Thanks: 3
Thanked 3 Times in 3 Posts
|
Re: Wip: 2007 Mp4/22
As I said on another forum I will follow this one closely...
 Great CF work on the front suspension! using Ferrari brakes how ironic is that  ? Looks like your going for all the details ? Looks like your going for all the details  |
|
|
|
|
|
08-27-2007, 08:42 PM
|
#8 | |
|
AF Regular
Thread starter
Join Date: Jul 2003
Location: Lynchburg, Virginia
Posts: 410
Thanks: 0
Thanked 0 Times in 0 Posts
|
Re: Wip: 2007 Mp4/22
Saint - Yes thanks for the comments on this board as well. It's tough trying to remember to update all of these places on the net.
Here is the update that includes cleaning the panel lines and adding some of the extra pieces to get ready for the chrome finish. Here you can see were I had to use CA glue to clean up a mess I made when my knife slipped cleaning the panel lines.  I used the back of an Xacto blade (brand new) to clean the panel lines. I started with a photo etched blade but it was slipping and bending so I needed something more stable. I would drag the very tip back and forth both directions on a line to clean up the mess that is the Studio mold. 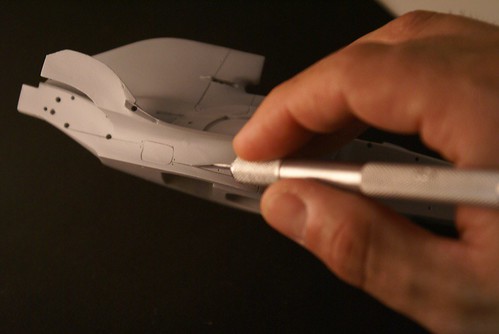 Here you can see one of the real trouble areas on the car. These panel lines around the head support are not very deep and need to be more detailed. After a single coat of primer the lines were already filled and hard to see. I plan to use thinned black or brown paint to bring out the panel lines and I need for them to be able to flow for this to work.  The wing support was added to the front of the nose using CA glue. Extra glue was added to both the right and left side to cause a puddle after the two pieces joined. A toothpick was used to spread the puddle evenly and the result after sanding and primer is a very clean looking contact point. With chrome paint going on the car I think every mistake will be easy to see so extra care is being taken now to get things looking right.  The back of the car requires some real work. Pieces need extra bending, putty, styrene and more filler to get them the right size and shape to make it look correct. I didnt take pictures of all the work that was done because it would have slowed me down but I can tell you that parts M42 - M43 need some work as does M46. Again, I'm not complaining because at least I can build this car in 1/20th scale! I'll put in the extra work.  You can see I'm not done yet. There are still some gaps and areas that need fixed. 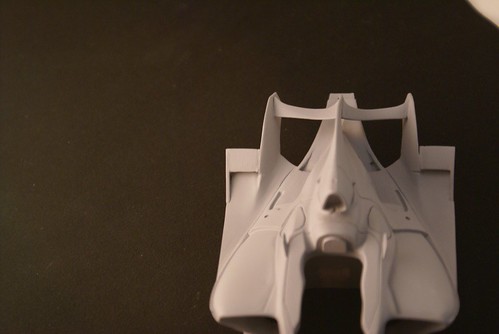 These '07 F1 cars really are good looking machines even before you get the final livery on them!  And a side view with more parts on the car.  And the front view.  I really hope to finish this kit in the next 3 weeks so keep the ideas and comments coming. They provide the motivation needed to keep pushing through the CF decals after hour and hours of the same thing over and over!! Thanks again for looking. Chris |
|
|
|
|
|
08-27-2007, 09:28 PM
|
#9 | |
|
AF Enthusiast

Join Date: Sep 2006
Location: USA, Florida
Posts: 590
Thanks: 3
Thanked 6 Times in 6 Posts
|
Re: Wip: 2007 Mp4/22
Your doing a great job these F1 S27 kits look a little tricky to build maybe one day I get enough nerve to try one.
__________________
Regards, Dave |
|
|
|
|
|
08-28-2007, 09:30 PM
|
#10 | |
|
AF Regular
Thread starter
Join Date: Jul 2003
Location: Lynchburg, Virginia
Posts: 410
Thanks: 0
Thanked 0 Times in 0 Posts
|
Re: Wip: 2007 Mp4/22
Fixing the panel lines tip.
1. Use the tape that is used to make labels and cut a small piece to work with.  2.Remove part of the backing to expose the tacky portion of the tape. Only remove part so you have an easy way to remove when you are done.  3.Place tacky side down on the kit along the panel line you want to scribe and drag back of xacto along the tape to ensure you dont make any mistakes.  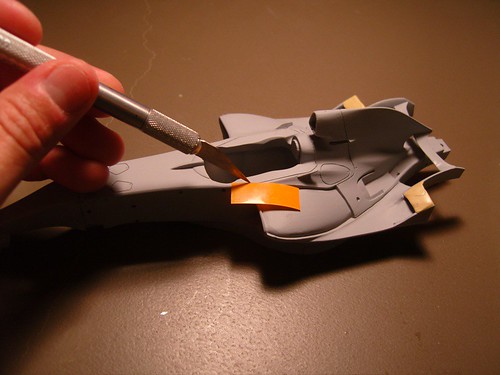 One piece can be used again and again and it is just thick enough to help guide the blade and keep you on track. Back to the update... This is my first time really using putty to do anything large on a kit. I chose to use Tamiya Epoxy Putty to fix M42 and M43 and make the connection to smooth and seamless.  Equal parts were used and as I found out it doesn't take much  Have water ready because things get sticky real quick!  These were mixed to ensure everything was mixed together and left to set while I tried to clean up some of the mess I had made.  I covered the entire piece because I didnt want to work with a transition in the middle of the wing. I will sand and shape tomorrow.   And now the kit will sit and dry till tomorrow.  Another update tomorrow. Chris |
|
|
|
|
|
08-29-2007, 03:42 AM
|
#11 | |
|
AF Enthusiast
Join Date: Feb 2004
Location: Brisbane
Posts: 751
Thanks: 0
Thanked 9 Times in 9 Posts
|
Re: Wip: 2007 Mp4/22
Great update! I also found out the hard way that you only need a LITTLE epoxy putty to get the job done. I use Milliput, but it appears that the Tamiya stuff is doing a great job for you.
Those two parts you've attached with the putty, have you actually covered the whole part with the orange stuff? If you find that makes it come out too thick, perhaps sand it off and just use a little clear epoxy glue for the join. If you have a product called Araldite that would be perfect, but you may not have it in your country (if you're not in Australia). Or perhaps I'm missing the point of why you're using the putty... anyway, looking forward to seeing how it comes out!
__________________
|
|
|
|
|
|
08-29-2007, 06:20 PM
|
#12 | |
|
AF Regular
Thread starter
Join Date: Jul 2003
Location: Lynchburg, Virginia
Posts: 410
Thanks: 0
Thanked 0 Times in 0 Posts
|
Re: Wip: 2007 Mp4/22
Left the kit in the car today to kind of cook the putty.
Sanded using Tamiya sandpaper and smoothed it down and made the wings the correct shape.   Primed the putty parts, sanded and primed again. These parts are now ready for the chrome.   I have scribed all the panel lines...again...and washed the kit. It will be left to sit for 2 days while I get the other parts ready and should be shooting the chrome Friday night/Saturday morning. Does anyone have any good pictures of the wheels/brakes on this car? Thanks for looking. Chris |
|
|
|
|
|
08-30-2007, 01:01 AM
|
#13 | |
|
AF Regular
Join Date: Feb 2006
Location: Moscow
Posts: 493
Thanks: 0
Thanked 0 Times in 0 Posts

|
Re: Wip: 2007 Mp4/22
|
|
|
|
|
|
08-30-2007, 01:46 AM
|
#14 | |
|
AF Enthusiast

Join Date: Oct 2005
Location: Monza
Posts: 1,150
Thanks: 21
Thanked 56 Times in 38 Posts
|
Re: Wip: 2007 Mp4/22
Hi, interesting progress, I'll be following it. Hope these could be helpful.
Bye: R     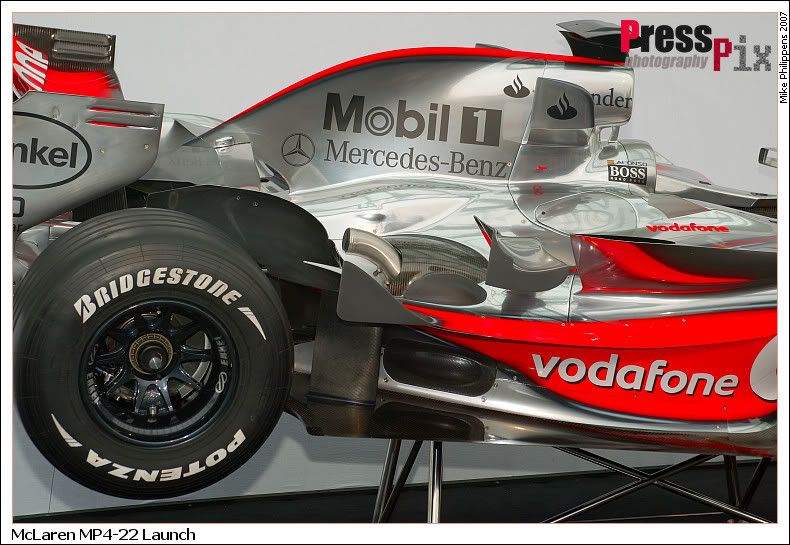 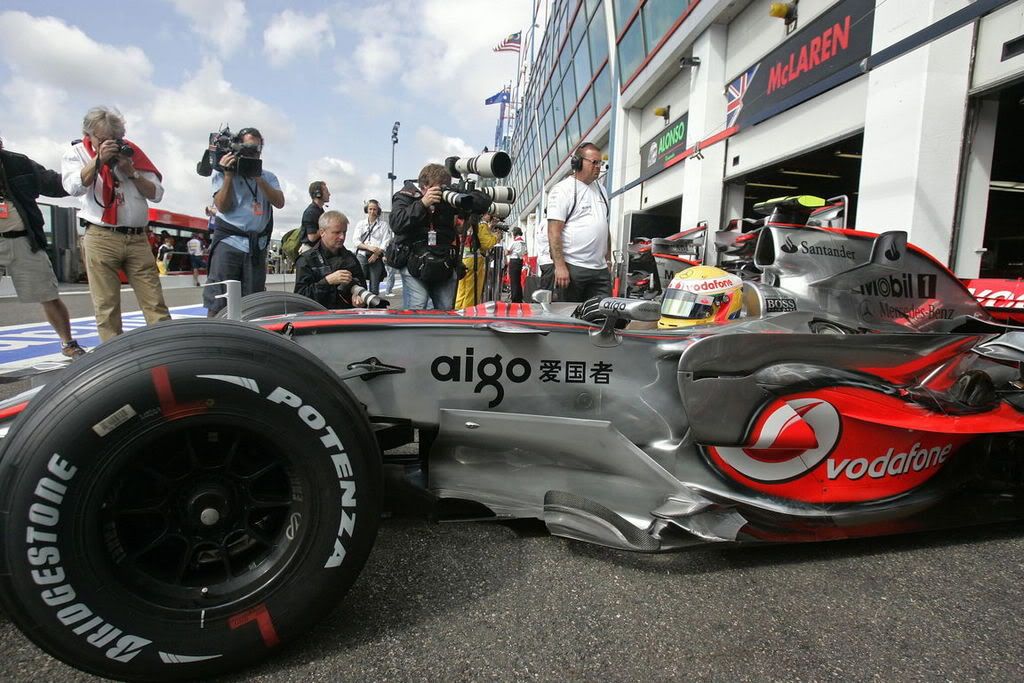 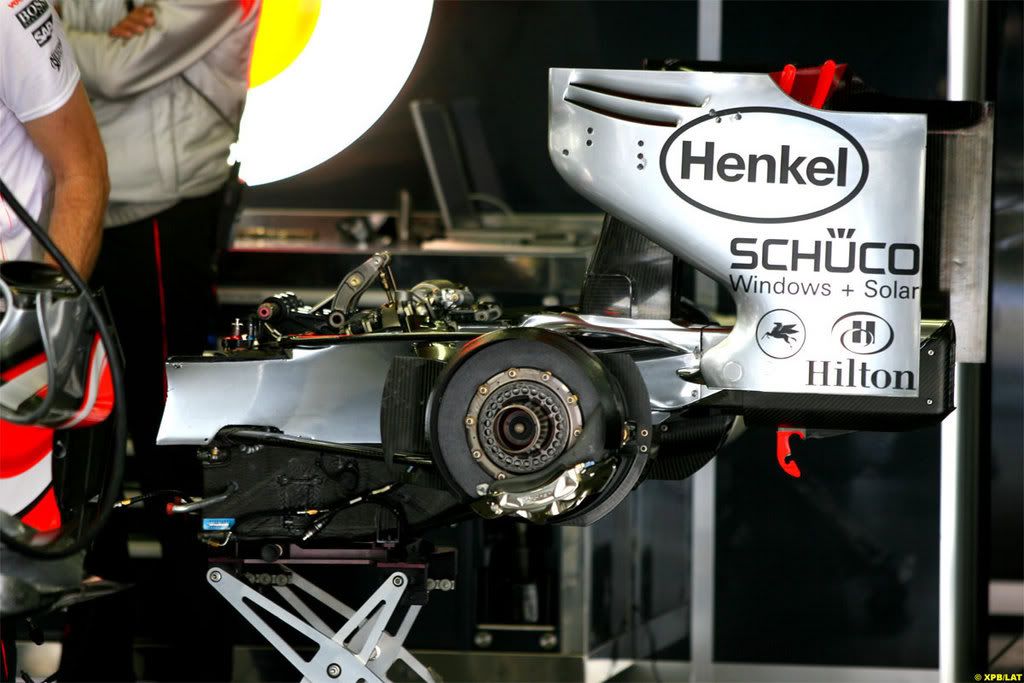  Last edited by Robi J; 08-31-2007 at 07:07 PM. |
|
|
|
|
|
08-30-2007, 07:00 PM
|
#15 | |
|
AF Regular
Thread starter
Join Date: Jul 2003
Location: Lynchburg, Virginia
Posts: 410
Thanks: 0
Thanked 0 Times in 0 Posts
|
Re: Wip: 2007 Mp4/22
Thanks Mr and Robi. Great pictures.
Working on CF decals tonight. I'll post pictures tomorrow. Chris |
|
|
|
|
|
|
POST REPLY TO THIS THREAD |
 |
|
|


