|
|
|

|
|
| Search | Car Forums | Gallery | Articles | Helper | AF 350Z | IgorSushko.com | Corporate |
|
| Latest | 0 Rplys |
 02-02-2005, 11:00 PM
|
#1 | |
|
Off playing with fire.
 
Join Date: Mar 2001
Location: Las Vegas, Nevada
Posts: 10,371
Thanks: 22
Thanked 20 Times in 16 Posts
|
4Runner FAQs
4Runner FAQs
This page outlines the most frequently asked questions about 4Runners and Off-roading Get DENSO (OEM) part numbers here. 1. What are the different generations of 4Runners I keep hearing about? 1st gen = 1984-1989 2nd gen = 1990-1995 3rd gen = 1996 - 2002 4th gen = 2003 - ? 2. What is the largest tire I can fit under my stock 4Runner? For 1st and 2nd gen 4Runners and trucks you can safely fit 32x11.5s with little or no rubbing. For 3rd gens you can fit 265/75 R16. However, tire size varies by manufacturer so some may rub a little more than others. Mud tires tend to vary more than street or A/T tires so they may rub even more. Also, 2 hidden concerns with going bigger are the speedometer offset and the possible loss in power. The loss in power is the result of the change in the effective gearing by going to a bigger tire. The severity of the power loss is dependant on your present gearing and how large a tire you moved up to. To remedy the loss of power you should change your gears in your differential(s). Having said that, usually if the tires are only enlarged 1 inch most people just live with the loss of power and speedometer error. Most 3rd gens don't feel the loss of power because the engine is more powerful. 3. The rear of the 4Runner seems to be sagging. What can I do? The springs on all the generations of 4Runners are notorious for sagging. Usually people replace the stock springs with after market springs from Downey, Performance Products and Old Man Emu. Less popular methods are to add spacers on top of the coil springs, add spacers between the coils of the springs or add air bags. For more info about 2nd and 3rd gen suspension options click here. 4. How do I know what gear ratio I have in the differential(s)? For 1st and 2nd gens (maybe 3rd gens too) click here. For the 3rd gens, click here. 5. What do the Overdrive and ECT buttons do on an automatic transmission? With the overdrive off the transmission will not use the highest gear. This is useful for towing and keeping up your speed up on the hills. I especially like to use it to slow me down fast without hitting the brakes which is useful when I see a cop. The disadvantage of turning off the overdrive is the high engine RPMs at freeway speeds and the resulting noise and poor mileage. The ECT button stands for Electronically Controlled Transmission and it essentially changes the shift points. It will let the engine rev higher before shifting to the next highest gear. This is useful for faster take offs and climbing those mountain passes. Again, use of the ECT button can diminish mileage. 6. What can I do to increase power of my 3.0 Liter V6 engine (1st and 2nd gens) In short, nothing. To get any appreciable power gains from the 3.0 you must throw in lots of money. The most popular and cost effective change is to go with headers. Next is to change the differential gears because you probably switched to larger tires. All the other engine mods out there either do nothing or cost more than an engine swap. 7. The mileage of my 3.0L V6 really bad, is this normal? Yes it is. I get around 17 mpg freeway and about 12mpg city (maybe less). My mileage is actually considered normal for a V6 auto transmission. During freeway driving I can get about 250 miles per tank while I've heard of people getting about 200 miles per tank. Both are normal, it all depends on your tranny type, your style of driving, and most importantly your gearing. 8. When I go around a corner in 4wd it feels like I have a lot of friction in the drivetrain. What is happening? When a car goes around a corner each tire travels in a slightly different path and as a result each tire is turning at a slightly different RPM. A differential (diff) allows each tire to turn at different speeds. For a 2wd truck there is one diff between the rear tires. For part time 4wd trucks there is one diff between the rear tires and one diff between the front tires. For full time 4wd and all wheel drive trucks, there is an additional diff, known as a center diff, between the front drive shaft and the rear drive shaft. This takes care of the speed difference between the front tires and the rear tires. The "friction" is binding in the 4wd drivetrain and it only happens with part time 4wd systems because there is no center diff. When making a turn using a part-time 4WD system, the front driveshaft and the rear driveshaft are locked together, turning the front and back tires at the same speed. In order for this to work properly there needs to be slippage of the front and/or rear tires, otherwise, tremendous stress is put on the transmission and tires. This is why you should not use part-time 4WD (or more specifically, turn) on dry pavement, or high traction surfaces. Alternatively, full-time 4WD, otherwise known as all-wheel drive, usually has a center differential which allows the front driveshaft to turn at a different speed than the rear. This allows for the use of 4WD on all types of driving surfaces." While full time 4wd is good for driving on the road, it is far from ideal off road. 9. What is a locker? A "Locker" is short for differential locker. It's almost like a limited slip differential (LSD) or Positraction, but it's much better for off roading. An open differential (that is, one without a LSD or locker) will always send the most power to the tire with the LEAST traction. That's why when you burn rubber only one tire left a mark on the road. It's even worse when one tire is on sand or ice, that tire will spin and the truck goes nowhere. An LSD helps a little by using clutch plates or gears to send more power to the other tire. This is fine for sand, snow, or ice, but when you are off roading it is quite easy to lift a tire completely off the uneven ground. When this happens to both the front and rear then the LSD can only do so much and all the power goes to the tires in the air and you go nowhere. A rear locker will positively lock the left and right tires together no matter what. This is the ultimate traction device used for off roading. However, when traveling on icy roads they can send you out of control because when you go around a corner the locker forces the tires to slip (remember, they have to travel different paths). To remedy this potentially dangerous condition some manufactures make the locker selectable or ratcheting. Newer 4Runners have a selectable center lockable diff. so that one can drive on hard packed surfaces. This is NOT the same thing as the selectable TRD rear diff lock found on the Tacomas and the '96-2000 4runners. The center diff lock does just that, it locks the center differential only. 10. Should I get weld on or bolt on sliders and where can I get them? Really, it doesn't matter whether you weld on or bolt on. Both methods, if designed properly, will provide plenty of strength to hold up the truck. Both methods, if done improperly, will fail. Weld-ons have the advantage of being simpler to mount. Many people will say they are stronger, but I don't believe so (and I'm a mechanical engineer). The disadvantages are they have to be welded on by somebody who is very good at welding and they can't be removed easily. The geometry of the weld to the frame and the amount of heat can potentially weaken the frame. Bolt-ons have the advantage of being removable. The down side is they are more difficult to mount and some designs still require small amounts of welding to the frame. The sliders that bolt completely through the frame require reinforcements in the form of sleeves to prevent the frame rails from being crushed. These sleeves should be welded in. For a list and description of available rock sliders, click here. 11. My 2nd gen 4Runner/Truck makes a loud popping/grinding noise when I make a sharp turn. What is this noise? Don't worry, most of the time this noise is just the steering stops rubbing on each other. Normally there is a plastic cap covering the metal preventing this noise. However, these quickly wear away and fall off. You can get replacement caps for a couple bucks at the dealer, but most people just grease the metal stops, or live with it. 12. What is this headgasket recall I keep hearing about and how do I know if my 4Runner/Truck has been worked on? Technically it's not a recall, it's a "Special Service Campaign." It affects most, but not all, 3.0L V6 engines. While the 3.0L is a reliable engine if maintained, they are notorious for the head gasket going out relatively early. To find out whether your 4Runner/Truck has had the headgasket fixed, give your VIN number to your dealer, or call Toyota's helpline. If your head gasket has not been fixed, they should still honor the campaign and fix any damage free of charge, this includes a new engine if the block is damaged. Toyota headgasket & oil sludge recall sites (thanks SydneyCanada): http://www.brian894x4.com/V6headgasketrecall.html http://home.off-road.com/~kemanuel/V6-HG.htm http://www.off-road.com/toyota/4runner/topqs.html http://www.yotatech.com/~corey/4runner_faq.htm http://www.off-road.com/toyota/4runner/topqs.html http://www.babcox.com/editorial/ic/ic110028.htm http://www.alldata.com/recall/make/Toyota_Truck.html http://www.alldata.com/TSB/60/94601650.html http://www.yotarepair.com/Campaigns.html (3.4L,V6,headgasket recall) http://home.off-road.com/~bibelheime...eadgasket.html (3.4L,V6,headgasket recall) http://home.4x4wire.com/erik/t100/3.4v6_headgasket.htm http://www.jasperengines.com/pdf/5SFECoolantLeaksTB.pdf http://www.nordicgroup.us/oil.htm#Toyota%20Sludge http://www.toyota.com/about/news/pro...-consumer.html http://www.usatoday.com/money/autos/...ota-sludge.htm http://www.petitiononline.com/TMC2003/petition.html http://groups.msn.com/ToyotaOwnersUn...gaskettsb.msnw http://groups.msn.com/ToyotaOwnersUn...adgaskets.msnw http://www.babcox.com/editorial/ic/ic100052.htm http://www.autosite.com/content/own/...action/recalls 13. What is the deckplate mod? The deckplate mod is a simple performance modification made to the airbox of the 3.4L V6 found in the 3rd gen 4Runners and Tacoma's. Basically, the mod entails cutting a 4-6 inch hole in the front of the airbox to improve breathing. The "deckplate" mod gets its name from the cover used to seal the large hole in the event of deep water crossings, mud, and rain. Deckplates are watertight covers used in the marine industry. If you do an internet search you will find many write-ups on how to perform the deckplate mod. Written by Robinhood150 from YotaTech.com Last edited by Brian R.; 10-19-2010 at 08:38 AM. |
|

|
|
11-10-2005, 10:35 PM
|
#2 | |
|
Resident Chemist

Join Date: Feb 2004
Location: Rockville, Maryland
Posts: 8,586
Thanks: 105
Thanked 157 Times in 157 Posts

|
Re: 4Runner FAQs
STARTER AND ALTERNATOR REPAIR
For starters that click when you turn the key and nothing else - most likely your starter contacts. See the information in the following links: http://www.4crawler.com/4x4/CheapTricks/Starter.shtml http://yotarepair.com/startercontacts.html http://www.4x4wire.com/toyota/maintenance/starter/ http://www.startercontacts.com/install.htm Starter contact kits (8mm ID hole): Ace Electric # S-5263 (only two contacts) Ace Electric # S-5264 (only two contacts) Metro # 66-82104 (only two contacts) (www.metroautoinc.com ,Pomona,California) Toyota # 28226-72010/80 (battery side)(also1KZTE-2LT-1KZT) Toyota # 28226-72080 (8808-9108) Toyota # 28226-16130 (9108-9308) Toyota # 28226-55050 (9308-9511) Toyota # 28226-70040 (9308-9511) Toyota # 28226-72040 (motor side if needed) Toyota # 28226-72010 (8808-9511) Toyota # 28226-74070 (9108-9511) For others besides 22R series: Toyota # 28226-54220 (motor side) (2LTE, 3L..LN13# IKZTE, 2L#, KZN130,LN108,112,85..4FC) Toyota # 28226-54250 (Diesel Surf 2.4TD, contains a new end cover and gasket) Toyota # 28226-54320 (battery side) (2LTE, 3L..LN13# IKZTE, 2L#, KZN130, LN108,112,85..4FC,3B-1HZ-BJ73-HZJ7#-1KZT-KZJ70) Toyota # 28226-17030 (battery side) (1H#-HDJ80-HZJ80) Toyota # 28226-56250 (battery side) (3B-1HZ-1PZ-PZJ7#) Starter contacts only (8mm ID hole): Ace Electric # S-5231 Ace Electric # S-5293 (crescent moon shape) Ace Electric # S-5295 (crescent moon shape) Metro # 66-82106 (www.metroautoinc.com ,Pomona,California) Tons more at: http://www.metroautoinc.com/PDF%20Fi...%20Contact.pdf Toyota # 28226-70040 Wilsons Electric # 45-29-652 Starter brushes: AC Delco # D762 GP Sorensen # 255048 Standard # JX-117 Whether your starter uses two rectangular types or one rectangular and one crescent you can substitute with two squares or one square and one crescent so any of the above part #'s for those kits will be the right ones,or about half of the auto electric shops in your local yellow pages would sell aftermarket contacts for only $5 each or the pair. If the brake and charge lights come on during revving of the engine then it's a sign that the carbon alternator brushes require replacing as this is the mileage for them to wear out. In alternators the brushes wear out on average every 140-170 000 miles where on the dashboard the brake & charge light both come on at the same time. About half of the auto electric shops in your local yellow pages sell carbon alternator brushes and copper solenoid starter contacts for about $5/pair.Another way to verify that the alternator is not charging is while the engine is running bring a metal screwdriver or any metal object near the alternator and if the alternator is working properly then it should act like a magnet and grab the screwdriver. For carbon brushes R&R: http://www.4x4wire.com/toyota/mainte...nator_brushes/ http://www.toyotaoffroad.net/afertig...torbrushes.htm http://perso.wanadoo.fr/adherence.4x...nateur_kzj.htm http://www.automotiveforums.com/vbul...d.php?t=166525 http://www.toyotanation.com/forum/sh...270&forumid=10 http://www.pirate4x4.com/forum/showt...r+brush+holder http://www.bitwalla.com/cruisers/art...lternator.html http://www.barneymc.com/toy_root/tec...c/altrnatr.htm For decoding the dashboard lights: http://www.powerbase-auto.co.uk/alternator_faults.htm http://members.1stconnect.com/anozir...alternator.htm Here are part #'s for Toyota alternator carbon brushes and copper solenoid starter contacts which are used in about 95% of all Toyota vehicles. Toyota alternator Brushes with holder: Toyota # 27370-35060=$29 CDN Honda # 31105-PZ1-003 Metro # 39-82003 (www.metroautoinc.com ,Pomona,California) Unknown brand name # F4019-53035 Alternator brush only (qty:1 brush unless otherwise stated): AC Delco # E724 AC Delco # E731 (side wire and concave tip) Ace Electric # DA-61 (brush only),S-5367 (brush holder) Beck Arnley # 178-1669 (side wire and concave tip) Beck Arnley # 178-1376 Borg Warner # X580 (side wire and concave tip) Canadian Tire # 19-2050-6=$4.49/pair Daihatsu # 27370-87302-000 Daihatsu # 27371-63020-000 Daihatsu # 27371-87501-000 Daihatsu # 27371-70300-000 Echlin # E601=$8.16 CDN/pair (UAP/NAPA) Echlin # ECHE601 Echlin # EC480 Echlin # ECHE480 GP Sorensen # 255047 (side wire and concave tip) GM # 94123056 GM # 96054118 Honda # 31144-PD1-004=$9.72 Honda # 31144-PD1-0040 Honda # 31144-PD1-0030 Honda # 31150-PR7-A01 Honda # 31150-PTO-003 Hino Industries # 021660-0390 Hino Industries # 021660-0510 Isuzu # 8-94123-056-0 Isuzu # 8-97032-308-0 Isuzu # 8-97032-310-0 Mazda # 021660-0390 Mazda # 021660-0510 Mazda # KL47-18-W75 Metro # 38-82001(side wire concave tip) (www.metroautoinc.com ,Pomona,California) Mileage Plus # E601SB Mitsubishi # MD604474 Mitsubishi # 21660-0510 Niehoff # WA571 (side wire and concave tip) NipponDenso # 021660-0390 NipponDenso # 021660-0510 Standard # JX-116 (side wire and concave tip) Subaru # 021660-0390 Subaru # 021660-0510 Suzuki # 31631-82610 Suzuki # 31656-82611 Suzuki # 021660-0510 Toyota # 27370-42010 Toyota # 27370-75060 Toyota # 27371-63020=$5.80 (up to 9105) (side wire and concave tip) Toyota # 27371-70300=$5.20 (9105-9511) Toyota # 27371-76004-71 UAP/NAPA # MPEE601SB Victory Lap # FAX57=$4.49 CDN/pair (Canadian Tire) Wilson's Electric # 26-29-7534 (side wire and concave tip)=$2.20 each CDN (Diesel Auto Electric)(Parts for Trucks,box of 10 for $3.40 CDN) Specifications: Length=15 mm Width=7 mm Thickness=5 mm Lead length=49 mm These Honda alternators are the same except the pulley must be swapped: 1986-89 Honda Accord (Carb),the EFI can be used but the voltage reg must be swapped 1990-93 Acura Integra Thanks to SydneyCanada for the above information.
__________________
Forum Guidelines:http://www.automotiveforums.com/vbulletin/guidelines.html "What we've got here is a failure to communicate" Last edited by Brian R.; 09-06-2016 at 07:48 AM. |
|
|
|
|
11-10-2005, 11:05 PM
|
#3 | |
|
Resident Chemist
Join Date: Feb 2004
Location: Rockville, Maryland
Posts: 8,586
Thanks: 105
Thanked 157 Times in 157 Posts
|
Re: 4Runner FAQs
FIXING PAINT CHIPS AND SCRATCHES
Materials 1. Small bottle of the proper Toyota touch up paint and Toyota clear coat, if needed (Toyota metallic finishes are clearcoat; a non-metallic colors were not). 2. DuPont PrepSol (available from autobody supply). 3. Disposable touch-up microbrushes made by ProTouch (from an autobody supply). 4. 3M Perfect-It II Rubbing Compound, Fine Cut (from an autobody supply). 5. Lacquer thinner to keep brush clean. 6. Wet-dry sandpaper: 1000 grit, 1500 grit, and 2000 grit (there is a new product out that is an alternative to wet sanding for use in auto touch ups - check it out at http://www.langka.com). Procedure - Scratches Use this procedure for long scratches and for large chips. 1. Use 1000 grit paper and wet-sand the scratch and the area around it. Make sure to use lots of water when sanding. This keeps scratching to a minimum. 2. Use DuPont Prepsol to clean wax off before touch-up. 3. Using microbrush and liberal amounts of paint, touch up the full-length of the scratch. As soon as the paint drys (10 minutes) do another coat. Repeat until you have done sufficient coats to have built a small mound of paint over the length of the scratch. 4. Let dry for 24 hours. 5. Now wet-sand the touched up surface with 1500 grit wet sandpaper. Sand in a front to rear motion since that's the direction the car is painted with, hence: you're going with the grain of the paint. Sand until you have eliminated the mound and any touchup paint outside of the scratch. 6. Clean area thoroughly and let dry. 7. Take a clean microbrush and begin to apply the clearcoat to the area. Don't be afraid to be liberal with it and don't try and keep the clearcoat within the scratch area. Apply approximately 3-4 coats, again until there is a small mound. Let it set and completely dry for 4-5 days. 8. Now, wet sand with 2000 grit wet sand paper. You will begin to see the clearcoated scratch blend into the rest of the paint - thus disappearing. (It produces a very gratifying feeling!) Procedure - Chips You can use this abbreviated procedure to fix the many small chips on the hood and front fascia. 1. Use 1000 grit paper and wet-sand the scratch and the area around it. Make sure to use lots of water when sanding. This keeps scratching to a minimum. 2. Use DuPont Prepsol to clean wax off before touch-up. 3. Using microbrush and liberal amounts of paint, touch up the chip. As soon as the paint drys (10 minutes) do another coat. Repeat until you have done sufficient coats to have built a small mound of paint over the expanse of the chip. 4. Let dry for 24 hours. 5. Wet sand with 2000 grit wet sand paper. You will begin to see the touch-up paint blend into the rest of the paint - nearly disappearing. The repairs are not noticable to passersby, and look much better than the chips did. Note: The clear coat on the flexible plastic parts doesn't rub back as well as the rest of the paint, probably due to the flex agents in the paint.. Adapted from a post to VetteNet by Doug Johnson, and to the Grand Prix mailing list by Paul Berndt.
__________________
Forum Guidelines:http://www.automotiveforums.com/vbulletin/guidelines.html "What we've got here is a failure to communicate" |
|
|
|
|
11-10-2005, 11:31 PM
|
#4 | |
|
Resident Chemist
Join Date: Feb 2004
Location: Rockville, Maryland
Posts: 8,586
Thanks: 105
Thanked 157 Times in 157 Posts
|
Re: 4Runner FAQs
__________________
Forum Guidelines:http://www.automotiveforums.com/vbulletin/guidelines.html "What we've got here is a failure to communicate" |
|
|
|
|
11-12-2005, 01:19 AM
|
#5 | |
|
Resident Chemist
Join Date: Feb 2004
Location: Rockville, Maryland
Posts: 8,586
Thanks: 105
Thanked 157 Times in 157 Posts
|
Re: 4Runner FAQs
There are several free online Toyota EPC catalogs that you can download that are amazing and I use them all of the time prior to a repair or when trying to cross reference parts:
Here is a post fellow poster (Todd) who posted it on another 4-Runner/Pickup discussion site about 4 years ago: "There is a newer version of the EPC available for download. Similar in size to the older version (254MB and 220MB zipped files) I have them on my personal FTP server (not always running), and they are also on another FTP server. Address and login for mine: 151.203.109.45 Port 21 Login: t4x4pickup Password: t4x4pickup Address and login for the other (usually running 24/7) ftp.lawvision.net User: upload Pass: upload Apparently they cover 1988 and up vehicles (I haven't unzipped mine yet). Feel free to upload and download on mine. Enjoy! Todd E:zoddoo@hotmail.com" Here are other places to download the free Toyota EPC catalogs: http://www.yankeetoys.org/docs.htm http://oldschool.supracentral.com/htm/epc.htm http://turbosupras.com/pages/en/pages/technical/epc.htm http://www.showmesome.info/hilux/inf...load_links.htm http://www.speedtoys.com/%7Earnout http://www.speedtoys.com/~gemohler/epc http://membres.lycos.fr/doc4toy4u/se...EPC_TOYOTA.zip http://thepiratebay.org/details.php?id=3355606 (DVD) For version 1/2002 the passwords are: Europe 02052311 General 02032511 U.S.A. 02022608 Japan 02071608 Heres the codes for the 01/2002 disks: Europe 02022004 General 02022212 U.S.A. 02022608 Japan 01121209 Thanks to SydneyCanada for the above post
__________________
Forum Guidelines:http://www.automotiveforums.com/vbulletin/guidelines.html "What we've got here is a failure to communicate" |
|
|
|
|
01-01-2006, 01:13 AM
|
#6 | |
|
Resident Chemist
Join Date: Feb 2004
Location: Rockville, Maryland
Posts: 8,586
Thanks: 105
Thanked 157 Times in 157 Posts
|
Re: 4Runner FAQs
Timing belt replacement for 3.4L 5VZ-FE
http://www.4x4wire.com/toyota/maintenance/timing_belt/ http://yotarepair.com/5VZ-FEtimingbelt.html Q: I have pinned the tensioner on my 5VZ-FE and all the sprockets are correctly aligned, but the new timing belt doesn't have enough slack to fit over the sprockets and pulleys. How can I get the timing belt on? A: If you haven't already done so, I suggest you use the tensioner compressor (pictured and linked below) to avoid having to remove the air conditioner compressor and bracket in order to remove the tensioner from the engine to compress the tensioner. http://www.amazon.com/gp/product/B00..._ya_oh_product 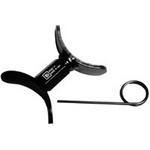 After you have compressed and pinned the tensioner, and with the tensioner installed: 1. Remove the No. 1 idler pulley. 2. Rotate the right cam sprocket (left one facing the engine from the front) clockwise so that the timing mark for the belt is somewhere around the 10:00-11:00 position. This moves some of the slack from the point where the No. 1 idler pulley is located to between the right cam pulley and the crank pulley. 3. Using large paper binder clips or clothespins to hold the belt on the cam pulleys, place the belt on the cam pulleys, lining up the timing marks on the belt with the marks on the cam pulleys. 4. Bring the belt around the water pump pulley and over the crank pulley, lining up the timing mark on the belt with the mark on the crank pulley. Rotate the crank clockwise if necessary to make the belt tight over the left cam pulley (right as you face the front of the engine), water pump pulley, and around the crank pulley, and still have the belt mark lining up with the crank pulley timing mark. 5. Bring the belt around the tensioner pulley, and take up the slack by rotating the right cam pulley clockwise until the left cam pulley moves slightly. The belt then has all the slack between the cam pulleys. 6. The right cam pulley timing mark should now be pointing to around 12:00, as well as the mark on the left cam pulley. The timing marks on the belt should be located over the marks on the two cam pulleys as well as the mark on the crank pulley. 7. Clean the threads on the No. 1 idler pulley bolt - install the pulley and tighten the pulley bolt to 30 ft-lbs. 8. Make sure the belt is approximately centered forward and back on all the pulleys. 9. Pull out the tensioner pin and recheck the timing marks on the belt-pulleys. Note that rotating the crank a few turns and bringing the timing marks back to the cam pulley marks will cause the timing marks to not line up any more (by one tooth on each pulley for each belt rotation). That is ok. The timing marks only have to line up when the belt is installed. Rotating the crank throws off the indexing, but maintains the correct cam timing. Timing belt replacement for 3.0L 3VZ-E V6 http://www.off-road.com/toyota/tech/v6tbelt/index.html 3.0-3.4L V6 Engine Conversion http://www.pirate4x4.com/forum/showt...8&page=4&pp=25 22R Valve Adjustment http://www.off-road.com/toyota/tech/...ves/index.html Toyota Differential Information http://www.a1.nl/phomepag/markerink/diffs.htm http://home.4x4wire.com/erik/diffs/#8.25 http://www.brian894x4.com/Gearratiosanddiffs.html Manual Hub Conversion http://www.offroadsolutions.com/tech...conversion.htm Installing Lockers Electric locker: http://www.4x4wire.com/toyota/tech/electric_locker/ ARB air locker: http://www.4x4wire.com/toyota/tech/arb_locker/ http://www.4x4wire.com/toyota/tech/gear_setup/ Detroit Softlocker: http://www.4x4wire.com/toyota/tech/detroit_locker/ Gearless locker: http://www.4x4wire.com/reviews/gearless/ Cleaning 5VZ-FE Throttle Body http://www.yotatech.com/~corey/tech/...b/haveblue.htm Cleaning 3VZ-E Throttle Body http://www.4x4wire.com/toyota/mainte...throttle_body/ 22R-Series Engine Tech Notes http://www.toysport.com/Technical%20...tech_notes.htm Cheap Tricks http://www.4crawler.com/4x4/CheapTricks/index.shtml Another Set of Excellent FAQs http://www.pirate4x4.com/forum/showt...hreadid=173918 4Runner Technical Information: http://www.4crawler.com/4x4/4R_TechInfo.shtml
__________________
Forum Guidelines:http://www.automotiveforums.com/vbulletin/guidelines.html "What we've got here is a failure to communicate" Last edited by Brian R.; 07-19-2009 at 11:12 PM. |
|
|
|
|
01-31-2006, 01:12 PM
|
#7 | |
|
Resident Chemist
Join Date: Feb 2004
Location: Rockville, Maryland
Posts: 8,586
Thanks: 105
Thanked 157 Times in 157 Posts
|
Re: 4Runner FAQs
Gas Smell in the Engine Compartment - 2nd Gen. 4Runner
Q: I have a gas leak in my 1993 4Runner. It started to smell now whenever I turn off the truck you can actually smell it, and sometime there are white smoke coming out from the engine compartment, any suggestions? A: Replace your pulse damper by the firewall. A leaking pulse damper is a known problem for the 2nd generation 4Runners.
__________________
Forum Guidelines:http://www.automotiveforums.com/vbulletin/guidelines.html "What we've got here is a failure to communicate" |
|
|
|
|
02-25-2006, 12:50 AM
|
#8 | |
|
Resident Chemist
Join Date: Feb 2004
Location: Rockville, Maryland
Posts: 8,586
Thanks: 105
Thanked 157 Times in 157 Posts
|
Re: 4Runner FAQs
Steering Wheel Vibration
Q: 98 4runner SR5 4WD. I bought this 4runner used and it had a little vibration in the steering wheel. I noticed the tires were worn and they were a cheap brand so I thought replaceing them would fix the problem. I put bfgoodrich AT 265/70/16's on to replace them. After having the tires reblanced 4 times they replaced them thinking they were a bad set of tires. New tires, same problem!! Everybody's saying that this is because the tires are so aggressive but I don't buy that because these tires get great reviews and some of my friends run them. The wheels on the front are brand new from toyota due to tire changer scratching them so they should be fine. Any other ideas? A: Your tires need to be balanced by a lug-centric balancing machine. The average tire shop has a hub-centric balancer and will be unable to reliably balance your wheels.
__________________
Forum Guidelines:http://www.automotiveforums.com/vbulletin/guidelines.html "What we've got here is a failure to communicate" Last edited by Brian R.; 05-14-2006 at 12:38 PM. |
|
|
|
|
02-26-2006, 08:18 AM
|
#9 | |
|
AF Regular
Join Date: Jul 2005
Location: Dartmouth,Nova Scotia
Posts: 126
Thanks: 0
Thanked 0 Times in 0 Posts
|
Re: Ordering parts direct????
These Toyota dealerships have the best prices in the USA & probably the whole world and have part # lookups,descriptions,prices and portions of their EPC catalog online:
http://www.1sttoyotaparts.com/partscat.html (10% shipping by Fed Ex or free shipping with $100 & over speak to Roger at 1-888-271-3948) http://www.toyotadiscountparts.com (free shipping with $100 & up) http://www.Toyotaparts4U.com http://www.toyotaofplano.com The best brand of aftermarket timing chain parts to use on the 20R & 22R series Toyota motors are: http://www.engnbldr.com/ToyotaHotlicks.htm http://www.22r.biz http://www.rpmrons.com/toyotatiming.html http://www.toyota-engine-parts.com http://www.europeanautomotive.com I have never heard of brake boosters failing on 4-Runners/pickups so check your hoses.Aisin and their aftermarket division ASCO are the OEM supplier for many Toyota parts,so if you do a Google search you will find their homepage then a retail dealer near you.If you are certain it's bad try any local junk yard,free buy & sell classified paper,website or community tack/cork board as many people buy a whole rig for the engine,tranny,frame or body and trash the rest to you can get one for free.If not try below: In North America the 22R & 22R-E s are used in the following: 22R 1981-82 Toyota Corona 1981-83 Celica 1981-87 Toyota pickup (up to 1990 on 2wd) 1984-87 Toyota 4-Runner 22R-E 1983-85 Celica 1985-95 Toyota pickup 1985-95 Toyota 4-Runner These are 38 4-Runner/pickup discussion sites which have free classifieds: http://www.wildyoats.com/vbulletin http://www.yotatech.com/index.php http://www.off-road.com/toyota http://www.toyota-4runner.org http://www.toyotaoffroad.com http://mkelly.proboards22.com http://www.t4x4pickup.com/dgroup/index.html http://www.voy.com/83795 http://www.4x4wire.com/toyota http://forum.ih8mud.com http://board.marlincrawler.com/ind ex.php?PHPSESSID=c3fa28cf3b61912b3160db2fa424afcf& http://www.birfield.com/modules.php?name=Forums http://www.pavementsucks.com/forums/...m.php?forum=14 http://www.automotiveforums.com/vbul...splay.php?f=65 http://www.automotiveforums.com/vbul...lay.php?f=1146 http://www.toyotanation.com/forum/f22 http://www.4wheelparts.com/forum/default.asp http://www.pirate4x4.com/forum/forumdisplay.php?f=12 http://mtt.truckmoxie.com/forums http://toyotatruckworld.tenmagazines.com/forums http://www.4x4review.com/discussions...sp?FORUM_ID=14 http://www.4x4review.com/discussions...sp?FORUM_ID=12 http://members.boardhost.com/wildrice http://www.gator4x4.com/forum/viewforum.php?f=5 http://www.b2g5.com/boards/board.cgi?user=marktoyota http://www.toyotaownersclub.com/forums/index.php? http://www.suvfans.com/forums http://www.network54.com/Hide/Forum/11128 http://www.toyota-parts.com/bb http://www.toyotaboard.com http://www.toyotaworld.com/bbs http://forums.vmag.com http://groups.google.com/groups?grou....toyota.trucks http://www.talkaboutautos.com/group/....toyota.trucks http://groups-beta.google.com/group/....toyota.trucks http://news-reader.org/alt.autos.toyota.trucks http://www.totally-toyota.com/toyota...cks/index.html http://www.autoforumz.com/Toyota-forum-65.html http://www.car-forum.net/toyota-trucks http://www.carstalk.net/viewforum-49.html http://cars.networktechs.com/forumdisplay.php?f=32 http://carcommons.com/toyota-trucks-vf60.html http://autos.groups.yahoo.com/group/toyota4runners http://autos.groups.yahoo.com/group/toyota4runner http://autos.groups.yahoo.com/group/the4runner4x4club http://autos.groups.yahoo.com/group/4-runner http://autos.groups.yahoo.com/group/4runner http://autos.groups.yahoo.com/group/wills4runnerworld http://lists.off-road.com/mailman/listinfo/toy4x4 http://ar.groups.yahoo.com/group/ClubDaihatsu4x4 These are 6 Canadian based 4-Runner/pickup discussion sites which have free classifieds: http://www.toyotaoffroad.ca/forum http://www.toontoysforums.ca http://www.4wheeler.ca http://www.bogginfreaks.com http://www.bc4x4.com http://island4x4.com These are 12 Toyota DIESEL 4-Runner/pickup discussion sites which have free classifieds: http://www.sr5.net/bbs/index.html http://www.toyotadiesel.com/phpBB2 http://www.toyotadiesel.com http://autos.groups.yahoo.com/group/toyotadieselclub http://pub12.ezboard.com/btoyotasurfdownunder http://www.toyotasurf.asn.au/forum http://groups.msn.com/toyotasurf/shoebox.msnw http://www.yotasurf.com/forums/index.php? http://www.yotasurf.co.uk/forums/index.php http://www.offroadpakistan.com/forum...forum.php?id=8 http://clean4x4.com http://jplan.com/cgi-bin/tractor/for...ickup%20Trucks http://www.biodieselsolutions.ca http://www.electronicshelp.net/forum7.html These are 3 Turbo gas (22R-TE) based 4-Runner/pickup discussion sites which have free classifieds: http://autos.groups.yahoo.com/group/22RTE-Trucks http://www.well.com/user/mosk/welcome.htm http://www.turboparts.info/pages/620208/index.htm These are 2 Trekker based discussion sites which have free classifieds: http://groups.yahoo.com/group/toytrekkers http://www.toyotaoffroad.com/Article...er/Trekker.htm These are 39 Toyota used parts suppliers and junk/bone/wrecking/salvage/recycling/dismantling/scrap yards: Toy Works 4WD Technology Shane Lawrence County Road 109 Orangeville,Ontario L9V 1A1 Canada Ph: (519) 938-9844 Toy Works K C Signs Portugal Cove,NL A0A 3K0 Canada Ph: (709) 895-6123 South Island Imports 2053 Balsam Rd Nanaimo (South),Vancouver Island,BC V9X 1T5 Canada Ph: 1-877-753-1119 Ph: (250) 753-8019 http://www.southislandimports.ca E-mail:southislandimports@shaw.ca Toyota 4x4 center (AllToy) Kami 4X4 Tony Carr 427 Mount Paul Way South Kamloops,BC V2H 1A7 Canada Ph: (250) 851-4480 Precision 4X4 Center (www.toyotafiberglass.com) (some pickup diesel parts) Corey Maidment (slacker) 1280 Commercial Way Unit 109 Penticton,BC V2A 3H5 Canada Ph: (250) 493-9473 Fax: (250) 493-9474 http://www.toyotafiberglass.com http://www.geocities.com/motorcity/flats/1738 info@toyotafiberglass.com support@toyotafiberglass.com sales@toyotafiberglass.com Corey CJ@toyotafiberglass.com webmaster@toyotafiberglass.com slacker501@shaw.ca coreymaidment@netscape.net HonDaToy Automotive Ltd 14325-114 Ave Edmonton,Alberta T5M 2Y8 Canada Ph: 1-800-661-3957 Ph: (780) 453-6711 http://www.hondatoy.com  arts@hondatoy.com arts@hondatoy.comYota Ray's Toyota 4X4 Truck Parts 1808A17 th Ave S.E Calgary,Alberta T2G 1K4 Canada Ph: 1-877-273-7322 Ph: (403) 2738137 Fax: (403) 2638185 http://www.yotarays.ca E-mail:office@yotarays.ca Adamant Service Center Box 70,Hagget Rd Adamant,VT 05640 USA Ph: (802) 233-1488 E-mail:asc@drbs.com Woodward's Used Toyota Parts 3059 Main St PO Box 236 Summneytown,PA 18084 USA Ph: 1-800-646-4386 Ph: (215) 234-4386 Fax: (215) 234-8035 Lowells Toyota Parts 111 Mechanic St Lexington,KY 40507 USA Ph: (606) 233-1173 Tallant Brothers (Toyota/Honda/Nissan) Jimmy & Greg 4695 Oak Grove Circle Cumming,GA 30130 USA Ph: 1-800-635-0351 Ph: (404) 887-5214 Fax: (770) 889-7244 Graham's Automotive 958 HWY 202 Calera,AL 35040 USA Ph: (205) 668-3441 http://www.grahamsauto.com E-mail:jon@grahamsauto.com Victor's Off Road Engineering Victor 4646 Lonedell Road Arnold (Saint Louis),Missouri 63010 USA Ph: (636)296-6696 Toyota Heaven 6723 Oakcrest Dr East Fort Worth/Kennedale,TX 76140 USA Ph: (817) 563-1744 Ph: (817) 563-1754 E-mail:frs@toyohv.actual-america.com A-1 Toyota Salvage 302 New Laredo Highway San Antonio,TX 78211-1908 USA Ph: (210) 921-0031 Yota Yard Jim/Nancy Wales 3134 Walnut St Denver,CO 80205 USA Ph: (303) 292-5078 Fax: (303) 308-0430 http://www.yotayard.com E-mail:nancy@yotayard.com Toyotas "R" Us 7730 CR 150 Salida,CO 81201 USA Ph: (719) 539-7733 Toyota Salvage 3224 S 40th St Phoenix,Arizona 85040 USA Ph: 1-877-807-4314 Ph: (602) 437-1222 http://www.toyotasalvage.com Mazda-Toyota Auto Recycling (also Nissan) Richard 3611 NW Marine Dr Troutdale,OR 97060 USA Ph: 1-800-628-0918 Ph: (503) 667-6818 Fax: (503) 669-7810 http://www.maztoy.com E-mail:sales@maztoy.com The Toyota Man 3610 NE Columbia Blvd Portland,OR 97211 USA Ph: (503) 775-3345 E-mail:thetoyotaman@earthlink.net Nix 99 13718 Mukilteo Speedway Lynnwood,WA 98037 USA Ph: 1-800-782-0682 Ph: (425) 743-2881 http://www.nix99.com arts@nix99.comAll Toyota Auto Recycling 27865 SR 410 East Buckley,WA 98321 USA Ph: 1-800-829-9766 Fax: (360) 829-1852 E-mail:dliy@aol.com Kings Honda & Toyota Auto Recycling Inc 9101 Martin Luther King Jr.Way South Seattle,WA 98118 USA Ph: (206) 723-9633 Fax: (206) 722-1599 http://www.kingshondaandtoyota.com arts@KingsHondaAndToyota.comAll Japanese Auto Recyclers 11301 Dismantle CT Rancho Cordova,CA 95742 USA Ph: 1-888-608-PART Ph: (916) 635-2345 Fax: (916) 635-8100 http://www.alljapaneseautoparts.com E-mail:alljapanese@jps.net Toyota Truck & Auto Recycling (TAP Recycling) 11337 Dismantle CT Rancho Cordova,CA 95742 USA Ph: (916) 631-7100 Toyota Engines By CT Engineering 3457 Fitzgerald Rd Rancho Cordova,CA 95742 USA Ph: (916) 852-1032 All Toyota Used Parts 3370-A Sunrise Blvd Rancho Cordova,CA 95742 USA Ph: 1-800-557-8674 Ph: (916) 853-7242 Fax: (916) 635-5724 http://www.alltoyotausedparts.com/ E-mail:webmaster@alltoyotausedparts.com Toyota Truck & Auto Recycling Al 3636 Omac Circle Rancho Cordova,CA 95742 USA Ph: 1-800-765-7100 Toyota Truck Parts 3440 Recycle Road Sacramento,CA 95742 USA Ph: 1-866-292-9495 Ph: (916) 853-0833 http://www.toyotatruckparts.biz/ E-mail:service@toyotatruckparts.biz Capitol Import 4071 Happy Lane Sacramento,CA 95827 USA Ph: 1-800-259-5529 Ph: (916) 366-7470 http://www.capitolimport.com E-mail:sales@capitolimport.com The Toyota Connection Ryan 2620 W. Capital Ave West Sacramento,CA 95691 USA Ph: 1-800-221-8696 Ph: (916) 371-7764 Fax: (916) 371-7037 Toyotas Only 11540 Hart St N. Hollywood,CA 91604/5 USA Ph: 1-800-835-2444 Ph: (818) 765-0322 Ph: (818) 765-0323 Fax: (818) 765-8013 http://www.toyopartsonly.com E-mail:webmaster@toyopartsonly.com LA Toyota Auto Dismantling Inc 11115 Tuxford ST Sun Valley,CA 91352 USA Ph: (818) 768 4142 Fax: (818) 768 8442 D & T Used Parts/DNT Auto Dismantling (Datsuns and Toyotas) 8970 Bradley Ave Sun Valley,CA 91352 or Pacoima,CA 91331 USA Ph: (818) 768-4666 Toyota Truck & 4X4 Dismantlers 991 Berryessa Road San Jose,CA 95133 USA Ph: (408) 436-7890 Fax: (408) 436-9779 Bernie's Auto Dismantling 1008 Vreeland Ave Wilmington,CA 90744 USA Ph: (310) 518-2685 California Mini-Truck Dismantlers 4002 State Street Montclair,CA 91765 USA Ph: (909) 622-1381 Fax: (909) 623-3240 http://www.calminitruck.com E-mail:info@calminitruck.com Minit Truck Dismantling Center 1700 Newton Avenue San Diego,CA 92113 USA Ph: 1-800-827-1970 Ph: (619) 233-3884 All Toyota Lexus Auto Recycling Chuck 1060 Otay Valley Rd San Diego,CA 92154-5615 USA Ph: 1-877-778-6968 Ph: (619) 661-0055 E-Mail:scrapdaddy@cox.net Sidney® Repairs tv's,vcr's,home/car audio out of my home E-mail:sidneybek@yahoo.com Dartmouth,Nova Scotia Canada 1985 Toyota 4-Runner,solid front straight axle,factory cruise control,sunroof,22R-E,W56,RN60LV-MSEK,rusted rear step/towing chrome bumper with 247 000 KM http://groups.google.com/group/hfx.f...4c696fbf04837f http://www.iwaynet.net/~nesda/May02/May18.html http://www.iwaynet.net/~nesda/SonyAudMod.html http://www.newark.com/product-detail...ge/32-9495.jpg http://www.tipsmaster.ca/hottips-1.HTM http://www.tipsmaster.ca/1011-TV32C50-007.jpg http://www.iwaynet.net/~nesda/June03/June0315.html http://www.iwaynet.net/~nesda/Apr03/Apr033.html O |\ __O _|_| \ (\__/) (='.'=) (")_(") ..> ...> ...> ...> .(....\............../....).. ..\....\........... /..../.. ...\....\.._.._../..../.... ....\..../....l..`\_./.... ..../....l....l....(..`\.... ...l.....l.._.l.._.\....\... ...l.....l__.l__.l''\....\.. ...\...................\../.. .....\__________/..... () () ^ () () / \ ^ ^ () () / \ \ ^ / \ | | / \ \ \____________ o o ) | | /_________\___\__\__________|_____| |
|
|
|
|
05-14-2006, 12:37 PM
|
#10 | |
|
Resident Chemist
Join Date: Feb 2004
Location: Rockville, Maryland
Posts: 8,586
Thanks: 105
Thanked 157 Times in 157 Posts
|
Re: 4Runner FAQs
TRANSMISSION FLUSH PROCEDURE
Q: How can I flush my transmission fluid without bringing it to a shop? A: Here is one way posted by popeye08: (from http://townhall-talk.edmunds.com/dir.../.ee9950e/4658 ) You can actually change virtually all the fluid in the system using the following method. We have 5 Toyota's in the family, and I have done this to them all at least once. It takes about an hour. Use whatever fluid is recommended on the dipstick, or in the manual. Our Camry's and Corolla's take Dexron, but the Celica takes Toyota Type IV fluid, available only from Toyota, at about $3.50/qt. Use what's recommended, or you'll be sorry. It's still less expensive than having it done. 1. Drop the pan*, drain the fluid, replace the filter, and reinstall the pan as you usually do. 2. Add 3 quarts of fluid. (or however many quarts of fluid are drained from the pan). 3. Remove the fluid return line at the transmission (usually the upper of the two lines), and place it into a one-gallon milk jug or similar semi-transparent container. You may want to place the container in a box with rags around it so that it doesn't spill. 4. Start the engine, and let about a quart or so of fluid get pumped into the milk jug (about 10-15 seconds). 5. Stop the engine, and add a quart of fluid to the transmission. 6. Repeat steps 4 and 5 until you get new fluid out of the drain line. You'll use about 8-10 quarts of fluid total, including the 3 you put in at the beginning, so you may need more than one milk jug. 7. Reinstall the drain line to the transmission, start the engine, and check for leaks. 8. With your foot on the brake, put the transmission in each gear, then into Park. 9. Let the car down and check the fluid level on the dipstick. Add fluid if needed to bring it up to the proper level. 10. Take it out for a test drive, and check the fluid level again. (*One caveat is that it is not nessary to drop the pan. Removing and replacing the filter is not necessary. It is more or less just a screen that doesn't get plugged unless your clutch plates shread or something equally traumatic happens. Brian R.)
__________________
Forum Guidelines:http://www.automotiveforums.com/vbulletin/guidelines.html "What we've got here is a failure to communicate" |
|
|
|
|
05-28-2006, 02:24 PM
|
#11 | |
|
Resident Chemist
Join Date: Feb 2004
Location: Rockville, Maryland
Posts: 8,586
Thanks: 105
Thanked 157 Times in 157 Posts
|
Re: 4Runner FAQs
The Automotive Repair Industry and How Not to Get Ripped Off
Info thanks to Flatrater. This is an article I found on the web. Now please read this as it impacts all of the car owners getting their cars worked on in a dealer or an outside shop. This is how it works use it to learn and to prevent getting ripped off by any shop. "After working over 15 years in the auto repair industry, I have some insight I would like to share with everyone. The auto repair industry has changed quite a bit over the years as more complex automobiles have driven a new kind of mechanic into existence. Some of this has fostered smarter, better trained mechanics. However, it has developed the parts swapping business into enormous proportions. Part of the reason I changed careers was because I was so frustrated by working in such a crooked environment. Bad mechanics that lacked morals made the most money and honest ones lagged behind significantly. One key problem with the auto repair industry is the flat rate pay system which nearly all repair shops use. Basically it works like this: Labor time manuals are printed by the manufacturer for warranty repair time standards. These are times for a given job that are preset and are rounded to the nearest 1/10 of an hour. For instance, the replacement of an ignition module on a particular car may pay 1.1 hours in the warranty manual. That means that no matter how long it takes the mechanic to change that module, he still gets paid 1.1 hours. Aftermarket flat rate manuals are used for after warranty repairs. These manuals usually just take the warranty manual and multiply the time by 1.5. In some cases special times will be used instead. A mechanics flat rate time charge is usually referred to as a flag. For instance, the mechanic changing the module above will flag 1.1 hours for it under warranty or 1.7 hours retail. Most mechanics are paid 100% commission based on what they flag. This is not always true but it is the overwhelming majority that are paid this way. For these mechanics, the motivation is to flag as many hours per day as possible. It is not impossible, or even that uncommon, for a mechanic to flag over 16 hours in an 8 hour day. The mechanic will make a given wage per flat rate hour. If he flags no time in a given day, he makes no money at all. Few shops guarantee a minimum income. There is no real maximum either. It is not unheard of for a fast, crooked mechanic to flag well over 80 hours in 5 day a week while working only a little over 8 hours per day. Thats not to say all mechanics that flag big hours are crooks though. The work load can be seasonal too. It was quite common to have a 50% or more pay fluctuation (flagged hours) from winter to summer. The shop effectively makes a portion of what the mechanic flags so they too are interested in having the mechanic flag as many hours per day as possible. There is little motivation to be honest and quite a bit of motivation to rip off the customers. Most shops will not pay a mechanic to do a job twice. If a mechanic changed a water pump for instance, and the car came back with a leaking water pump gasket, the mechanic would have to replace the gasket and charge no time. The problem is that it is in the best interest of the shop and mechanic to blame the leak on something else that they can charge the customer for. Electrical and electronic parts typically have about a 30% to 60% no fault found rate on warranty returns. That means that about 30% to 40% were misdiagnosed in the field or the failure was not found during lab analysis. Dealers/managers love those high speed guys because they make the company a ton of money. They figure what's a few blown out customers compared to a good profit. They're not going away, in fact, they are becoming all too common because that's what it's coming down too. Tech's haven't got a cost of living increase in years. When you ask a manager for a raise he says, "You want a raise, make more hours!" A few managers base their mechanics pay on hours produced. Techs working over 80 hours a week got a $2 per hour raise over a 40 hour tech. It is the exception to find a company giving a raise to the tech with the highest customer satisfaction. There is not really a flat rate time for diagnosis in most cases. This means that a good mechanic that can troubleshoot a problem in 0.5 hours may charge significantly less than a clueless mechanic that spends 2 days swapping parts to figure it out. In the first case, an honest mechanic will flag 0.5 hours. Some may claim that since they are so smart, they will flag 0.8. In the second case, the same repair will cost the customer 2 full days plus any additional parts that were swapped as a guess. Again, there is very little incentive for the shop owner to intervene unless the customer complains. Many mechanics will guess and swap parts until the problems are solved or the customer runs out of money. Only about one quarter of the mechanics out there can really troubleshoot problems accurately. Of those, only a portion can troubleshoot intermittent and more difficult problems. Most electrical and driveability problems on today's automobiles are intermittent. If you find a good mechanic you can trust, stick with him and tell all your friends. On the other side of things, mechanics are often blamed for problems they did not cause. It seems all too often that a customer would claim the oil change we did caused their headlamps to flicker intermittently or some other bizarre problem that is in no way connected. Customers also seem to think that today's cars are smart and that there is some mystery machine hidden in the the shop that, when plugged into the car, will tell the mechanic everything that is wrong from low tire pressure to internal engine problems. This is far from accurate. Yes, modern cars do have sophisticated electronics on them and they do give the mechanic information such are fault codes and data values but they don't troubleshoot and they never will. On board software does have the capability of determining an out of range sensor or improper outputs. It can give the mechanic valuable information to help him narrow a problem down. It will never troubleshoot for him! An engine control for instance, which is generally the most sophisticated control on the vehicle, can only read values at the pins that connect it to the wiring harnesses. It can determine if a circuit is open or shorted or out of normal range but that is about it. It is up to the the well trained, smart mechanic to determine where the actual fault is. As I said earlier, most electrical and driveability problems are intermittent. That means that no matter what tests you run, chances are they will all pass. This is where data loggers and real smarts come into play. It seems for the most part that bigger cities have more crooked shops than smaller ones. I think this is because a poor reputation in a small town will put you out of business whereas in a big city there are plenty of customers to go around. The strategy is usually to get all they can out of you when you do come if assuming you won't be back anyway. Also watch out for "mechanic of the month" award winners. These guys are usually the ones who flag the most hours to get a bonus on top of it. They are generally the most crooked as well. Examples I will now give a few real world examples of some of the things that go on in a shop. A new car dealer had a scam going that involved all the service personnel. They would bring new cars right in off the convoy truck and claim every one had alignment problems, driveability problems, and transmissions problems. Each of 3 mechanics would flag the maximum allowable time for work they supposedly did although no work was really performed on most of the vehicles. While these were all warranty claims, it is still fraud and the manufacturer was getting ripped off for more than a year. Some of these mechanics were being paid a 6 figure income by all the phony time they flagged. The dealership was finally caught and closed down but those same mechanics got jobs at other dealers. How would you like one of them working on your car? A little old lady brought her car into a shop. A mechanic sold her over $2000 worth of parts and labor and the car was still not fixed. After all of that, it turned out there was a bad spark plug wire causing an intermittent misfire. The customer was still charged the full amount and none of the unnecessary parts were removed. One mechanic was charging for piston ring replacements on certain vehicles under warranty on a routine basis. Few of the engines were ever taken apart. He would work at a dealer for a year or so until others would start to suspect and then go to another dealer to do it again. He rarely worked a full day but typically got paid over 12 hours per day. During the 1980's, before detergent gasoline and deposit resistant injectors, the injectors would periodically need professional cleaning. The process typically pays about 1 hour but really only takes about 15 minutes of a mechanics time since he can connect the machine, start the process, and do other work while the injectors are being cleaned. Starting in the late 1980's, deposit resistant injectors were introduced and detergents were added to gasoline to prevent clogged injectors. Some mechanics will still try to sell you an injector clean as maintenance. There are cases where injectors may need to be cleaned to correct poor running but it is really not a maintenence item anymore. Another similar situation arises with the throttle body. Throttle bodies will sludge up, especially if you use natural (non-synthetic) oils. It was common in the 1980's to periodically clean the throttle body. In the early 1990's, new measures were taken to eliminate the need to clean the throttle body. In fact, some throttle bodies come pre-sludged with a special coating to allow proper idle speed. If you remove the coating, your idle may be too high. Some mechanics still sell throttle body cleaning as a maintenance item. It generally takes about 5 minutes and they will charge you an hour. In some cases it will actually cause an idle problem where one was not previously present. Warning signs? There are a few warning signs you can watch out for:
Most vehicle manufacturers now require at least some degree of training which is helping to drive the right behavior. Modern mechanics working on high-tech systems require a significantly higher skill set than mechanics of yesterday. Vehicles have become very complex. Most of the problems on these high-tech systems are intermittent making it even harder. Some manufacturers don't seem to understand what it takes to troubleshoot problems on these modern systems and believe that the mechanics out there simply don't have the aptitude to learn what they need to so they don't give the detail of information required to really understand these systems. This adds to the challenges a good mechanic faces. Modern vehicle troubleshooting requires many of the techniques a doctor would use to troubleshoot problems with humans. The real frustration comes when these vehicle doctors take home less money than a mechanic that just swaps parts. I would guess that only about 10% of the mechanics out there fit into the vehicle doctor category. Another 20% have some skills for troubleshooting. Many of the rest just swap parts and their skill is the speed at which they can change these parts. Often it is the doctors who really end up troubleshooting most of the problems for the others but he does not make the money for it. That should be improving as vehicles become more complex. Modern vehicles are significantly more reliable than older ones. The newer the better. Modern vehicles require very little maintenance and very few repairs compared to those just 10 years earlier. Generally, any of the larger automakers make a better quality product today than the best cars of 10 years ago. I blame most of the problems with the repair industry on the flat rate pay system. It can drive the wrong behavior throughout the organization. It gives clear incentive to go for speed and not accuracy. How would you like your pay cut in half because business was slow. Go home and tell your family that and see how it makes you feel. Upsell becomes easier to justify. It can be a very stressful living. Now work in those conditions and watch the guy next to you cheat the system and rake in the money with bonuses and praise from management to boot. Mechanics are no more dishonest than anyone else by nature, flat rate pay is to blame. "
__________________
Forum Guidelines:http://www.automotiveforums.com/vbulletin/guidelines.html "What we've got here is a failure to communicate" |
|
|
|
|
07-05-2006, 09:10 PM
|
#12 | |
|
Resident Chemist
Join Date: Feb 2004
Location: Rockville, Maryland
Posts: 8,586
Thanks: 105
Thanked 157 Times in 157 Posts
|
Re: 4Runner FAQs
ENGINE VACUUM HOSE ROUTING DIAGRAM
Q: I'm having trouble isolating a vacuum problem. I've checked the egr - good, replaced ALL vacuum lines, but car still misses at 20-25mph and 45-50mph. with egr vacuum line d/c'd the miss is gone. while trying to make sense of manual, i came across pic of egr and vacuum lines as they are connected in the pic - they don't match my cars egr vacuum lines although the pic is supposed to represent same. if anyone can direct me to an appropriate manual, or even better, if someone can send me a diagram it would be much apprieciated. A: Give your VIN to a Toyota parts department and they should be able to order a vacuum routing diagram for you to stick under your car hood (if there isn't one already there). This is the best diagram to follow for your car. They have to have these available for cars who have to have their hoods replaced.
__________________
Forum Guidelines:http://www.automotiveforums.com/vbulletin/guidelines.html "What we've got here is a failure to communicate" |
|
|
|
|
07-07-2006, 11:58 PM
|
#13 | |
|
Resident Chemist
Join Date: Feb 2004
Location: Rockville, Maryland
Posts: 8,586
Thanks: 105
Thanked 157 Times in 157 Posts
|
Re: 4Runner FAQs
REMOVING STARTER FROM '96 - '02 4RUNNER
Thanks to Maxman1, leenmachine, and robby1320 Q: After removing all the hardware and connector, I found there was no room anywhere to remove the starter from the vehicle. I removed the front tire, dip stick, exhaust manifold heat shield, but all the openings are too small to allow the starter to be removed. V-6, AT, 4WD. Anyone know how to get the darn thing out? A: Method 1 - Remove the trans tube, lift the truck, remove the right front wheel, remove the rear splash pan, remove the power cable and plug from the starter, remove the two bolts holding the starter in. Then remove the 4 bolts holding the steering rack in, disconnect the right front ball joint, slide the rack out, and bring the starter out from the bottom. I know it sounds like alot of work, but it shouldn't take more than 2 hours if you have the right tools. Method 2 - Gently push the brake line out of the way. Remove the bolt on the inside of the frame that holds brake line in place. The exhaust manifold heat shield and the upper half of the tranny dipstick also must be pulled. Once all this is done the starter goes right in. Method 3 - Disconnect the battery. Remove the dipstick and upper half of the dipstick tube. The tube wiggles right off after unbolting it. Don't forget to plug the hole with a clean rag or something to keep debris out. Get in under the vehicle with extensions and a knuckle to remove the starter mounting bolts. Remove the front tire and the protective rubber sheet inside the fender. Look at the brake line. There is a removeable segment that, one removed, will give you great access to the starter. I would be hesitant to just bend it out of the way, since a kink will ruin the brake line. Let the brake fluid drain completely. Using a piece of string, I wrapped it around the upper brake line/fitting and pulled it to the left out of the way. The starter is now completely accessible. Bleed the brakes after re-assembly. Here is another procedure from spp88: To all who contemplate this job, here is some info I didn't see on the posts in the FAQ section. The best starter removal DIY I found was at http://www.yotatech.com/f128/starter...4runner-76347/ but it misled me in an important way. My 4Runner is a 96 3.4L-V6 4WD and AT so maybe his was different. Below I refer to his DIY steps as the baseline. I had the "click-click" symptom others have clearly described so I ordered the contact kits from StopShopandDrive.com had them on-hand the next day. (I had already eliminated the battery, starter relay and top-side connections as culprits, so the starter itself had to be dealt with. Step by Step A. Before working on the starter, be sure to disconnect the battery. B. Follow steps 1-5. After the brake line is removed, I gently manouvered the inside bracket to the outside of the frame rail so the line could be moved fore & aft without strain. C. I don't know what step 6 refers to. D. Step 7: My dipstick tube has a simple o-ring seal so no big effort was used to loosen it nor was sealant needed on reassembly. E. 8-10: I was able to crack the starter bolts with no problem. Access from underneath with the right assortment of sockets, extensions and universals. Removing the primary electrical cable was easy. Unhooking the small wire connector requires a left-handed 180 degree hand universal or a high pain threshold to squeeze the connector lock tab. Access through the wheel well. F. Step 11-13 is where I departed from the DIY (Mod Note: Original author of Yotatech procedure had headers, whereas spp88 does not). I could not believe that removing the exhaust manifold/collector was necessary to get the starter out. It isn't at least for my vehicle. After removing the starter bolts, you can remove the starter through the wheel well access hole as long as you put it in the perfect orientation. Slide the brake line forward (inside bracket is now outside the frame) and rotate the starter every which way to slide it out. It is tight, but I did it in a couple of minutes with no damage to anything other than a scratch on my arm. Pay attention on how it comes out to save time in putting it back. G. On a bench, I cleaned everything, replaced the contacts http://yotarepair.com/startercontacts.html, cleaned up the plunger contact area (some recommend replacing it) and re-assembled. H. Putting things back was simple after I found the magic orientation to slide it through the hole. I had an able assistant hold the starter in place through the access hole while I was underneath the truck to get the bolts started, otherwise I might still be at the job. It has been starting with no issues ever since. My actual labor was probably about 2 hours not including the hour or so I spent staring at the access hole convincing myself that Toyota put it there just for starter removal and that no major parts had to be removed to do the job. Thanks to all the DIY help that preceeded my effort. Best of luck to others who take this task on. Here is the incentive: My parts cost including shipping was $25.40. Ask your local dealer or Indy shop what they want for a starter R&R. REMOVING STARTER FROM 3.0 V6 2ND GEN 4RUNNER Thanks to 4Wheel DISCONNECT THE BATTERY FIRST THING!!!! Use a combination of your longest 3/8 drive extensions to get your ratchet in front of the motor mount, do this from the top side leaning over the fender, this is to remove the top bolt, remove the wires from the top side also when you get BOTH bolts removed you can rotate the starter to gain access to the terminals. The bottom bolt is on the transmission side this one you will need to be under the truck, then go back topside and undo the wiring. You will have to move transmission cooling lines if you have an automatic, one of the mounts for the lines actually uses the starter bolt to anchor. Dont forget to reattach this when installing the starter. I have a 92 and there is no need to remove the tire or raise the truck, in fact raising the truck will put your work further away from you when you are underneath. Once completely disconnected the starter drops out through the bottom. It is not the simplest DIY job but anyone with a 3/8 ratchet set can do it. It will take the better part of a morning to do it. Manual: http://personal.utulsa.edu/~nathan-b...g/1starter.pdf
__________________
Forum Guidelines:http://www.automotiveforums.com/vbulletin/guidelines.html "What we've got here is a failure to communicate" Last edited by Brian R.; 10-28-2008 at 07:33 PM. |
|
|
|
|
07-08-2006, 09:04 PM
|
#14 | |
|
Resident Chemist
Join Date: Feb 2004
Location: Rockville, Maryland
Posts: 8,586
Thanks: 105
Thanked 157 Times in 157 Posts
|
Re: 4Runner FAQs
WHAT GEAR RATIO SHOULD I USE WITH OVERSIZE TIRES?
Q: i got a '95.5 toyota tacoma. It's a 2.7L 4X4 Auto and I'm not sure what kind of gears it has in it. I put a 6-in lift with 33-in tires and i need a little more power and the trans needs some help. What size gears i should put in it and what brand is a good one? A: Here is a chart for the axle codes and a link to a gear chart. There should be a tag in the drivers side door jam. Find your gears and match them up for an exact match. I would recommend a 4.56 or a 4.88 if you wheel it. http://www.tacomaterritory.com/wiki/...php/Gear_Codes http://www.tacomaterritory.com/wiki/...php/Gear_Chart Here is another link with information about how to identify your vehicles gear ratio. Within this article are additional links about gearing. http://www.brian894x4.com/Gearratiosanddiffs.html I would recommend Yukon gears. Be prepared regear is not cheap. You will need to buy master install kits for both diffs. Thanks to TcmaBoy and Flash75 for the above information.
__________________
Forum Guidelines:http://www.automotiveforums.com/vbulletin/guidelines.html "What we've got here is a failure to communicate" |
|
|
|
|
07-08-2006, 09:18 PM
|
#15 | |
|
Resident Chemist
Join Date: Feb 2004
Location: Rockville, Maryland
Posts: 8,586
Thanks: 105
Thanked 157 Times in 157 Posts
|
Re: 4Runner FAQs
__________________
Forum Guidelines:http://www.automotiveforums.com/vbulletin/guidelines.html "What we've got here is a failure to communicate" |
|
|
|
|
 |
POST REPLY TO THIS THREAD |
 |
|
|


