|
|
|

|
|
| Search | Car Forums | Gallery | Articles | Helper | AF 350Z | IgorSushko.com | Corporate |
|
| Latest | 0 Rplys |
|
|||||||
| WIP - Motorsports Post topics for any "Work In Process" motorsports vehicles in this sub-forum. |
 |
 Show Printable Version | Show Printable Version |  Email this Page | Email this Page |  Subscribe to this Thread
|
|
|
Thread Tools |
 04-27-2021, 11:16 AM
|
#1 | |
|
AF Enthusiast
Join Date: Mar 2009
Location: Madrid
Posts: 650
Thanks: 109
Thanked 68 Times in 67 Posts
|
Porsche 935 K3 Coca Cola 1/24 Nunu
Después del Lancia Delta S4, empiezo otro kit de la misma marca, Nunu, pero de circuitos, y también un icono del siglo pasado: Porsche 935 K3 a escala 1/24. En concreto, el que vienen en la decoración de la caja pertenece al vencedor de las 24 Horas de Le Mans del año 1979:
After the Lancia Delta S4, I start another kit from the same brand, Nunu, but for circuits, and also an icon of the last century: Porsche 935 K3 in 1/24 scale. Specifically, the one that comes in the decoration of the box belongs to the winner of the 24 Hours of Le Mans in 1979: 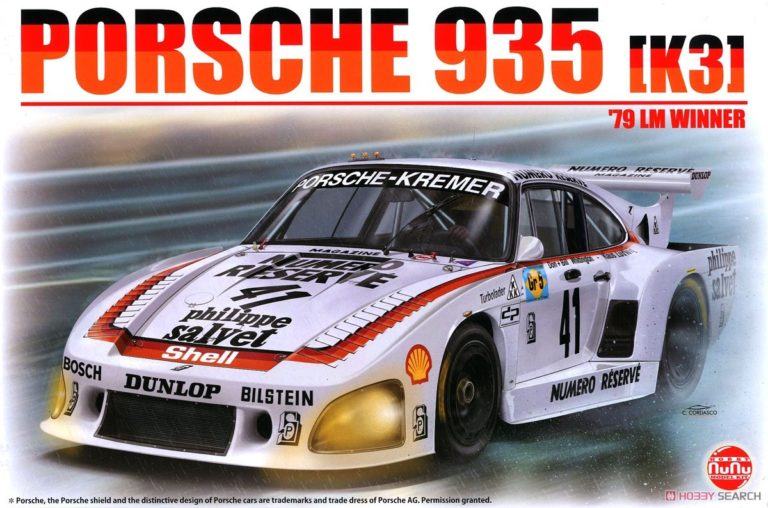 Pero yo voy a hacer otra decoración que me gustó mucho: la roja de Coca Cola. Y para eso, usaré las calcas de Decalcas que os muestro a continuación: But Im going to do another livery that I really liked: the red Coca Cola one. And for that, I will use the Decalcas decals that I show you below: 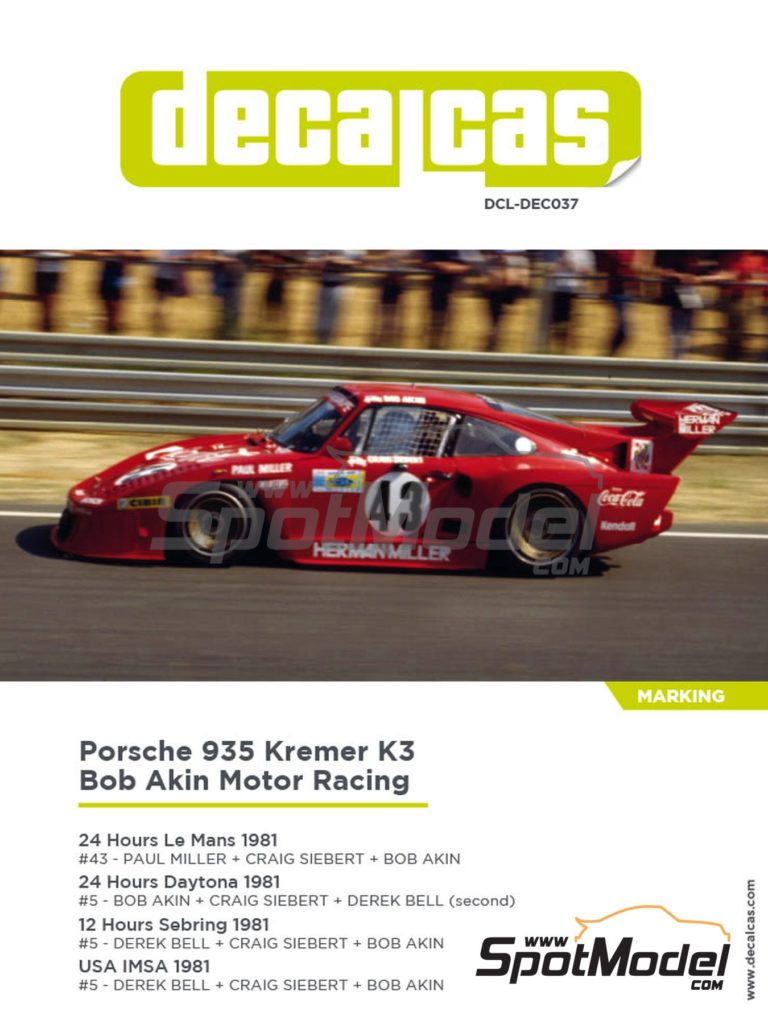 Viendo fotos del modelo real, me doy cuenta que en la aleta trasera izquierda, hay dos entradas de aire en lugar de una, por lo que voy a usar un transkit de SK Decals que contempla esas dos entradas, hecho en resina, se adapta muy bien y está muy bien hecho: Looking at photos of the real model, I realize that in the left rear wing, there are two air intakes instead of one, so Im going to use a transkit from SK Decals that contemplates those two intakes, made in resin, fits very well and is very well done: 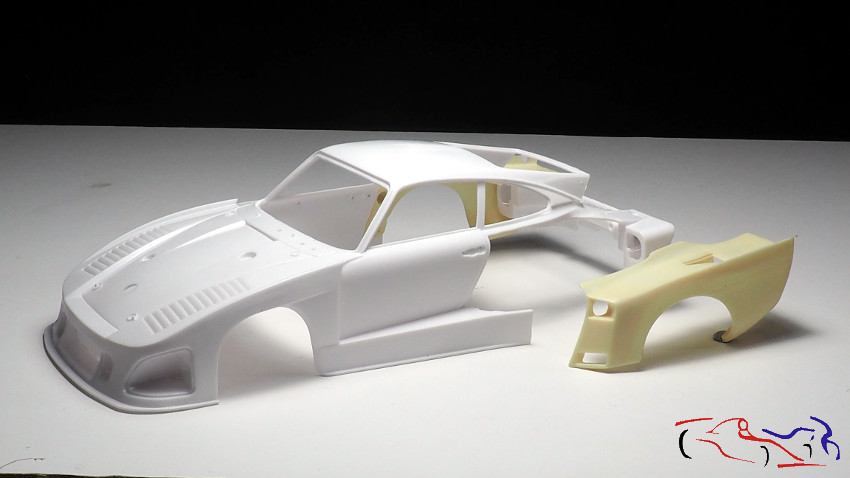 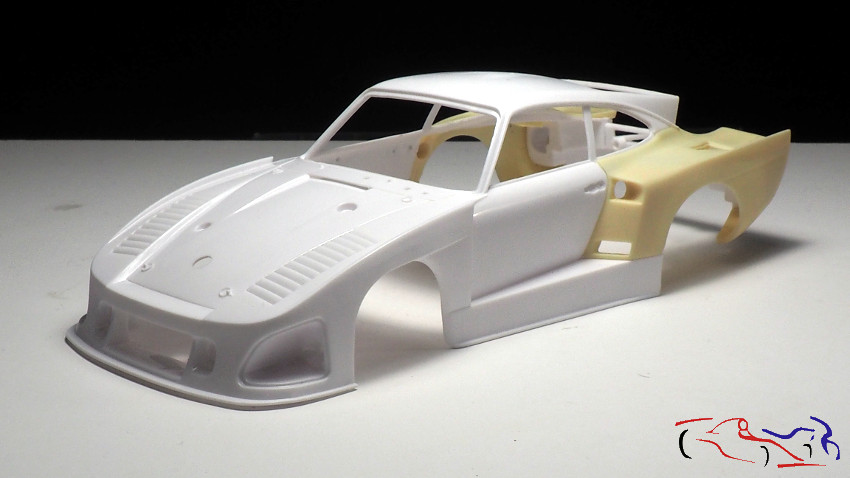 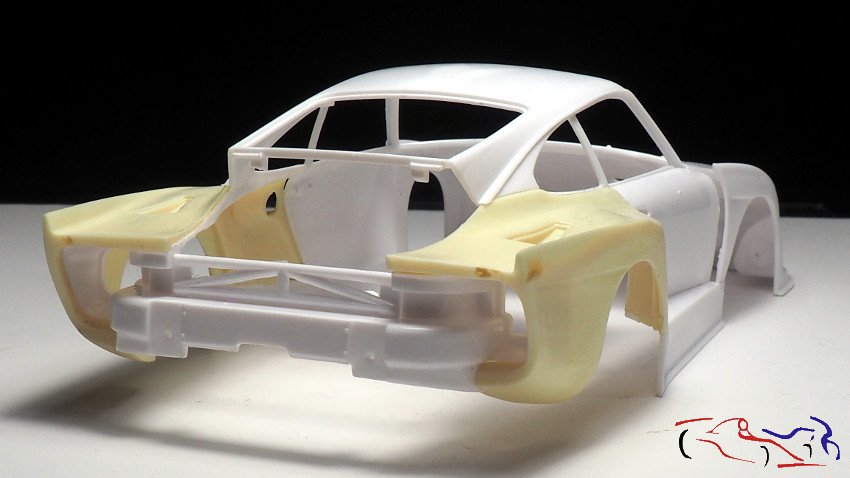  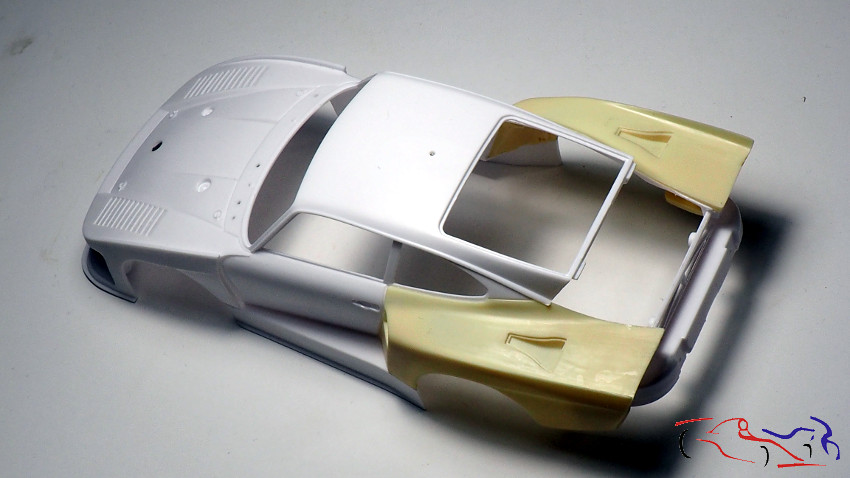 Ahora os enseño la base del alerón trasero, que se situa encima del motor. Consta de 4 piezas que encajan bien, pero hay que añadir masilla y lijar para que todo sea una pieza sin los bordes de unión, como veremos un poco más delante. Ahora la pegamos ycolocamos en la carrocería para ver su encaje: Now I show you the base of the rear wing, which sits on top of the engine. It consists of 4 pieces that fit well, but you have to add putty and sanding to make the whole piece without the edges of union, as we will see a little further on. Now we glue it and place it on the body to see how it fits:  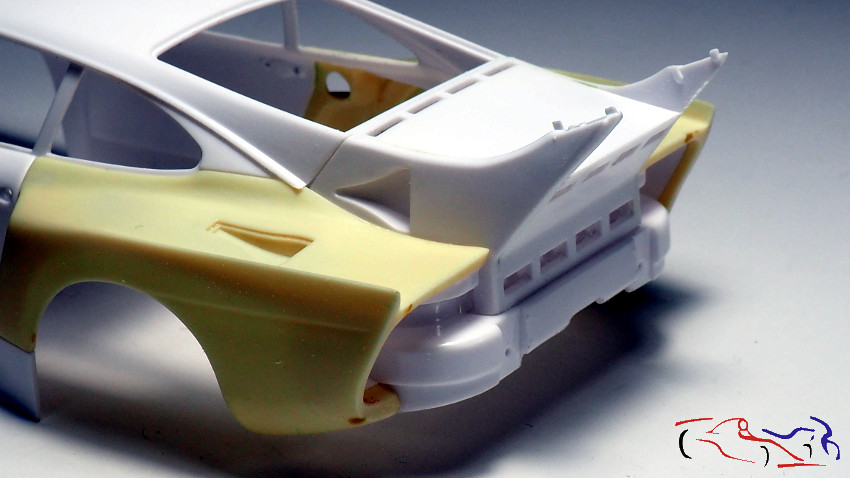 Y vamos a ver el conjunto premontado, con las ruedas puestas. En principio no hay problemas aparentes, si acaso los agujeros de los de los bornes de unión de las piezas que, en general, convienen agrandar: Lets take a look at the pre-assembled, with the wheels on. In principle there are no apparent problems, except for the holes in the terminals for the connection of the parts which, in general, should be enlarged: 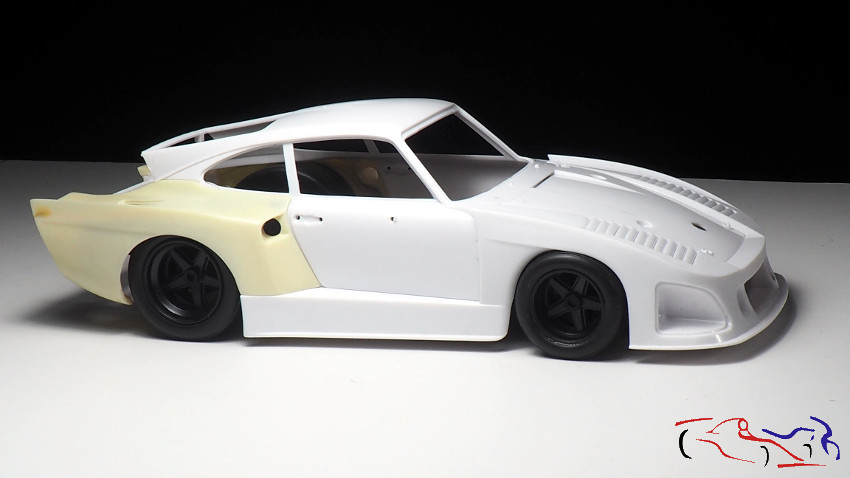 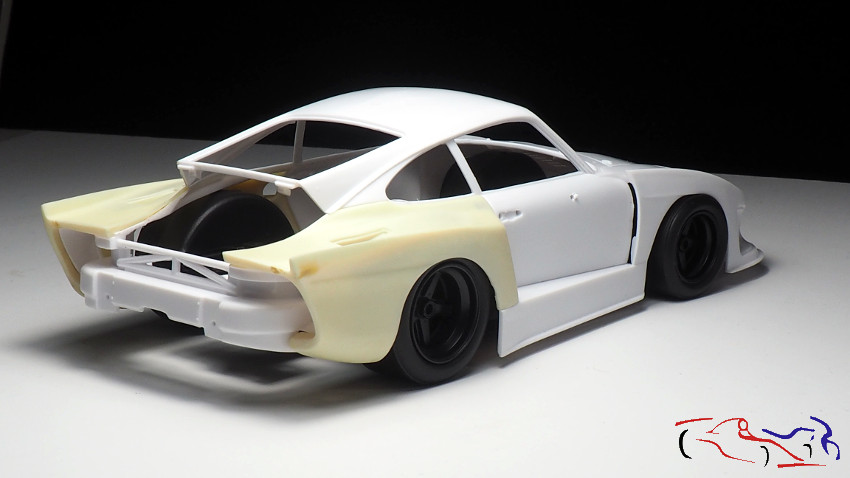  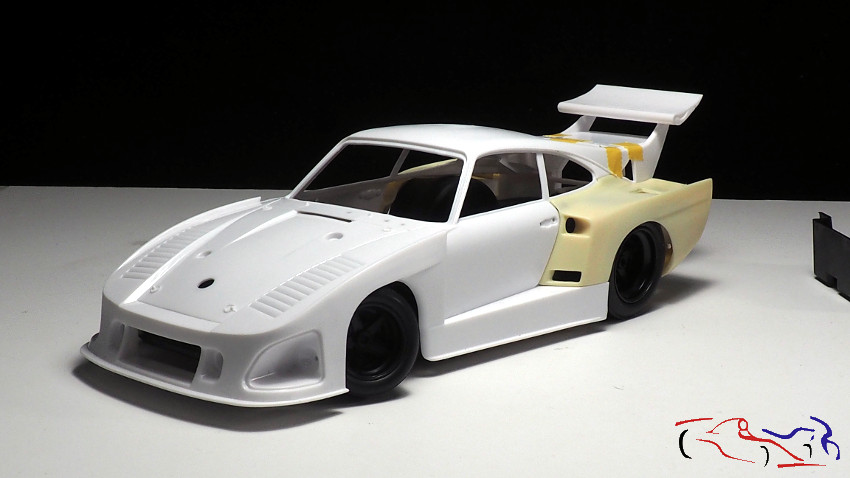 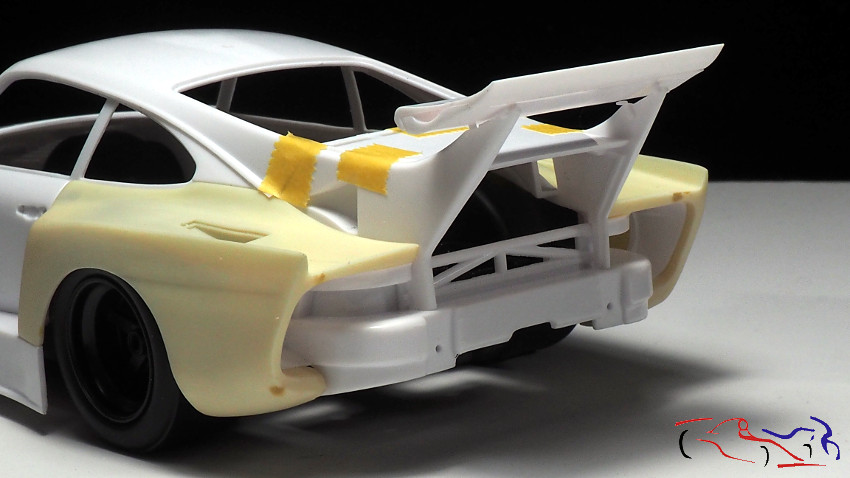 En la última foto, habéis visto el alerón trasero que viene en dos piezas, que hay que rellenar de putty un par de veces porque las líneas de unión resaltam notáblemente: In the last picture, you have seen the rear wing that comes in two pieces, which need to be filled with putty a couple of times because the lines stand out noticeably: 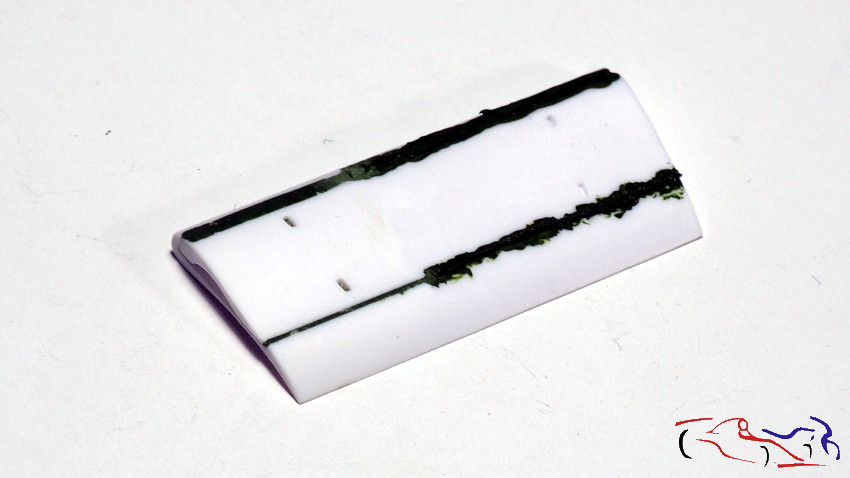 A su vez, la base se ve un poco tosca, sobre todo las uniones con el alerón: At the same time, the base looks a little rough, especially the joints with the spoiler:  Por eso, y fijándonos en las fotos del coche real, le eliminamos las propias fijaciones que irán en fotograbado y le afinamos las dos bases del alerón, como aparece en las fotografias siguientes: For this reason, and looking at the photos of the real car, we have removed the actual fixings, which will be photo-etched, and refined the two bases of the spoiler, as shown in the following photographs: Vemos que el pilar derecho ya ha sido modificado: We can see the right pillar has already been updated: 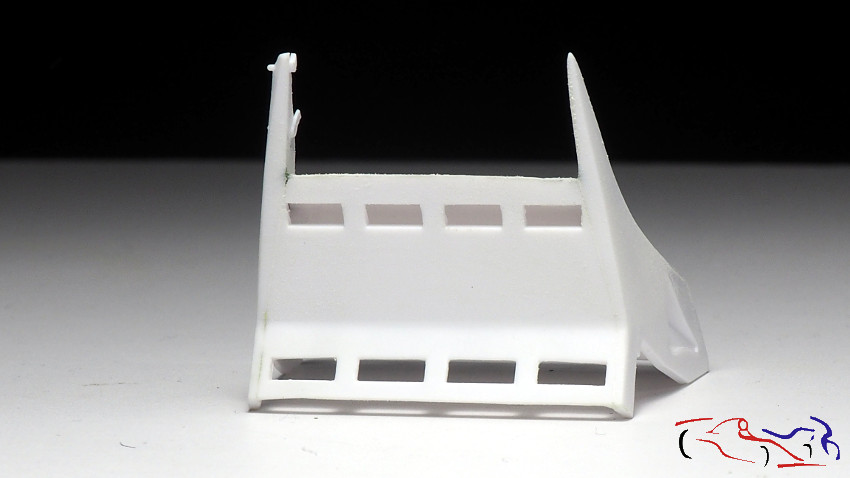 Aquí vemos ambos Pilares ya modificados: We can see both pillars already updated: 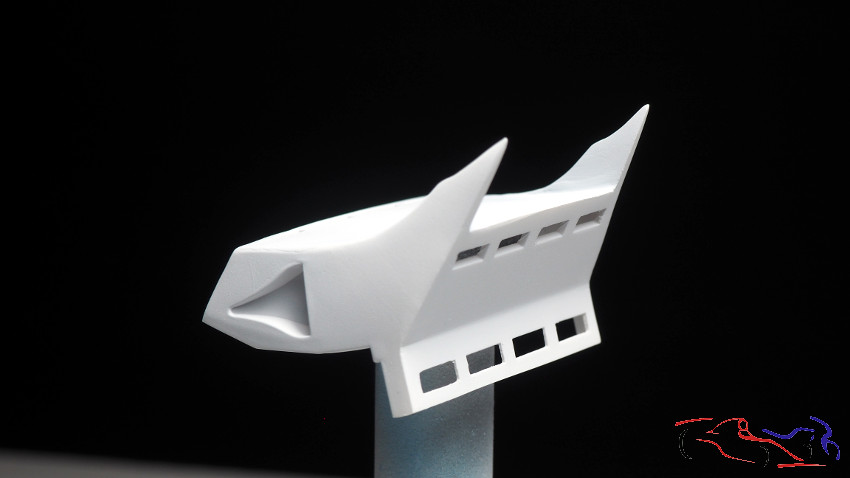 Al igual que en el Porsche 936, le perfilamos las branquias delanteras (aquí tenemos en proceso la izquierda y la derecha en estado original): As with the Porsche 936, we have outlined the front gills (here we have the left in progress and right is in the original state): 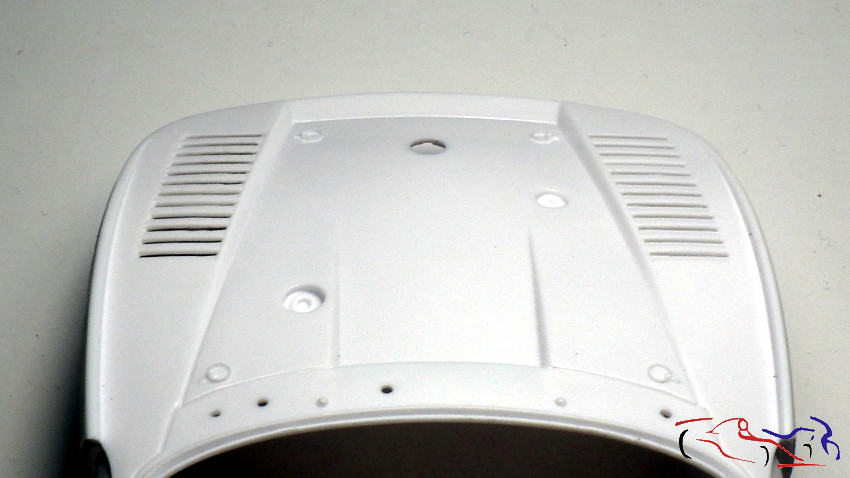 Y como en este kit, quería hacerle algo diferente, decidí que podía abrir la puerta con su bisagra activa. Y para eso, empecé a cortar la puerta con la parte posterior de un cutter. Un inconveniente era el pilar trasero que separa la puerta. Y para hacerlo, corté un trozo a medida de la cinta que se usaba antiguamente para etiquetar (el DIMO de toda la vida) como guía para el corte, tanto de la puerta como del cristal: And since I wanted to do something different with this kit, I decided that I could open the door with its active hinge. And for that, I started cutting the door with the back of a cutter. One drawback was the rear pillar that separates the door. And to do this, I cut a piece of the tape used in the old days for labelling (the DIMO of all times) as a guide for cutting both the door and the glass: 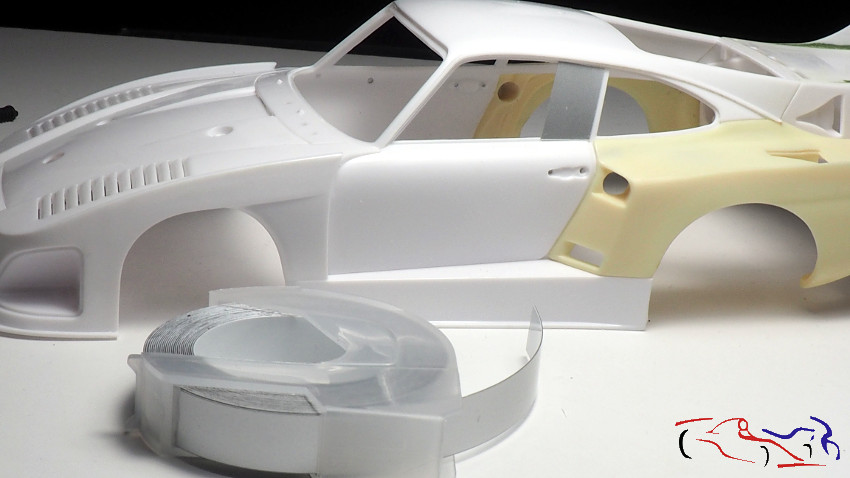 Y aquí el resultado una vez separada toda la puerta de la carrocería: And here is the result once the whole door has been separated from the bodywork: 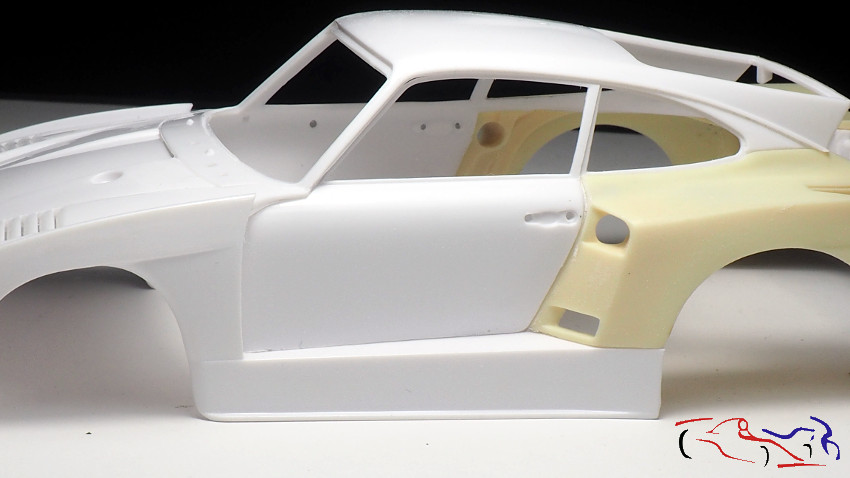 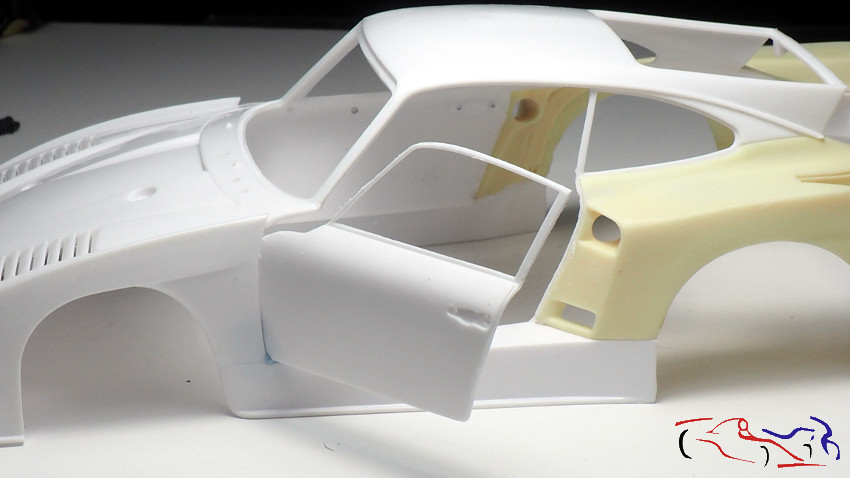 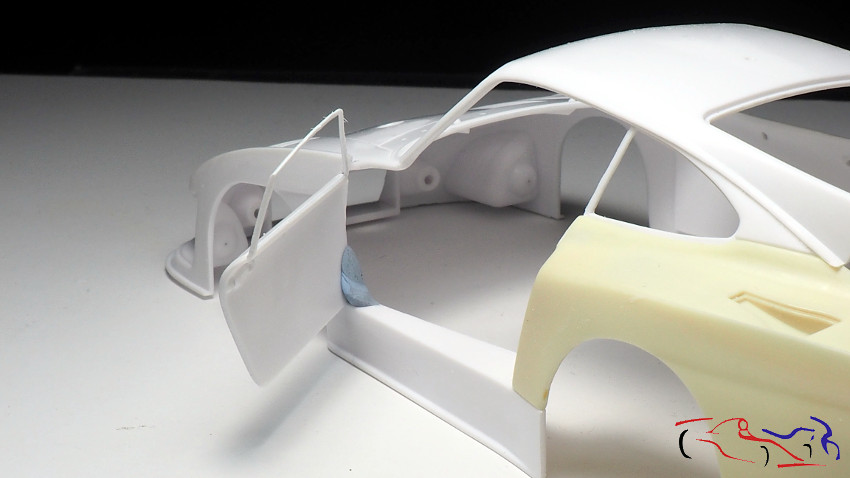 A su vez, necesitamos cortar el panel interior para separar la parte que va unida a la puerta. Para ello ponemos el panel en su posición, lo montamos dentro de la carrocería, y marcamos el contorno interior de la puerta. Después cortamos de la misma manera. In turn, we need to cut the inner panel to separate the part that is attached to the door. To do this, we put the panel in position, mount it inside the body, and mark the inner contour of the door. Then we cut it with the same process.  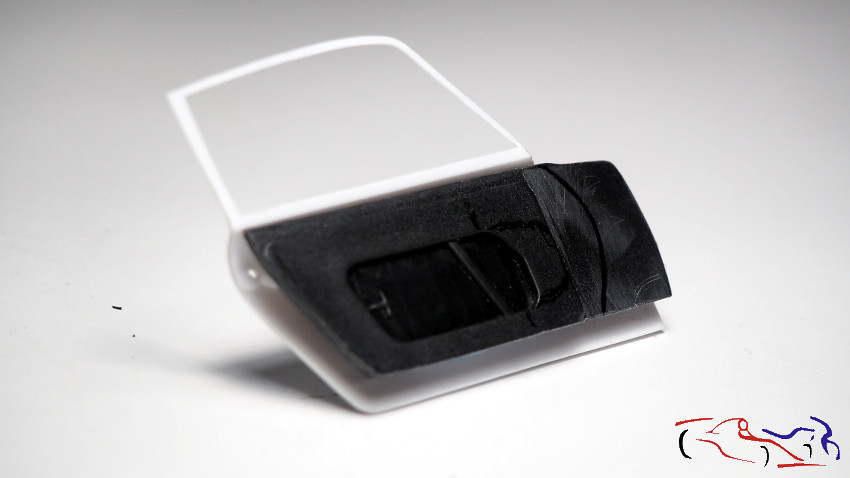 Para hacer la bisgra, después de varias opciones y pruebas, cojo tubo de cobre al que le inserto una varilla, y doblo por los extremos. Esta parte irá pegada en la puerta por la parte del tubo, para que la varilla se fije en el panel interior y pueda girar. Pero ahora, el problema en que todo tiene que ser fijado después de pintar y lacar, con lo que decido hacerle dos agujeros, poniendo dos casquillos donde pasaré y pegaré la varilla doblada de la bisagra. Se pueden ver esos dos casquillos en la foto de la derecha: To make the hinge, after several options and test, I take a copper tube to which I insert a rod, and I bend the ends. This part will be glued to the inside door on the side of the tube, so that the rod is fixed to the inner panel and can rotate. But now, the problem is that everything has to be fixed after painting and lacquering, so I decide to make two holes, putting two sockets where I will pass and glue the bent rod of the hinge. You can see those two sockets in the picture on the right: 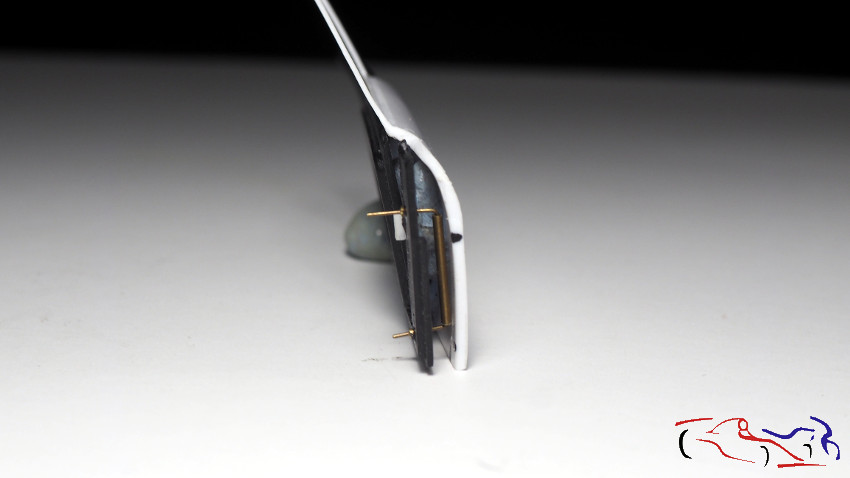 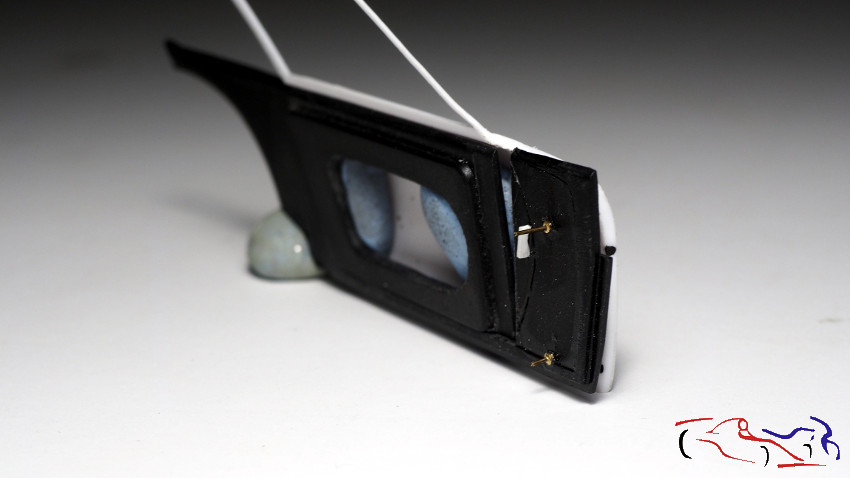 Y por supuesto, hay que realizar y adaptar el interior de la puerta. Para ello hacemos los perfiles y recortamos el interior del panel, de acuerdo con la forma que tiene: And of course, the inside of the door has to be made and adapted. To do this, we make the profiles and cut out the inside of the panel, according to its shape: 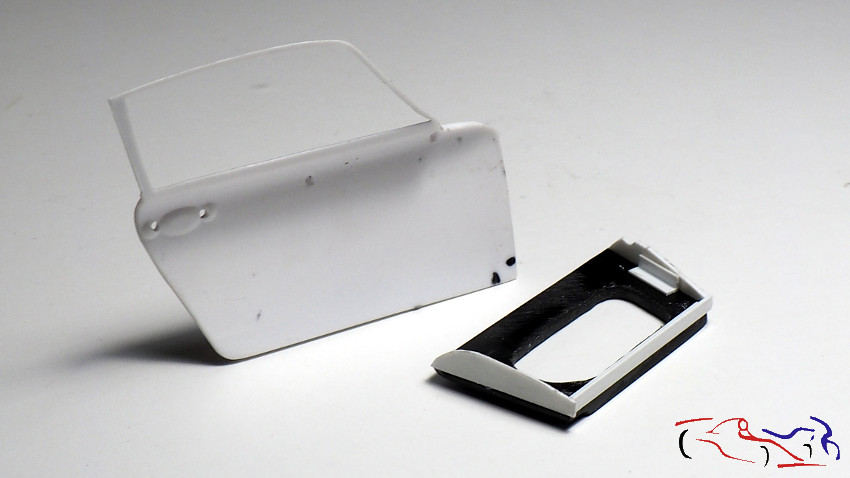 Lo presentamos en la puerta y añadimos lámina de plastico por su perímerto interior. La pegamos con ciano y polvos de talco para asegurar la pieza: We put it on the door adding a plastic film on the inside perimeter. We glue it with cyano and talcum powder to secure the piece: 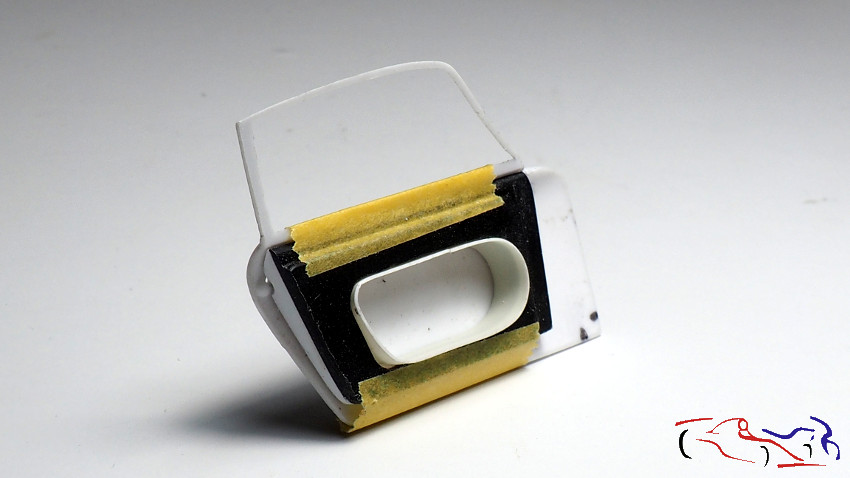 Una vez seco, lijamos el sobrante enrasando el panel, y le añadimos piezas del interior como son un vástago que recorre la puerta, y una canalización para el sistema de apertura de la puerta, formada por una arandela y un tubito. En ese tubito irá la pieza que servirá para abrir la puerta. Once dry, we sand the excess to make the panel flush, and we add interior parts such as a rod that runs along the door, and a channel for the door opening system, formed by a washer and a small tube. The piece that will be used to open the door will be placed in this small tube. 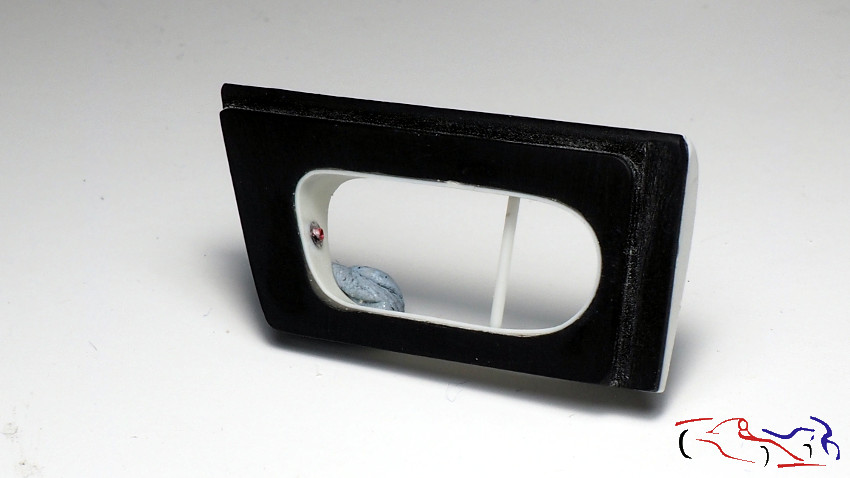 Y este es el resultado (sin pegar el panel de la puerta. Vemos la bisagra lista para ponerse en la carrocería. Para pegarla, ya que es perpendicular al suelo y paralela al panel (la puerta no es vertical), pongo la bisagra en la carrocería, pongo ciano en la puerta y la coloco en su lugar. Una vez seco, solo estará pegado la parte de abajo, más cercana a la puerta, y para segurar el resto, lo rellenos con ciano y polvos de talco. Al secarse, lo rebajo con el minitaladro. And this is the result (without gluing the door panel). We can see the hinge ready to be put on the bodywork. To glue it, as it is perpendicular to the floor and parallel to the panel (the door is not vertical), I put the hinge on the body, put some cyano on the door and put it in place. Once dry, only the bottom part, closest to the door, will be glued, and to secure the rest, I fill it with cyano and talcum powder. When it dries, I then cut it down with the mini-drill. 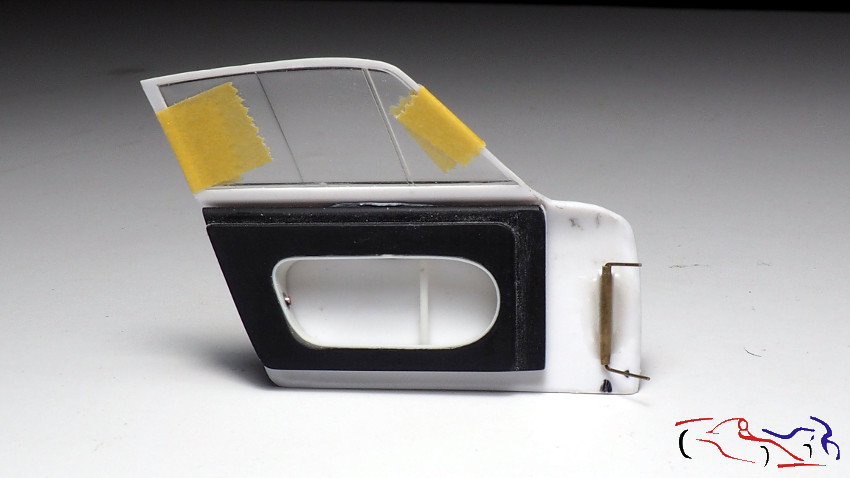 Más procesos que tiene el abrir una puerta: adaptar la carrocería, añadiendo un marco y rellenar lo huecos. Vemos el marco superpuesto, a continuación, ya fijado con el hueco de la aleta trasera tapado, y una tercera foto más cercana. Hay que afinar esa pieza aun!: More processes involved in opening a door: adapting the body, adding a frame and filling in the gaps. We see the overlapping frame, below, already fixed with the rear wing gap plugged, and a third, closer photo (That part still needs to be tuned!): 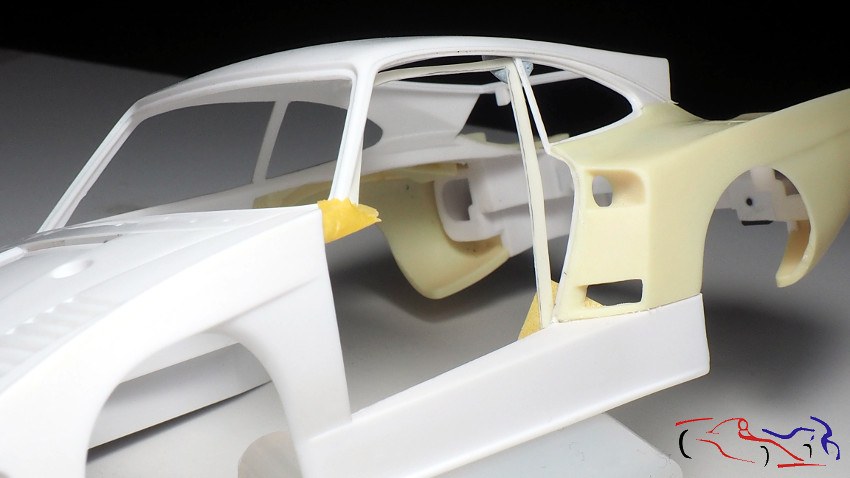 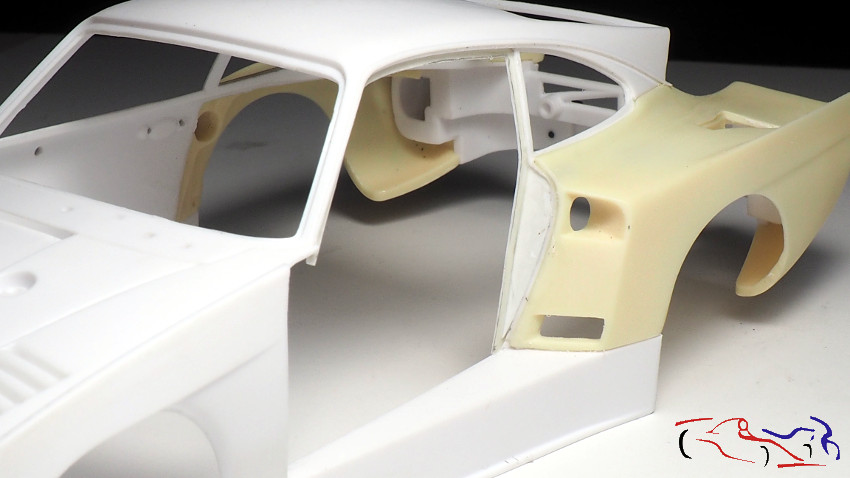 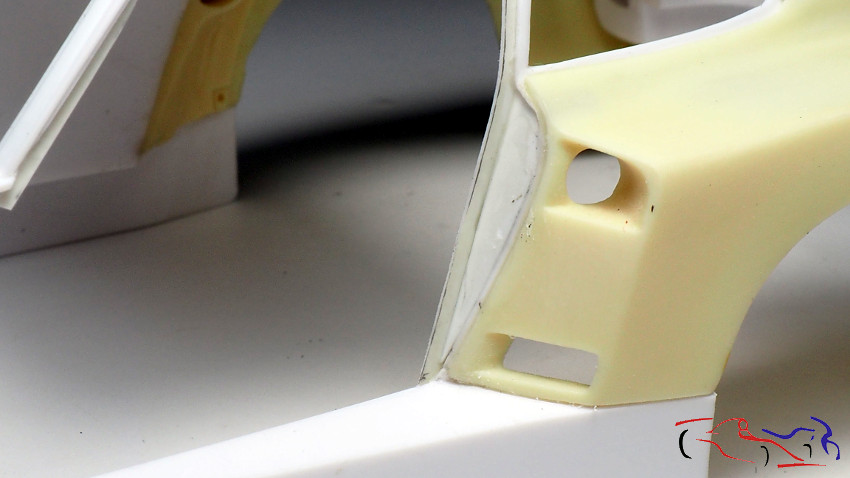 Pasamos a la parte del motor. Lo montamos todo para ver como queda y lo que hace falta: We move on to the engine part. We put it all together to see how it looks and what is needed: 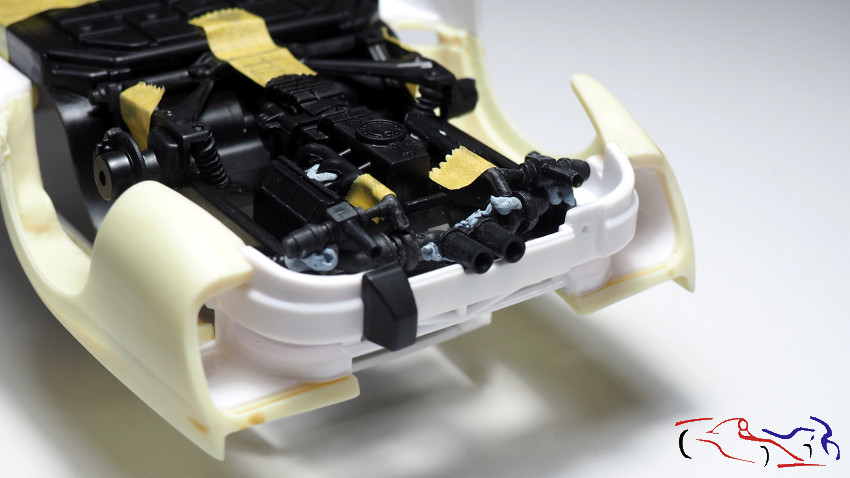 Y vemos que la pieza de los escapes deja mucho que desear, por lo que la sustituiremos con tubos de latón, que los pondremos en el minitaladro para adelgazar el ancho del tubo: And we can see that the exhaust piece leaves a lot to be desired, so we will replace it with brass tubes, which we will put in the mini drill to thin the width of the tube: 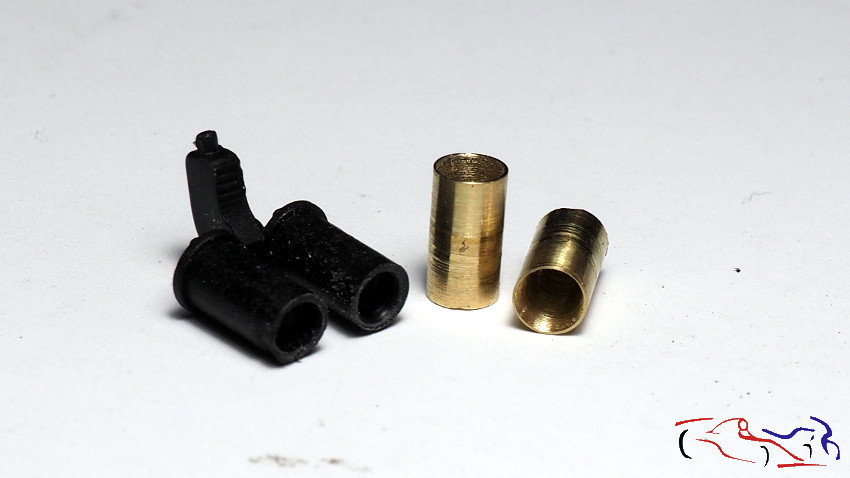 Y los unimos a la salida de ambos turbos, poniendo en la unión, ciano con polvos de talco. Lijamos para dar continuidad a la pieza: And we join them at the outlet of both turbos, putting in the union, cyano with talcum powder. We sand to give continuity to the piece: 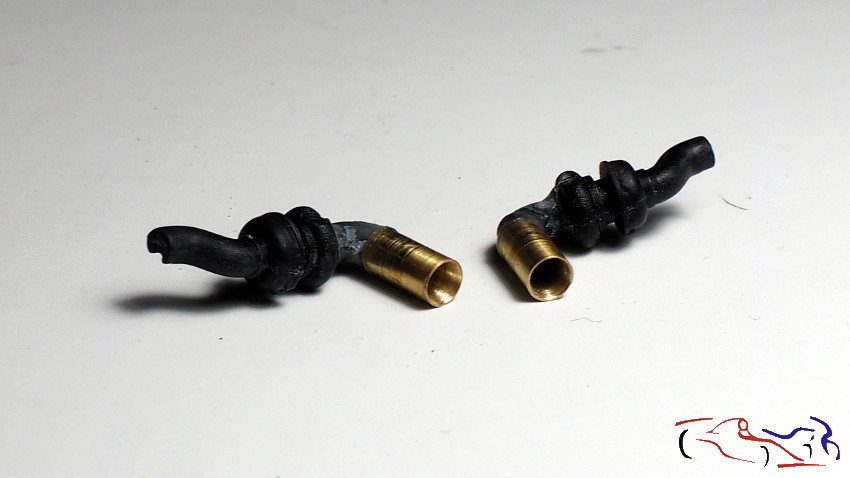 Más detalles: la pieza negra con forma de U, además de ser más fina, tiene una forma distinta: More details: the black U-shaped piece, besides being thinner, has a different shape: 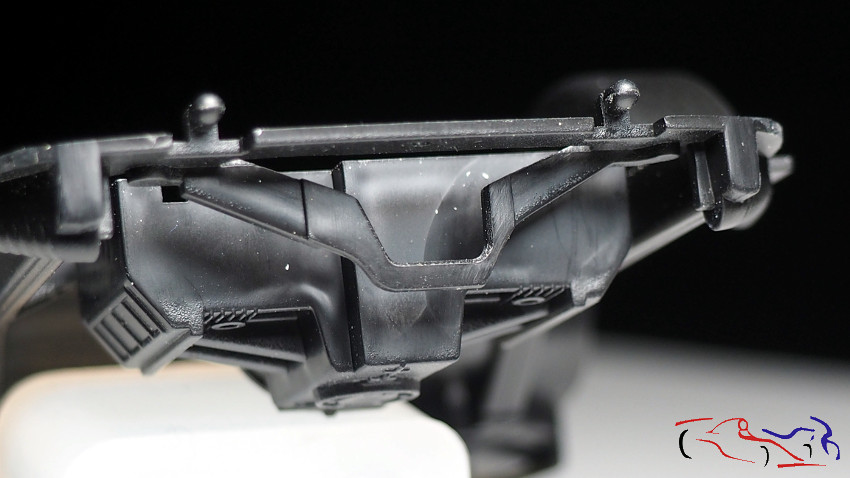 Por lo que la eliminamos y ponemos una pieza de metal, con tres agujeros y forma más real. La vemos detrás d l os tubos de escape modificados anteriormente y superpuestos para la foto: So we removed it and put a metal piece, with three holes and a more realistic shape. We can see it behind the exhaust pipes modified before and superimposed for the photo: 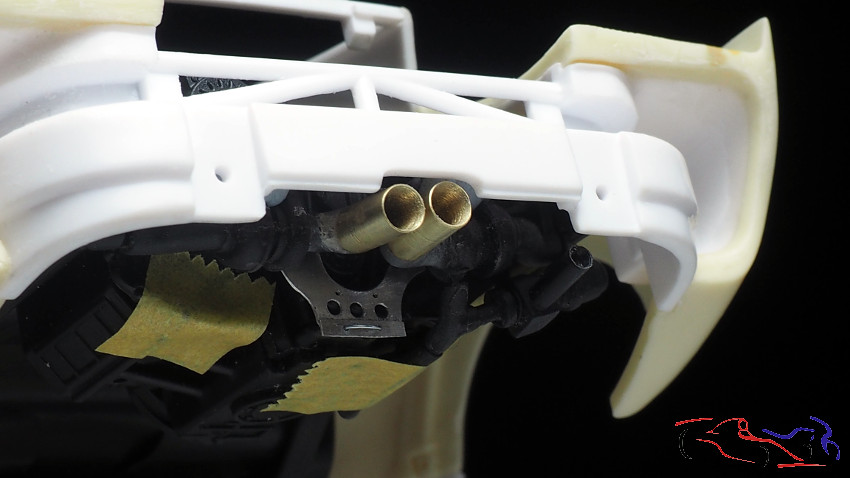 Más tareas de la parte trasera: rellenamos las uniones de la carrocería con las piezas de resina con ciano y polvos de talco, que después lijamos para igualar las superficies. Decir que este no es un problema de l TK ya que habría que hacer lo mismo con las piezas originales de plástico. More work on the rear: we filled the body joints with the resin parts with cyano and talcum powder, which we then sanded to even out the surfaces. It should be noted that this is not a problem for the TK, as the same would have to be done with the original plastic parts. 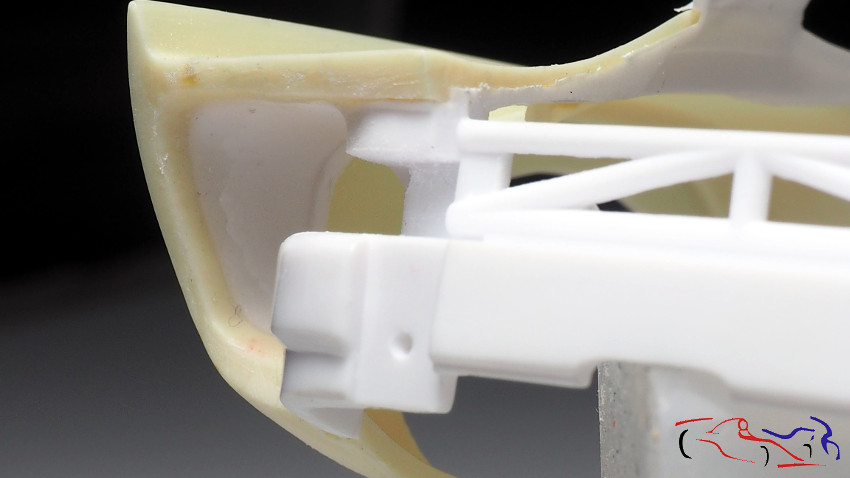 Y bueno .muchas piezas listas para imprimar y pintar!! And well . lots of parts ready to prime and paint!!!  Y para terminar, os muestro el TK de ruedas de Scalelab24 que voy a usar en este montaje, que son las que originalemente llevaba con esa decoración: And finally, I show you the TK wheels from Scalelab24 that Im going to use in this assembly, which are the ones the car originally wore with this decoration: 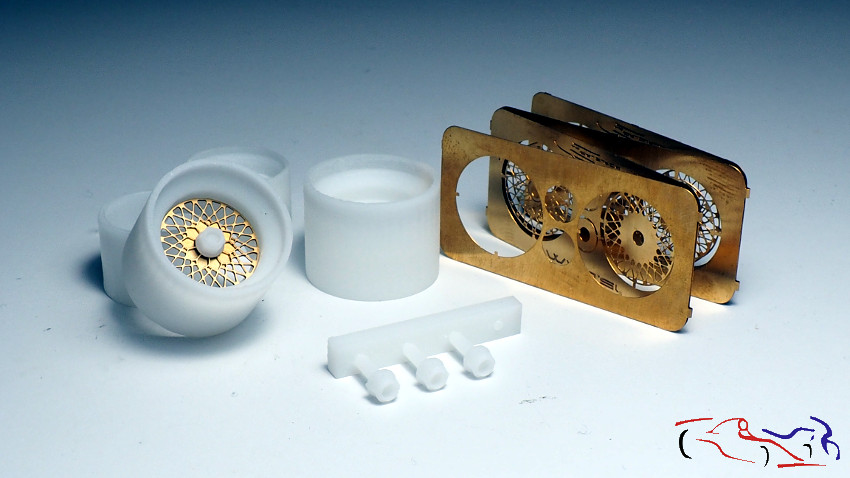 Gracias por mirar y comentar!! Thanks for watching and commenting! |
|

|

|
|
04-27-2021, 12:33 PM
|
#2 | |
|
AF Newbie
Join Date: Oct 2020
Location: Netherlands
Posts: 60
Thanks: 7
Thanked 8 Times in 7 Posts
|
Re: Porsche 935 K3 Coca Cola 1/24 Nunu
Great car Jesus and i like it when a car is modified to match the original car.
Also love your WIP pictures, Keep up the good work.
__________________
Thx for watching,  Greetz Peter Greetz Peter
|
|
|
|
|
|
04-27-2021, 12:58 PM
|
#3 | |
|
AF Regular
Join Date: Aug 2011
Location: Torino
Posts: 391
Thanks: 175
Thanked 62 Times in 58 Posts
|
Re: Porsche 935 K3 Coca Cola 1/24 Nunu
Great choice and really superb progress on the Porsche Jesus'
 |
|
|
|
|
|
04-27-2021, 01:49 PM
|
#4 | ||
|
AF Enthusiast
Thread starter
Join Date: Mar 2009
Location: Madrid
Posts: 650
Thanks: 109
Thanked 68 Times in 67 Posts
|
Re: Porsche 935 K3 Coca Cola 1/24 Nunu
Quote:
|
||
|
|
|
|
04-27-2021, 01:50 PM
|
#5 | ||
|
AF Enthusiast
Thread starter
Join Date: Mar 2009
Location: Madrid
Posts: 650
Thanks: 109
Thanked 68 Times in 67 Posts
|
Re: Porsche 935 K3 Coca Cola 1/24 Nunu
Quote:
|
||
|
|
|
|
04-27-2021, 04:00 PM
|
#6 | |
|
AF Enthusiast
Join Date: Mar 2009
Location: Rio de Janeiro, Brazil
Posts: 1,209
Thanks: 6
Thanked 144 Times in 136 Posts
|
Re: Porsche 935 K3 Coca Cola 1/24 Nunu
Great job! I'll be following
__________________
https://www.instagram.com/denilsonvm_modelcars/ |
|
|
|
|
|
04-28-2021, 01:30 AM
|
#7 | ||
|
AF Enthusiast
Thread starter
Join Date: Mar 2009
Location: Madrid
Posts: 650
Thanks: 109
Thanked 68 Times in 67 Posts
|
Re: Porsche 935 K3 Coca Cola 1/24 Nunu
Quote:
|
||
|
|
|
|
04-28-2021, 09:08 PM
|
#8 | |
|
AF Modelrater
 Join Date: Jul 2002
Location: Forks Township, Pennsylvania
Posts: 12,894
Thanks: 18
Thanked 63 Times in 56 Posts
|
Re: Porsche 935 K3 Coca Cola 1/24 Nunu
Another fantastic progress thread from the Master!
__________________
|
|
|
|
|
|
04-29-2021, 04:02 AM
|
#9 | ||
|
AF Enthusiast
Thread starter
Join Date: Mar 2009
Location: Madrid
Posts: 650
Thanks: 109
Thanked 68 Times in 67 Posts
|
Re: Porsche 935 K3 Coca Cola 1/24 Nunu
Quote:
|
||
|
|
|
|
06-03-2021, 07:48 AM
|
#10 | |
|
AF Enthusiast
Thread starter
Join Date: Mar 2009
Location: Madrid
Posts: 650
Thanks: 109
Thanked 68 Times in 67 Posts
|
Re: Porsche 935 K3 Coca Cola 1/24 Nunu
Continuamos con este proyecto, despacito porque la preparación para la pintura lleva su tiempo y dedicación, sobre todo cuando se recrean piezas. En este caso, os muestro como queda la bisagra de la puerta. Esos dos extremos doblados giran sobre el tubo, que está fijado a la puerta con un listón de Evergreen (redondeado para que apoyara el tubo) pegado con ciano, y rellenado con loctite y polvos de talco. Después se ha lijado hasta dejarlo tan estrecho como el tubo.
We continue with this project, slowly because the preparation for painting takes time and dedication, especially when recreating pieces. In this case, I show you how the door hinge looks like. These two bent ends turn on the tube, which is fixed to the door with a strip of Evergreen (rounded to support the tube) glued with cyano, and filled with loctite and talcum powder. It has then been sanded down to be as narrow as the tube. 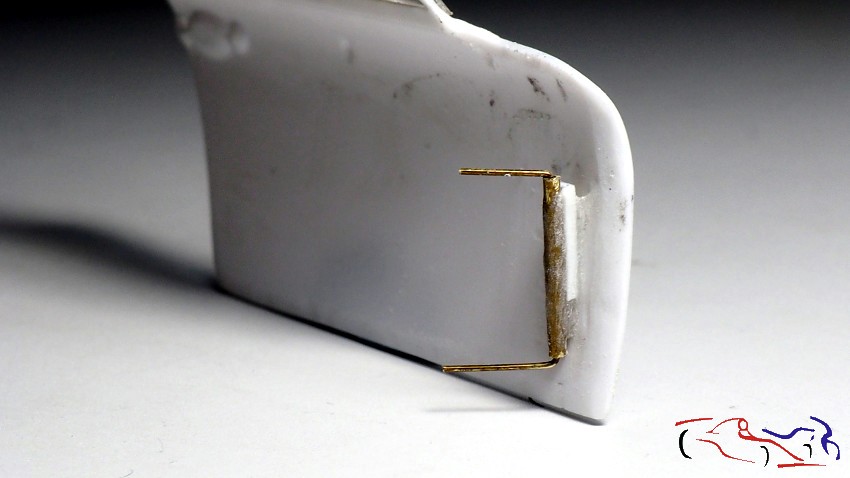 Y la puerta, debe quedar cerrada, y bien cerrada!! Para ello, le añado unos imanes tanto en el guarnecido interior de la puerta (uno redondo) como en el de la carrocería. Para ello, le hago una rebaja en la pieza para meter el imán, rectangular en este caso. And the door must be closed, and well closed! To do this, I add magnets both in the inner trim of the door (a round one) and in the bodywork. To do this, I make a cut in the piece to put the magnet, rectangular in this case. 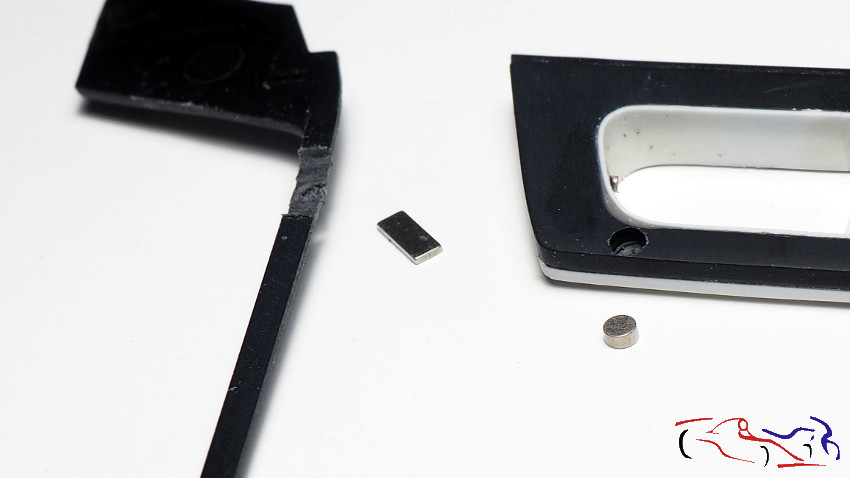 Pero no me fue bien, y al final el guarnecido del cockpit se estropeó (pieza izquierda en la foto anterior), teniendo que pegar la pieza al cockpit para asegurar mejor los trabajos posteriores, cortar, rellenar y alisar….y pensar en otra posición de los imanes. Mientras tanto, le puse dos tubos delante por donde pasarán los vástagos de la bisagra: But it didn’t go well, and in the end the cockpit trim was damaged (left piece in the previous photo), and I had to glue the piece to the cockpit to better secure the later works, cut, fill and smooth …. and think of another position for the magnets. In the meantime, I put two tubes in front where the hinge rods will pass through: 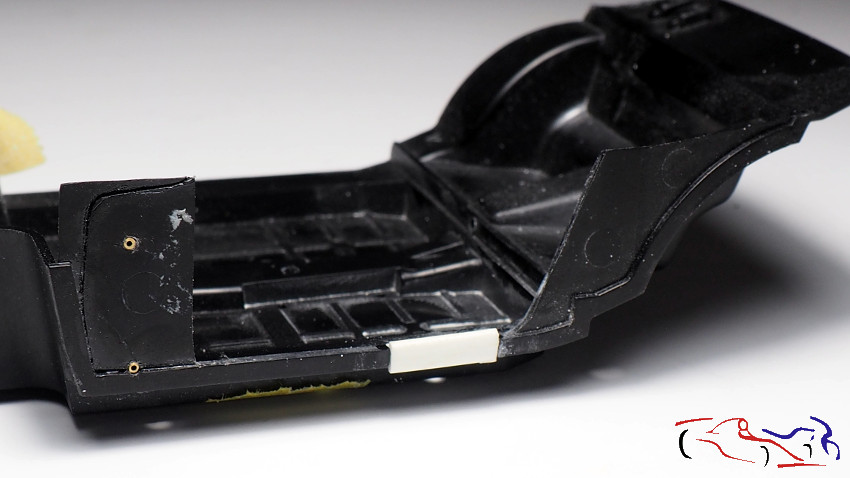 SI vemos el interior de la carrocería, podemps observar el marco interior de la puerta, y la masilla epoxy puesta para rellenar los huecos: If we look inside the bodywork, we can see the inner door frame, and the epoxy putty used to fill the holes: 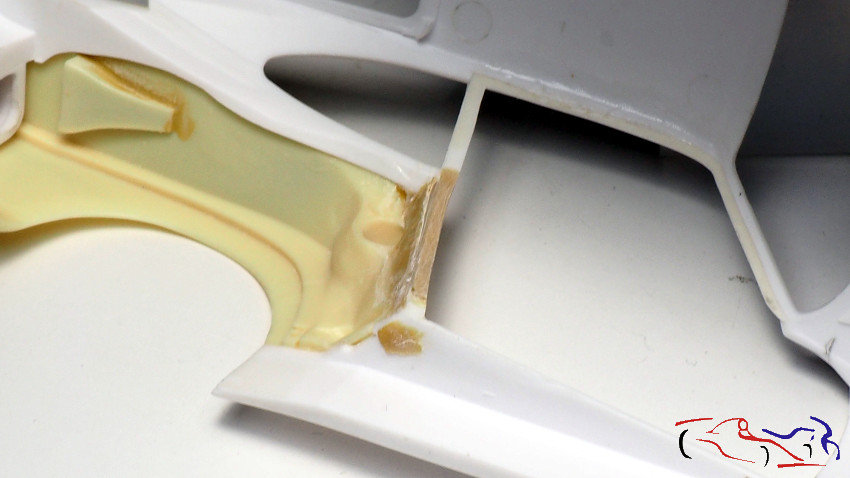 Una vez pegado el guarnecido en la puerta, podemos tapar el hueco del primer imán, y ver el nuevo imán, más pequeño, puesto en el lateral trasero de la puerta. Once the trim has been glued on the door, we can cover the hole of the first magnet, and see the new, smaller magnet placed on the back side of the door. 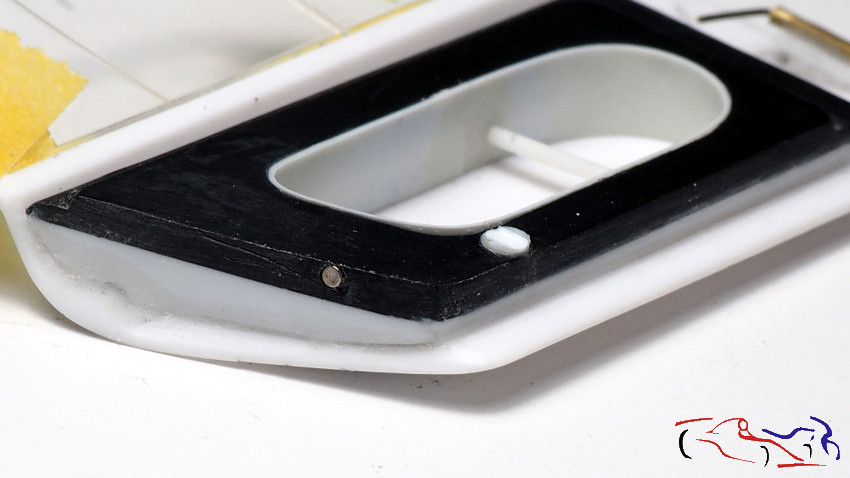 Para el alerón trasero, decido pegar los laterales de fotograbado y ponerle unos alambres por debajo en donde irán las fijaciones. Así podremos trabajarlo sin problemas… For the rear wing, I decide to glue the photo-etched sides and put some wires underneath where the fixings will go. This way we can work it without problems… 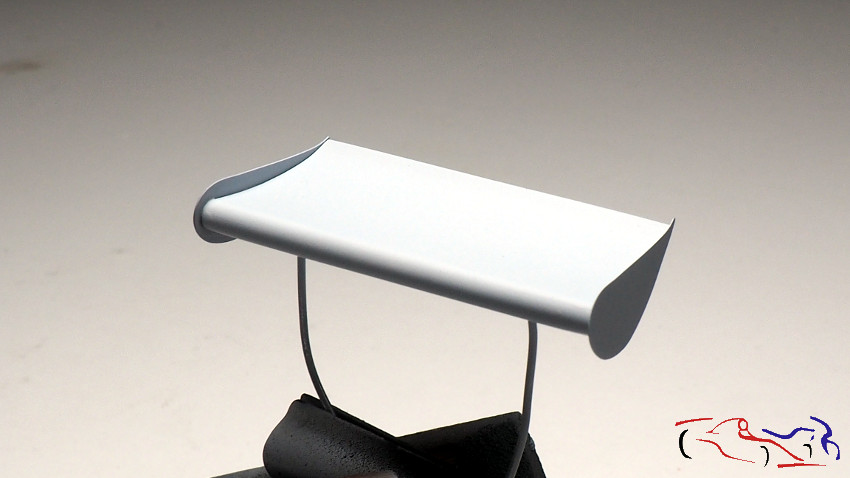 Pasamos al salpicadero, con los botones eliminados para ponerlos de metal o resina. Pasamos al salpicadero, con los botones eliminados para ponerlos de metal o resina. 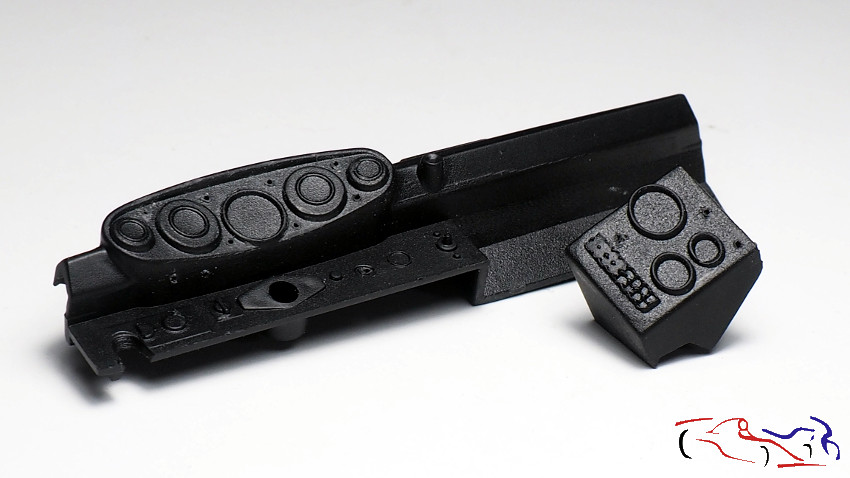 Unas piezas que requieren más detalle son la palanca de cambios y el repartidor de frenada. Al estar la puerta abierta, se va a poder ver mejor… por los que los haremos a scratch. Some parts that require more detail are the gear lever and the brake distributor. As the door is open, you will be able to see them better… for those of us who will scratch them. 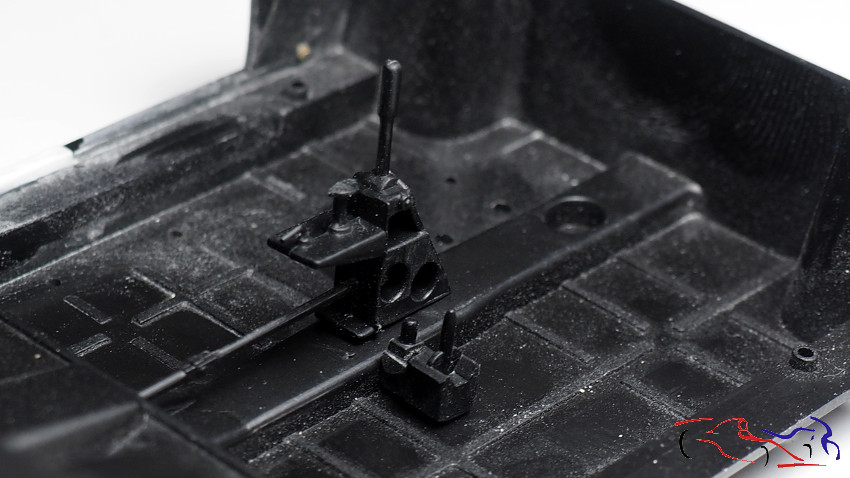 Sobre una plancha de Evergreen, hago el diseño de la nueva base de la palanca: On a sheet of Evergreen, I make the design of the new lever base: 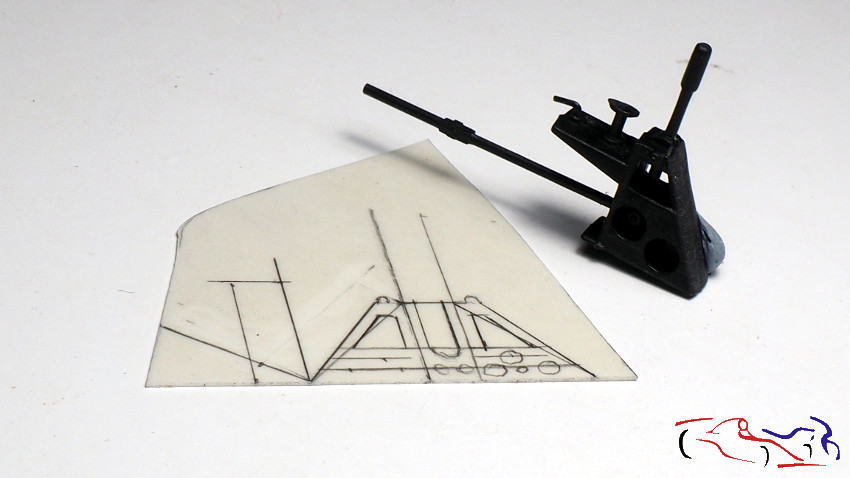 También hago agujeros sobre tubos para empalmar otros de menor tamayo perpendicularmente…. I also drill holes on tubes to join smaller ones perpendicularly …. 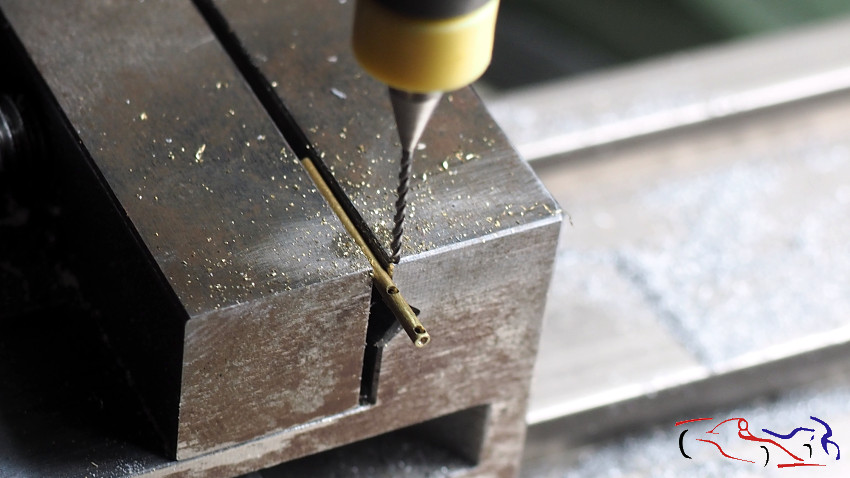 Y aquí está el resultado… And here it is the result… 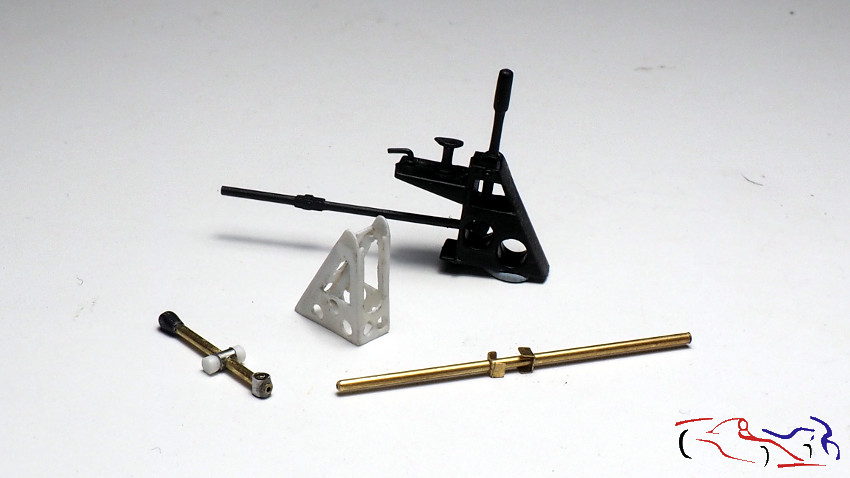 Vamos a explicar lo realizado. – La palanca de cambios. el pomo es de otro modelo, que le hice un agujero en la base para ponerle un vástago para que se coloque en el tubo vertical. Este tubo vertical tiene otro horizontal incrustado, al que le he puesto en los extremos dos trozos de plástico torneados hacia el centro, para que simule que tiene posibilidad de movimiento. Ese tubo transversal es el eje de donde la palanca de cambios bascula. En al parte inferior, tenemos otro tubo pero puesto en disposición perpendicular al de arriba, y conecta la paanca con la barra que va a la caja de cambios. Y en el medio de ésta, lleva un cardan simulado, realizado con dos laminas de latón contrapuestas, como se ve en la foto anterior. Esta palanca irá puesta en la pieza d eplástico que hay en la tablilla de madera. – El repartidor de frenado. Untubo vertical, con otro en su interior, que en la parte inferior, atraviesa otro tubo más ancho horizontalmente. En cada extremo, he puesto dos trozos de tubo de aluminio, a los que he aplastado el extremo, redondeándolo y haciéndoles un agujero para que un tornillo les atraviese y fije. Estos dos trozos d ealuminio, conectarán con los cables que van al repartidos de frenada. Esta palanca, irá colocada entre las otras piezas de metal que están sobre las maderas. En concreto, la de la derecha es la que en realidad tiene los pasos para fijar la palanca. Let’s explain what has been done. – The gear lever. The knob is from another model, which I made a hole in the base to put a rod to be placed in the vertical tube. This vertical tube has another horizontal tube embedded in it, to which I have put two pieces of plastic turned towards the centre at the ends, to simulate the possibility of movement. This transversal tube is the axis where the gear lever tilts. In the lower part, we have another tube but placed perpendicular to the one above, and it connects the lever with the rod that goes to the gearbox. And in the middle of it, there is a simulated cardan shaft, made with two opposing brass plates, as shown in the previous photo. This lever will be placed on the plastic piece on the wooden board. – The brake distributor. A vertical tube, with another one inside it, which in the lower part, crosses another wider tube horizontally. At each end, I have put two pieces of aluminium tube, which I have flattened the end, rounding it and making a hole for a screw to go through and fix them. These two pieces of aluminium will be connected to the cables that go to the braking system. This lever will be placed between the other metal pieces that are on the wood. Specifically, the one on the right is the one that actually has the steps to fix the lever. 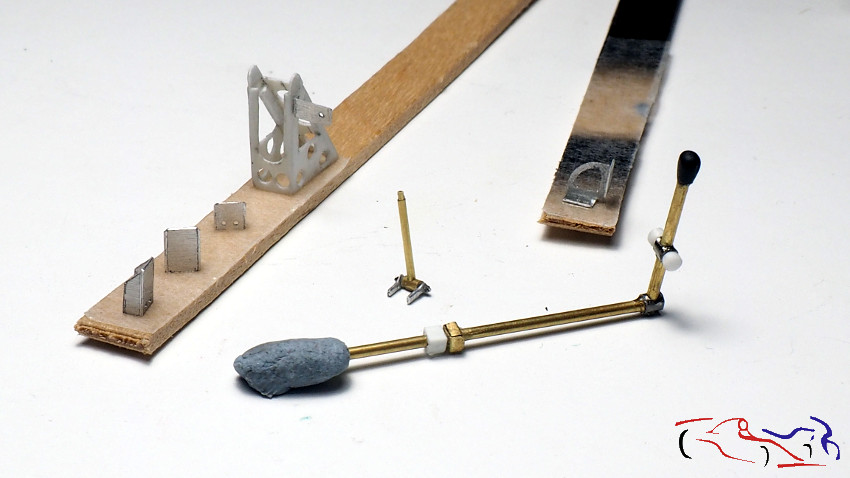 Y aquí están, una vez imprimados y pintados con Metal Aluminio de Zero, y junto a las piezas originales. Faltan los remaches de fotograbado en las zonas de giro. And here they are, once primed and painted with Zero’s Metal Aluminium, and next to the original parts. The photoetched rivets are missing in the pivot areas. 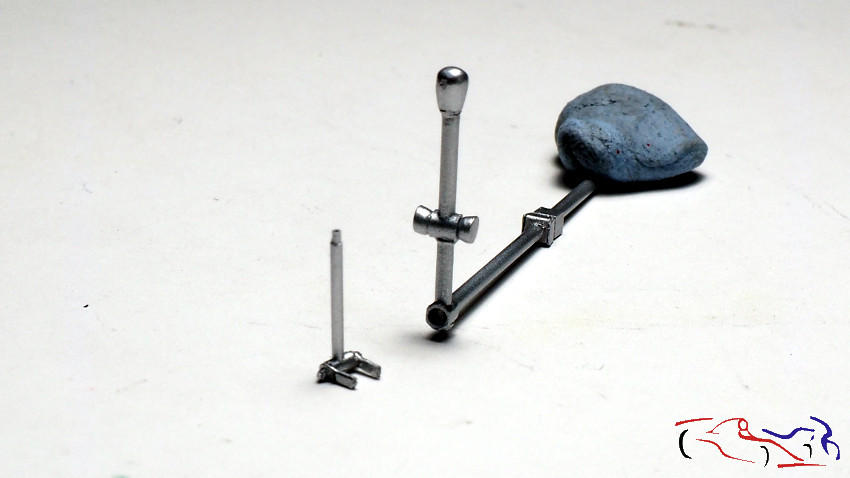  Otra pieza que hay que hacer es un tirador metálico que tienen todos los Porsche (936, 934, 935, 956, 962), que tiene dos mangueras que van hacia el motor, y desconozco su motivo. Para hacerla, ponemos una varilla de plástico en el minitaladro, y a darle forma con la cuchilla, limas y lijas!! Another part to be made is a metal handle that all Porsche’s have (936, 934, 935, 956, 962), which has two hoses that go towards the engine, and I don’t know why. To make it, put a plastic rod in the mini-drill, and shape it with the blade, files and sandpaper! 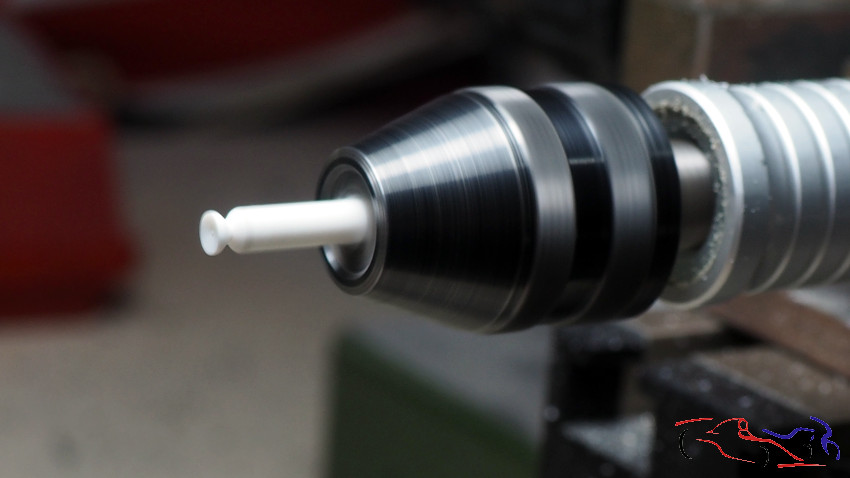 Pasamos al chasis, que pintamos con negro semi mate de Zero. decir que al probarlo, he visto que la pintura estaba un poco granulosa, como la texturizada, y he pensado que le podía venir bien, incluso después, tiene como ciertos rastros marrones…..¿?: We moved on to the chassis, which we painted with semi-matt black from Zero. I have to say that when I tested it, I saw that the paint was a bit grainy, like the textured one, and I thought it could be good for it, even afterwards, it has some brown traces …..¿?  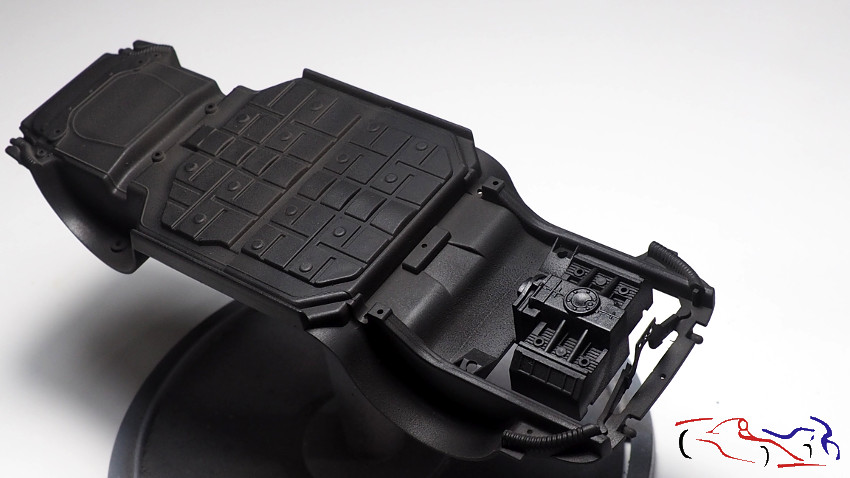 Pero para el habitáculo, asiento y salpicadero, he usado otra pintura semimate, también de Zero pero en buenas condiciones!! But for the cabin, seat and dashboard, I used another semi-matt paint, also from Zero but in good condition!!! 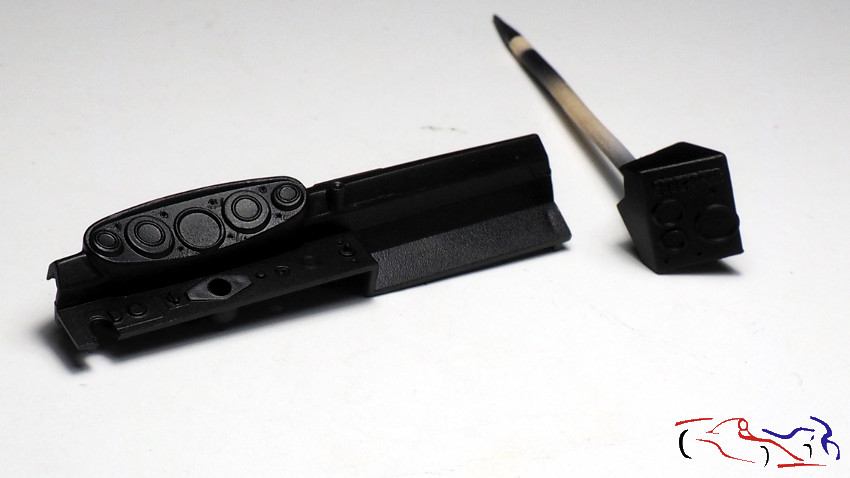 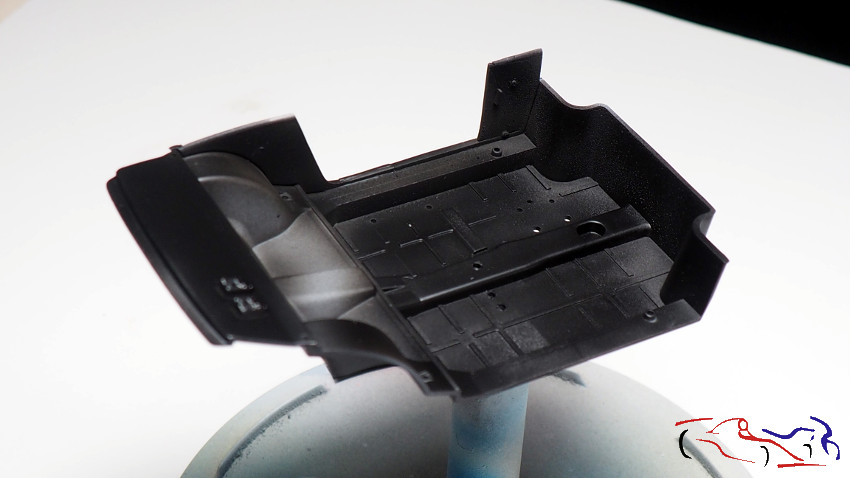 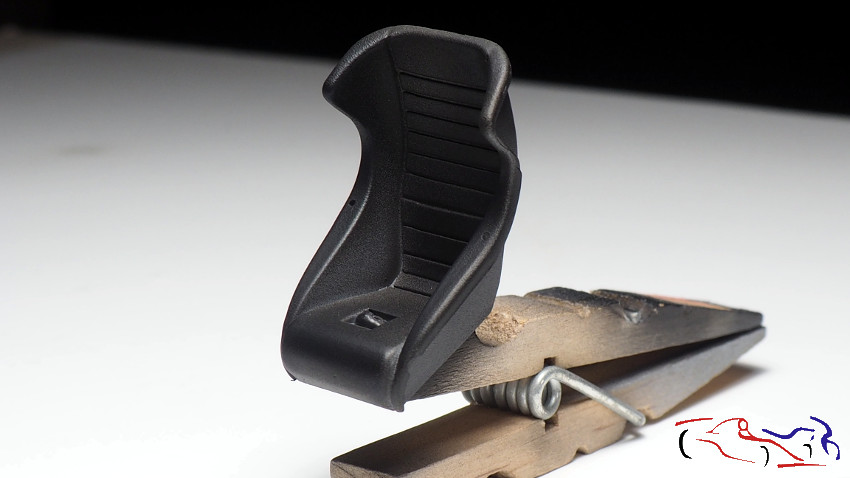 Ahora pasamos al arco de seguridad, al que después de pegado, le añado la típica barra horizontal que llevan todos los Porsche delante del piloto y debajo del salpicadero. Se fija con unos pernos metálicos que le he practicado: Now we move on to the roll bar, to which, after gluing, I add the typical horizontal bar that all Porsche cars have in front of the driver and under the dashboard. It is fixed with some metal bolts that I have made: 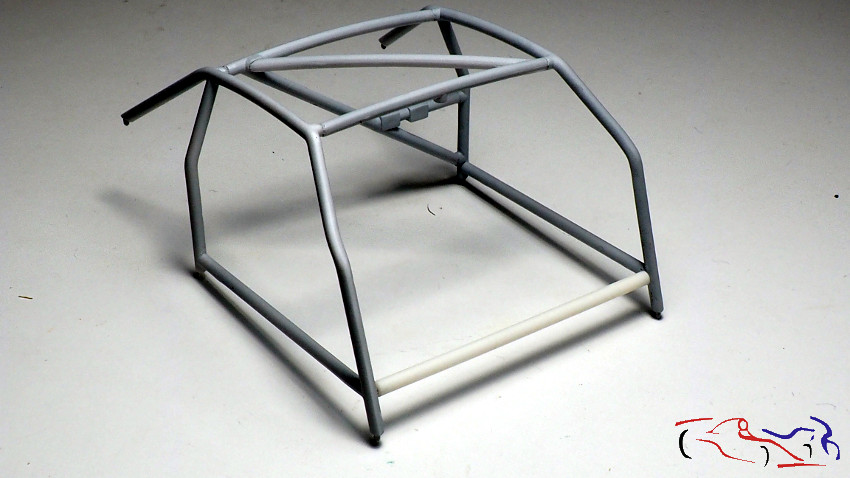 Mas detalles, en esta caso en los turbos: les faltaba esas plaquitas de latón que le he añadido! More details, in this case on the turbos: they were missing those little brass plates that I have added! 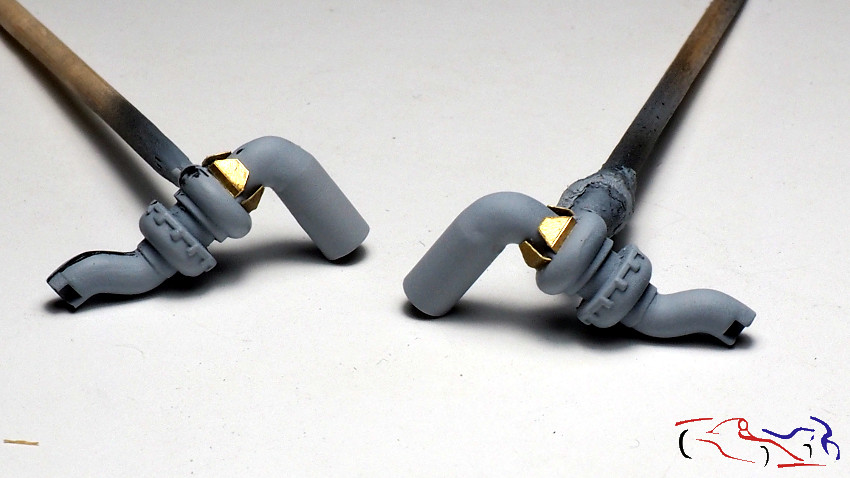 Y como ya he imprimado y pintado algunas piezas, como no iba a estar la carrocería en ese proceso!! Y después de la primera mano, se han tenido que retocar algunos detalles…. And as I have already primed and painted some parts, how could the bodywork not be in the process! And after the first coat, some details had to be retouched…. 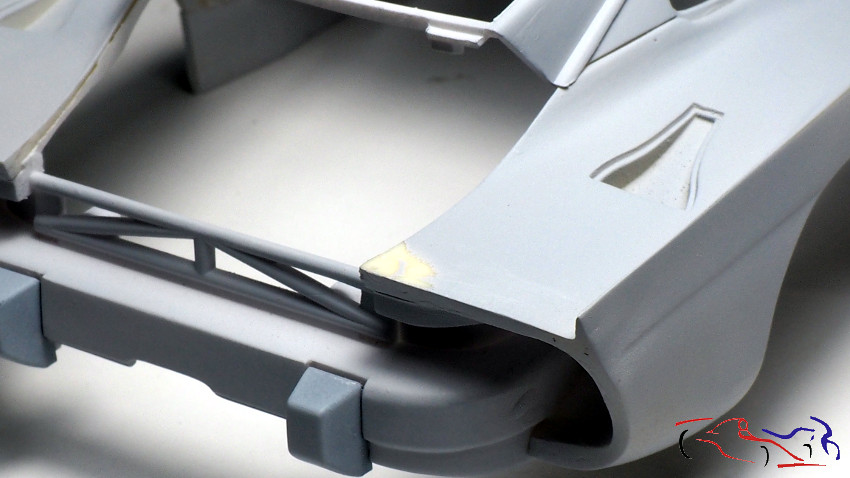 ….para terminar la carrocería con tres manos de imprimación Gravity Spain!! ….for finishing, the body with 3 layers of Gravity Spain primer!! 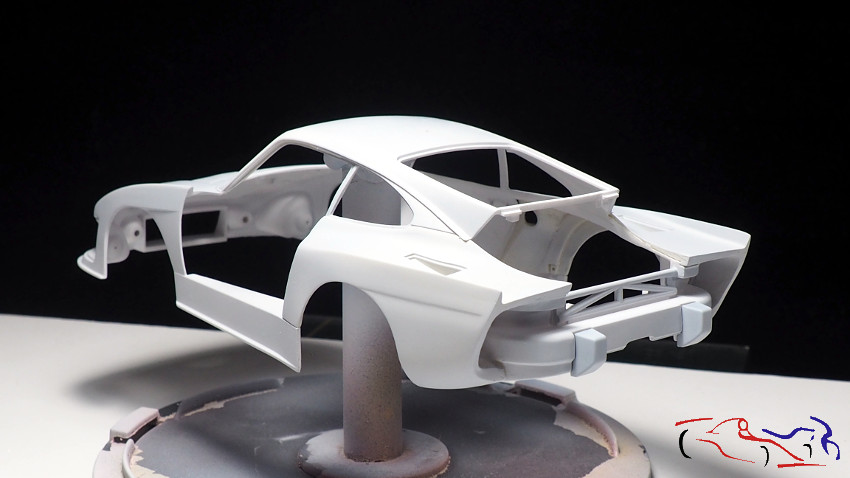    Y ya, el siguiente paso será empezar a dar color y pegar piezas!! Gracias por ver y comentar!! And now, the next step will be to start colouring and gluing the pieces! Thanks for watching and commenting! Last edited by JesusM; 06-03-2021 at 07:50 AM. Reason: Wrong translation!! |
|
|
|
|
|
06-08-2021, 03:43 AM
|
#11 | |
|
AF Enthusiast
Thread starter
Join Date: Mar 2009
Location: Madrid
Posts: 650
Thanks: 109
Thanked 68 Times in 67 Posts
|
Re: Porsche 935 K3 Coca Cola 1/24 Nunu
Como dije en mi anterior post, lo siguiente sería empezar a dar color, y aquí empezamos con la carrocería. Después de imprimar con Gravity, de acuerdo con la decoración elegida, el color debía ser el rojo Coca Cola, y para ello usé la referencia GC-1180, Coca Cola Red del mismo fabricante. Di una primera capa muy fina, y después dos capas más húmedas. Como iba pintando varias piezas además de la carrocería, el tiempo de espera entre capas era el que me daba pintar el resto de piezas. Muy fácil de pintar, y deja al final, una superficie que no requiere barniz para poner las calcas. Aun así, hay que pintar alguna cosa en blanco para sustituir una calca
. Podéis ver en la última, foto, otras piezas pintadas: la puerta izquierda, el alerón trasero y su soporte:
As I said in my previous post, the next thing to do was to start giving colour, and here we started with the bodywork. After priming with Gravity, according to the chosen decoration, the colour had to be Coca Cola red, and for this I used the reference GC-1180, Coca Cola Red from the same manufacturer. I applied a very thin first coat, and then two more wet coats. As I was painting several parts in addition to the bodywork, the waiting time between coats was the time I could paint the rest of the parts. Very easy to paint, and at the end, it leaves a surface that does not require varnish to put the decals on. Even so, it is necessary to paint something in white to replace a decal . You can see in the last picture, other painted parts: the left door, the rear wing and its support:  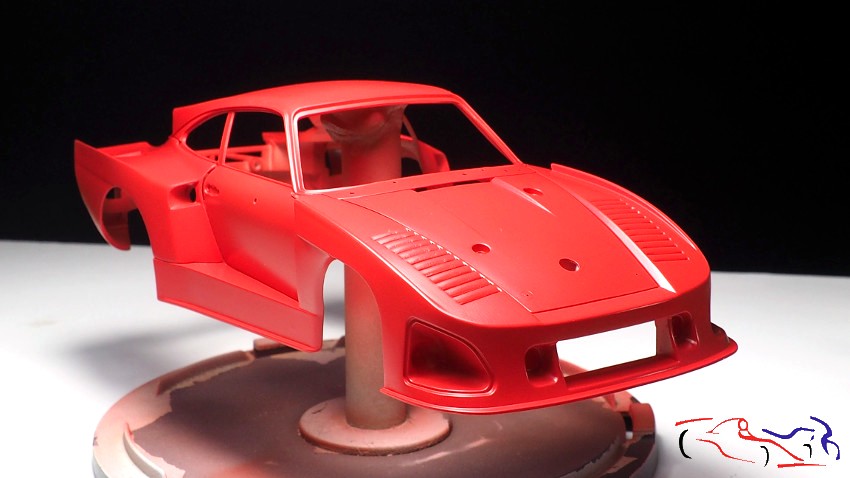 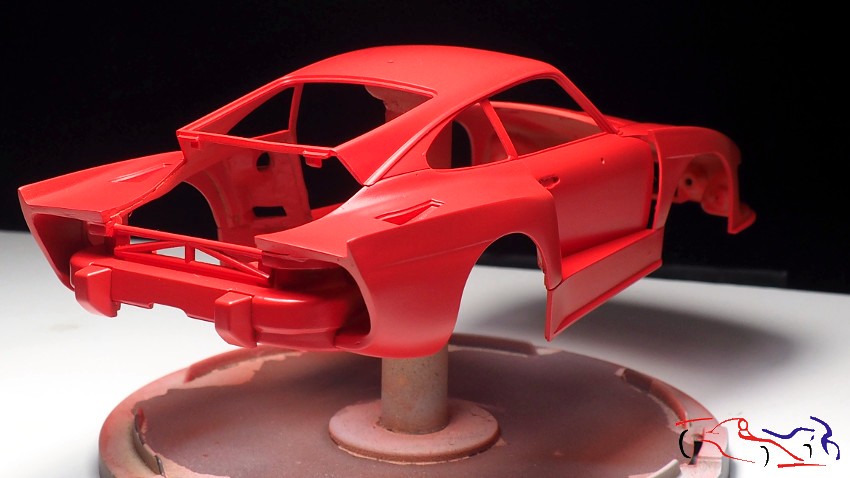 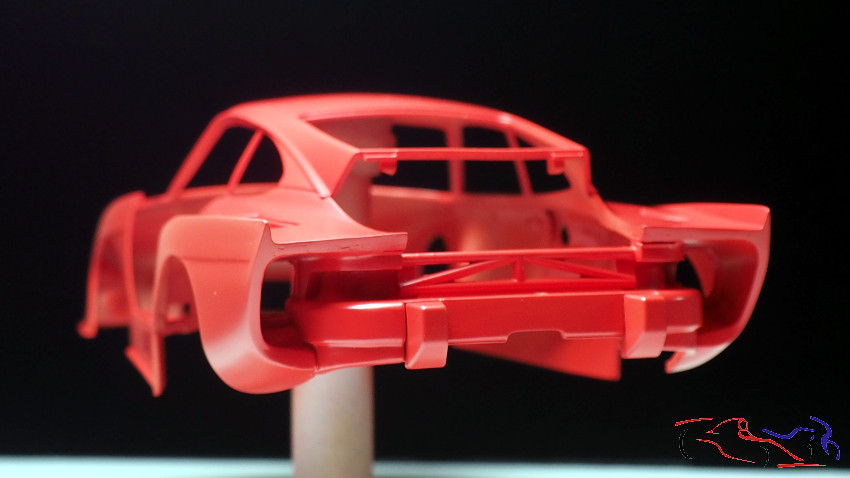 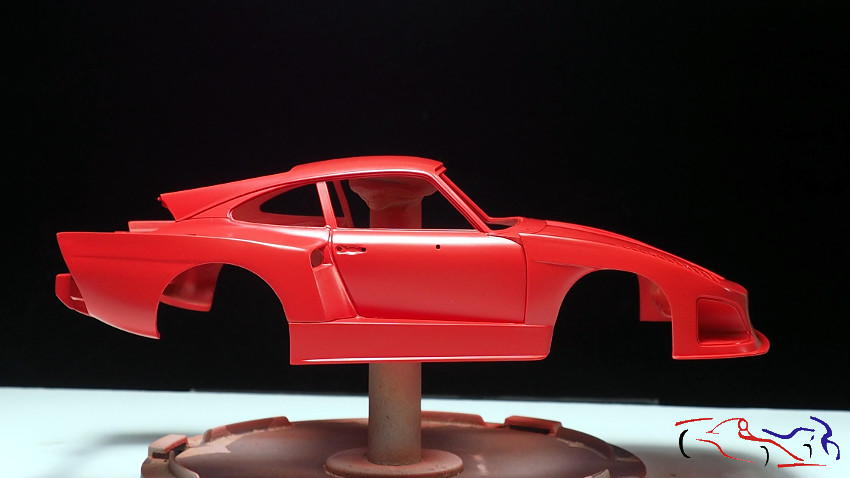 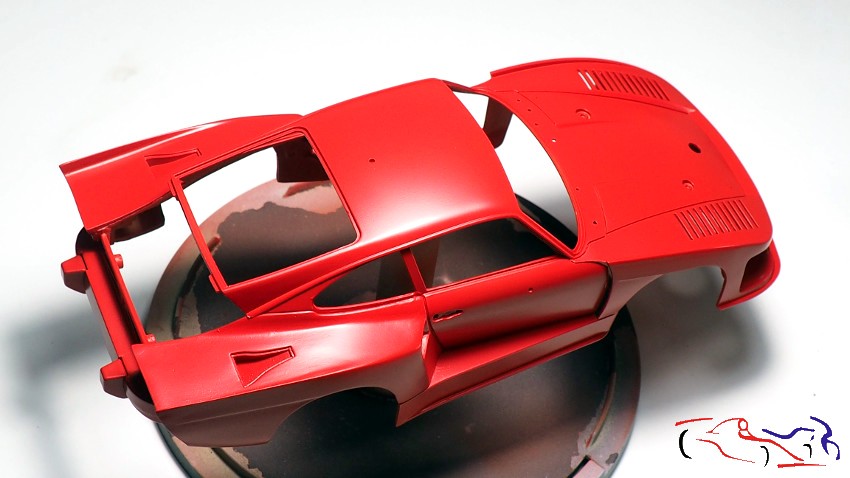 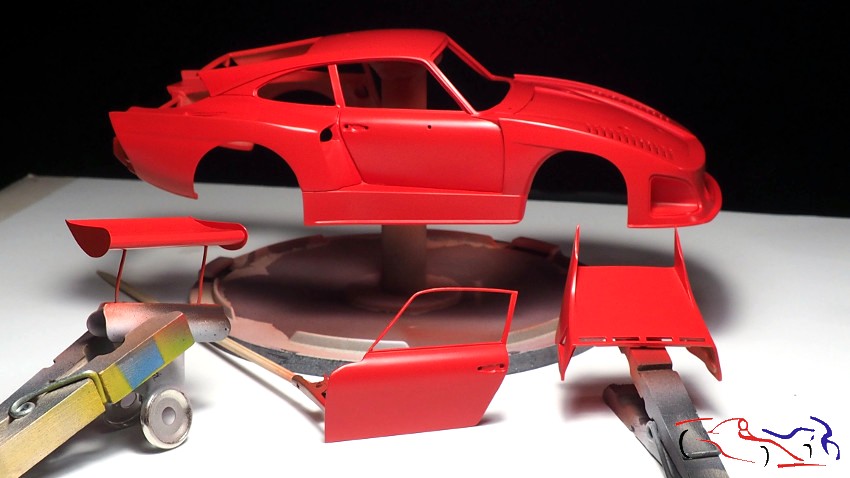 Después de imprimar muchas piezas, hay que darles color. Aquí vemos las barras de seguridad, con la delantera transversal que he añadido, todo situado sin pegar en el habitáculo. Fue pintada con el Metal Aluminium de Zero: After priming many parts, they need to be coloured. Here we see the safety bars, with the front cross bar that I have added, all placed without glue in the passenger compartment. It was painted with Zeros Metal Aluminium:  Y más piezas pintadas con el mismo aluminio. Muchas son la base para seguir pintando con otros colores, como negro satinado o metal quemado: And more pieces painted with the same aluminium. Many are the basis for further painting with other colours, such as satin black or burnt metal: 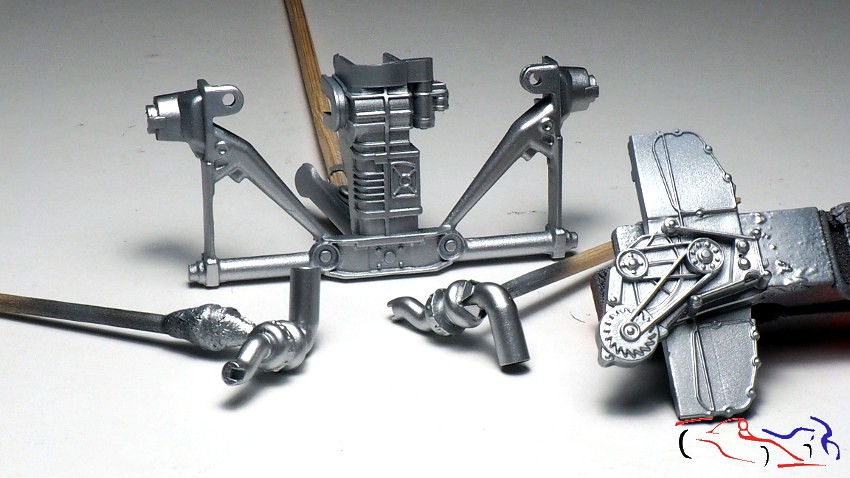 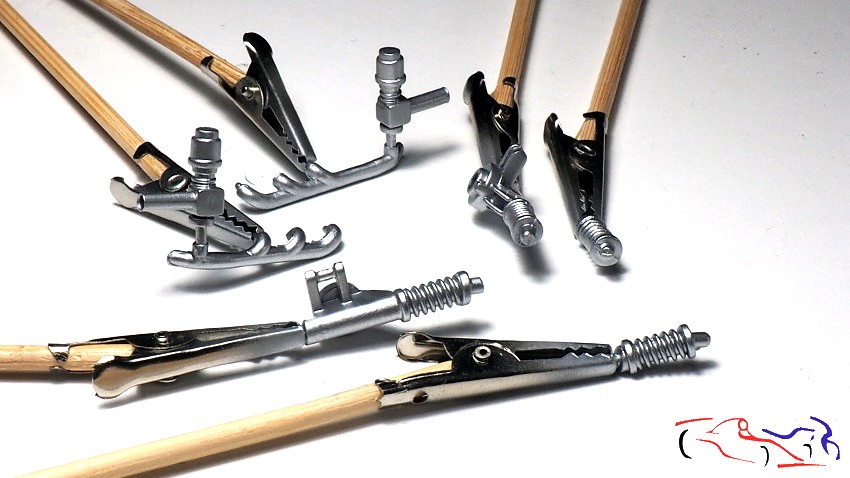 En el caso de los amortiguadores, he decidido utilizar el rotulador permanente negro para pintar los muelles, sobre el aluminio. El resultado es muy limpio si no los vas a sustituir por un muelle real, puesto que en este caso, poco se van a ver. In the case of the shock absorbers, I decided to use the black permanent marker to paint the springs on the aluminium. The result is very clean if you are not going to replace them with a real spring, as in this case, little will be visible. 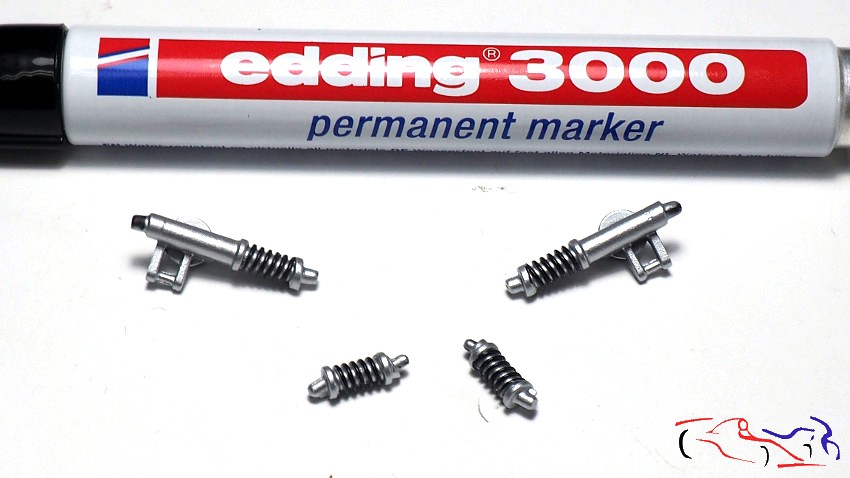 Y terminamos con el chasis. Una vez enmascarado, y con el mismo aluminio, se aplica sobre el cuerpo del motor, para terminar con el Panel Liner negro de Tamiya. En el resto del chasis, he aplicado un pincel seco con los nuevos colores de MIG para estos casos. En concreto, he usado el AMIG0622 DRYBRUSH Gun Metal, aplicándolo desde delante hacia detrás: In the case of the shock absorbers, I decided to use the black permanent marker to paint the springs on the aluminium. The result is very clean if you are not goAnd we finish with the chassis. Once masked, and with the same aluminium, it is applied on the engine body, to finish with the black Tamiya Panel Liner. In the rest of the chassis, I applied a dry brush with the new MIG colours for these cases. Specifically, I have used the AMIG0622 DRYBRUSH Gun Metal, applying it from front to back:ing to replace them with a real spring, as in this case, little will be visible. 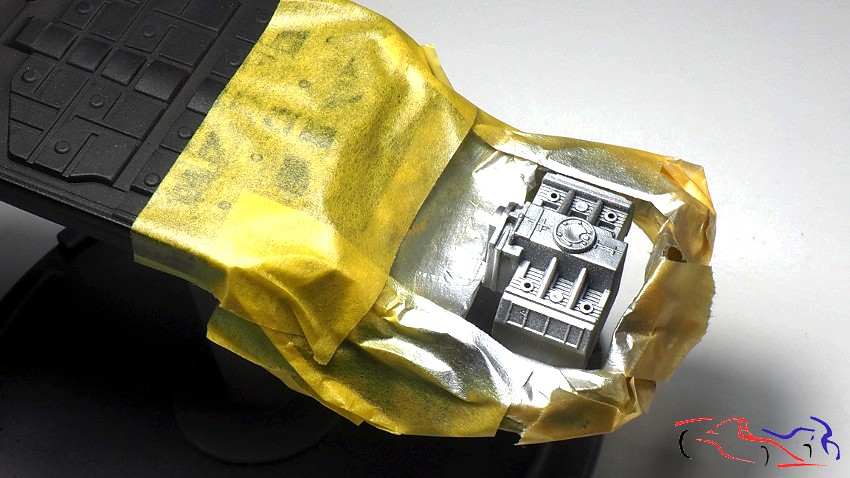 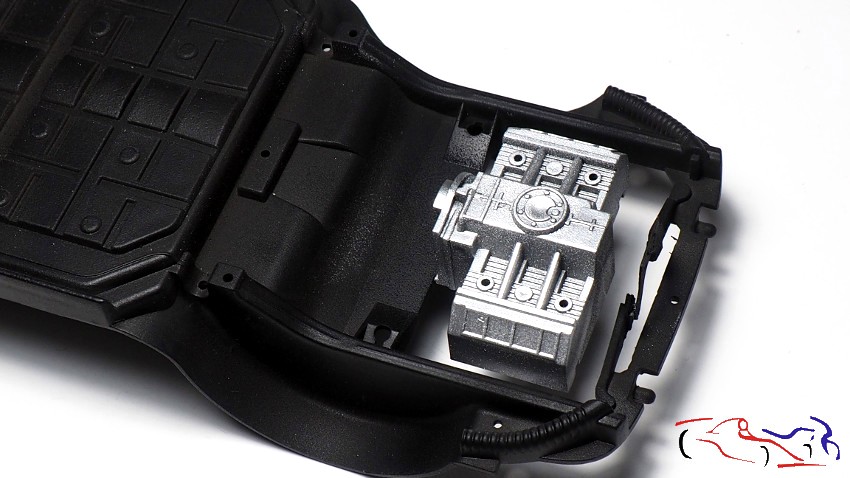 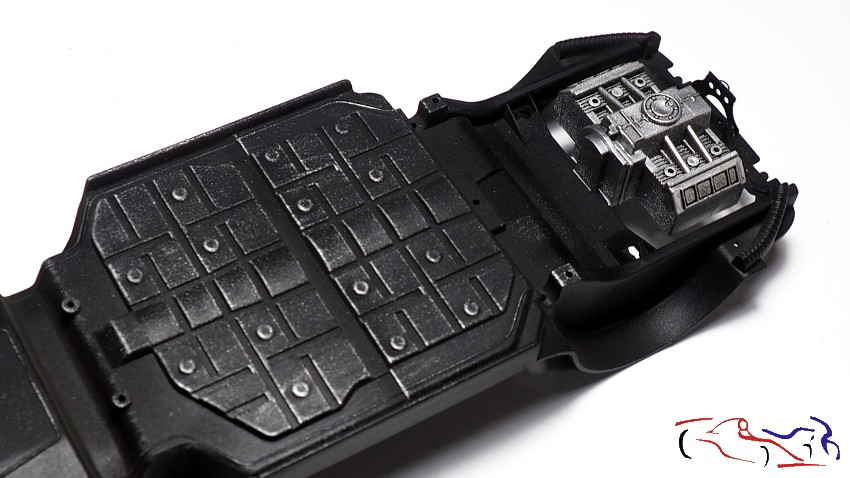 Y aunque a las piezas les queda aun algunos detalles de pintura, con el color se ve todo mucho mejor!! Gracias por ver y comentar!! And although the pieces still have some painting details left, with the colour it looks much better! Thanks for watching and commenting! |
|
|
|
|
|
07-15-2021, 02:18 AM
|
#12 | |
|
AF Enthusiast
Thread starter
Join Date: Mar 2009
Location: Madrid
Posts: 650
Thanks: 109
Thanked 68 Times in 67 Posts
|
Re: Porsche 935 K3 Coca Cola 1/24 Nunu
Desde que puse el anterior post, he ido haciendo muchas cosas, incluyendo el trabajo realizado en la carrocería. En esta actualización, he seleccionado solo el proceso de la carrocería, dejando el resto para el siguiente artículo.
Since the previous post, I have been doing a lot of things, including the work done on the bodywork. In this update, I have selected only the bodywork process, leaving the rest for the next article. Y empezamos preparando la carrocería para pintar la clásica banda blanca de CocaCola. De acuerdo con las calcas, podemos poner esta banda con una calca, o pintarla de blanco, para lo cual, Decalcas proporciona la correspondiente máscara. La ponemos en su lugar y tapamos el resto. Decir también que existe la posibilidad de pintar toda la carrocería de blanco, y poner la máscara para tapar la linea y depués, pintar de rojo. Eso había pensado al principio, pero para qué pintar toda la carrocería, desperdiciar todo ese blanco para solo esa línea? Cada cual que haga lo que más le interese y que la posibilidad está ahí!. And we start by preparing the bodywork to paint the classic white CocaCola stripe. According to the decals, we can put this band with a decal, or paint it in white, for which Decalcas provides the corresponding mask. We put it in place and cover the rest. There is also the possibility of painting the whole bodywork in white, and put the mask to cover the line and then paint it in red. Thats what I had thought at the beginning, but why paint the whole bodywork, wasting all that white color for just that line? Everyone can do what he/she wants, and the possibility is there. 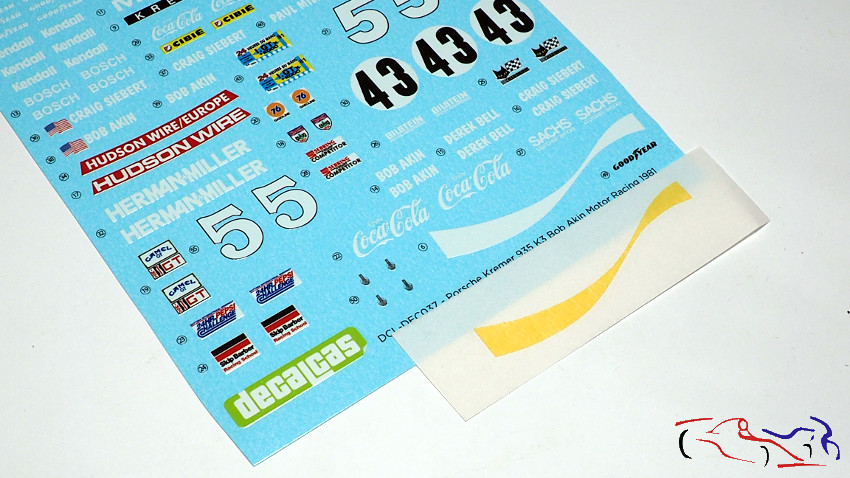 Aquí vemos la carrocería lista para pintar de blanco: Here we see the bodywork ready to be painted white: 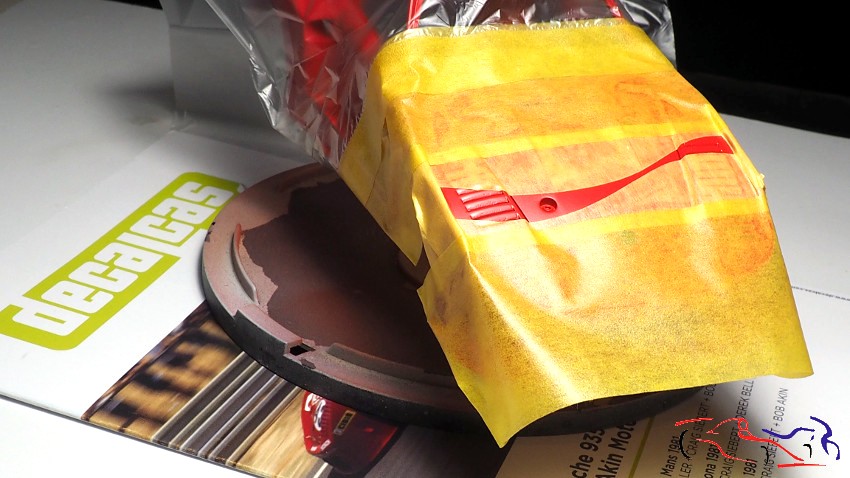 Y aquí, ya está pintado: And here is already painted: 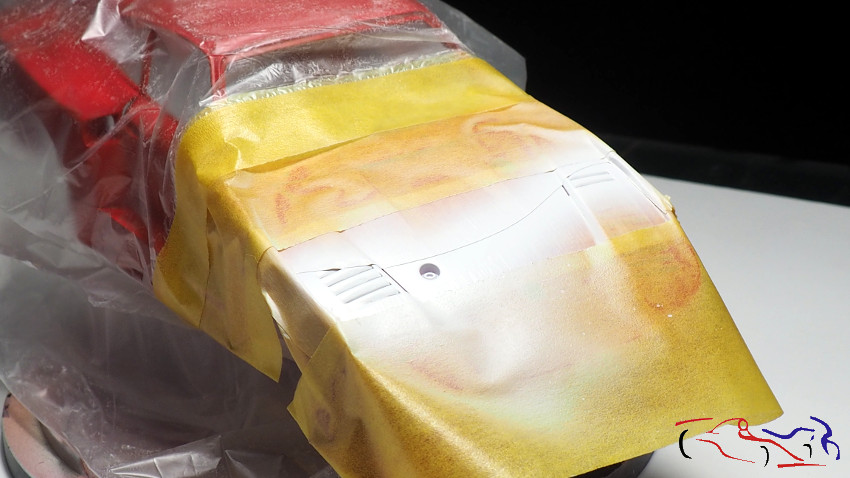 Y este es el resultado quitando las máscaras: And here is the result removing the mask: 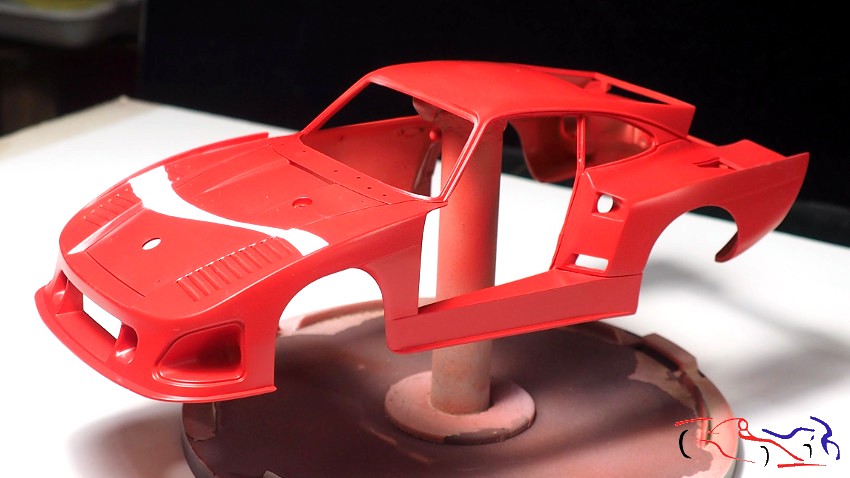 Y una vez pintado, pasamos una lija con grano 3000 al agua para eliminar el exceso de pintura blanca que se deposita a lo largo de la máscara: Once painted, we sand it with the mask with 3000 grit sandpaper and water to remove the excess white paint that is deposited along the mask: 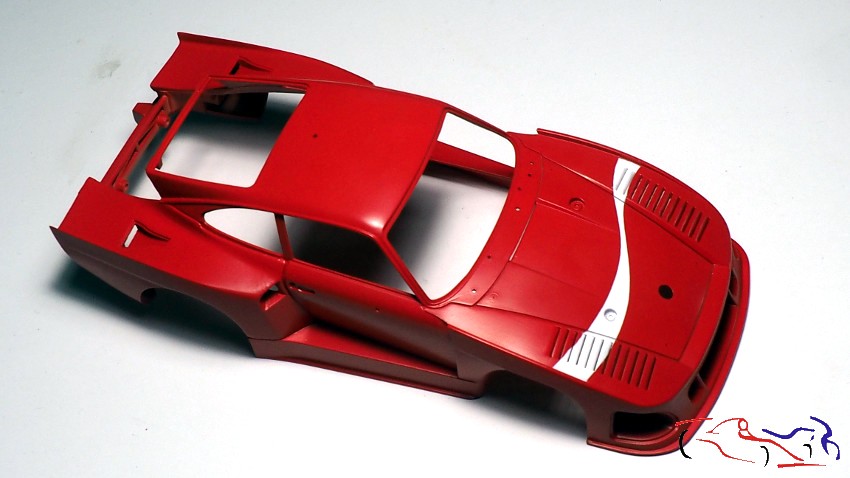 Pero no siempre salen las cosas perfectas y al lijar, se me fue la mano en los dos círculos que pongo en la imagen del capó, por lo que enmascaré lo blanco y pinté un poco más con rojo sin acercarme a la máscara, para evitar una línea roja con exceso de pintura: But things dont always turn out perfectly and when sanding, I got a little overdone that you can see in the two circles I put in the bonnet image, so I masked the white part and painted it a little more with red without getting too close to the mask, to avoid a red line with excess paint: 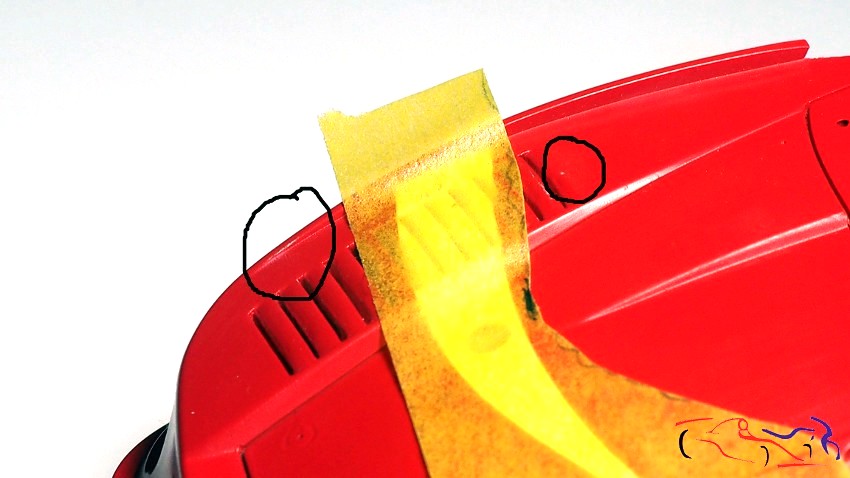 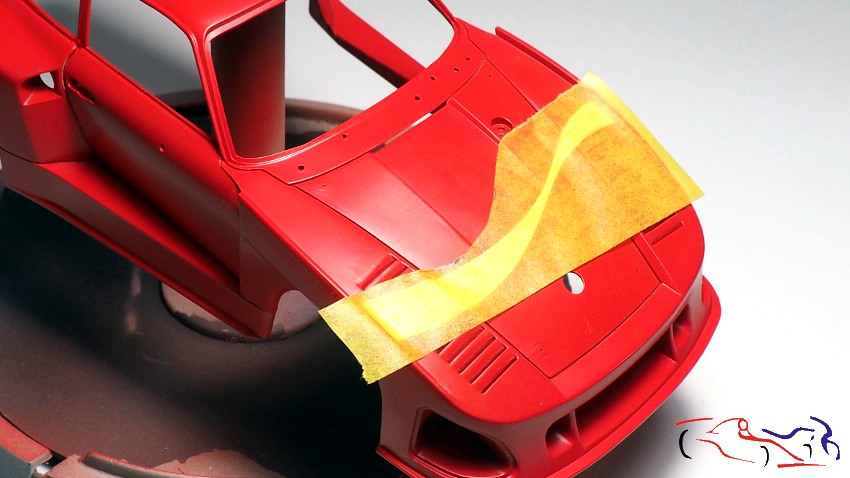 Y ya, llega el momento de poner las calcas. Como he lijado la carrocería, su superfici está lo suficientemente lisa, para pone las calcas directamente sin barnizar o lacar: And now its time to put the decals on. As I have sanded the bodywork, its surface is smooth enough to put the decals on directly without varnishing or lacquering: 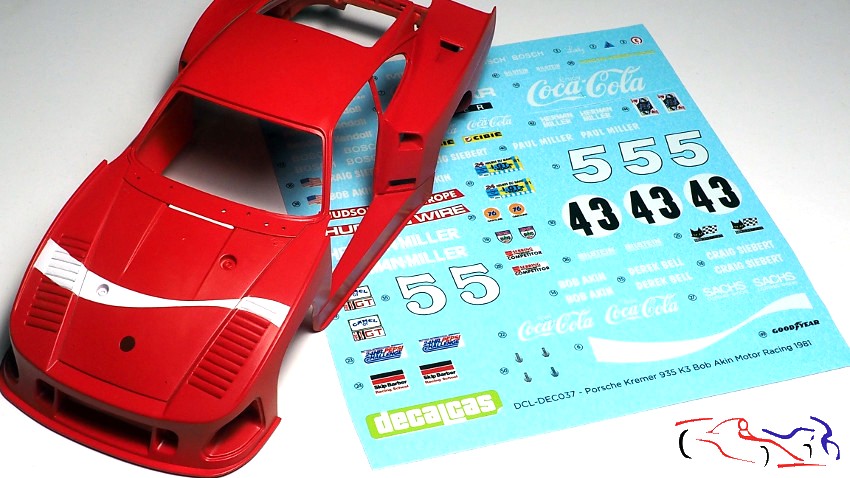 Las calcas de Decalcas se ponen bien sin líquidos, solo con agua y siguiendo las instrucciones del fabricante. Decalcas decals can be applied without liquids, only with water and according to the manufacturers instructions. 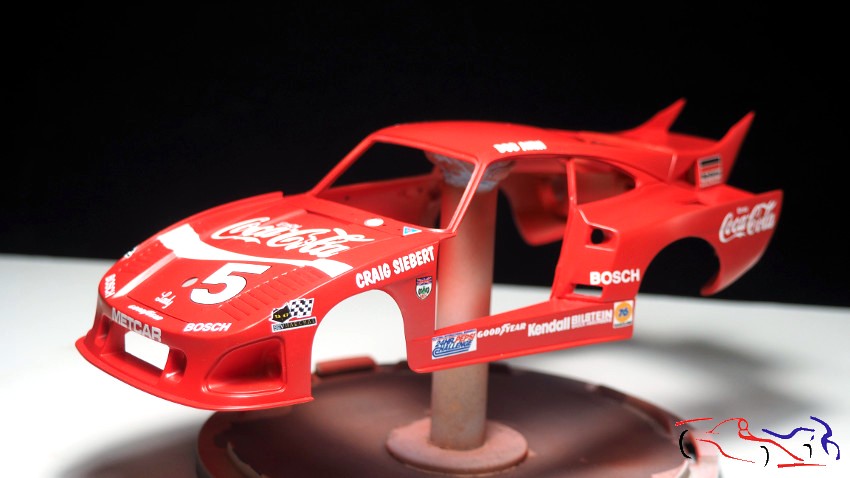 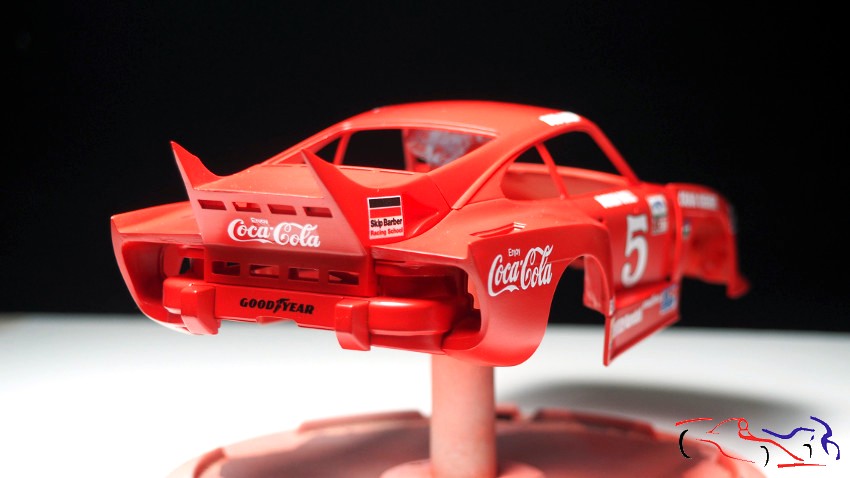 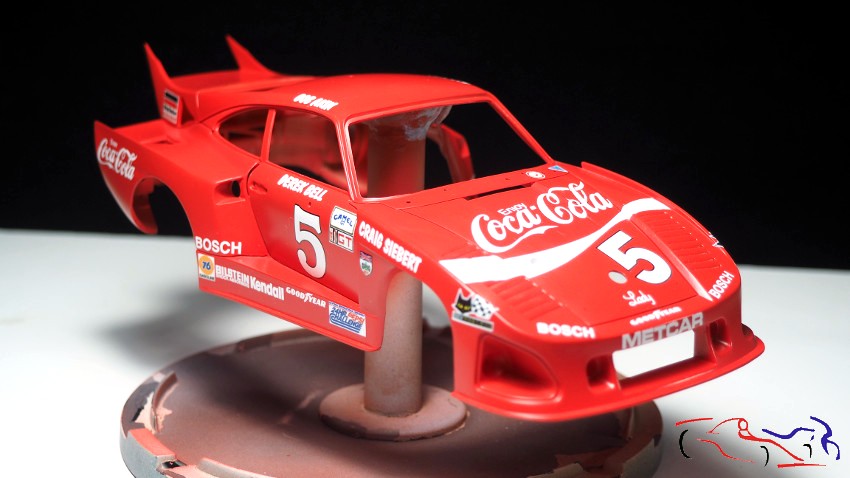   Una vez estén todas las calcas puestas, lo disponemos todo para lacar: Once all the decals are in place, we prepare everything for lacquering: 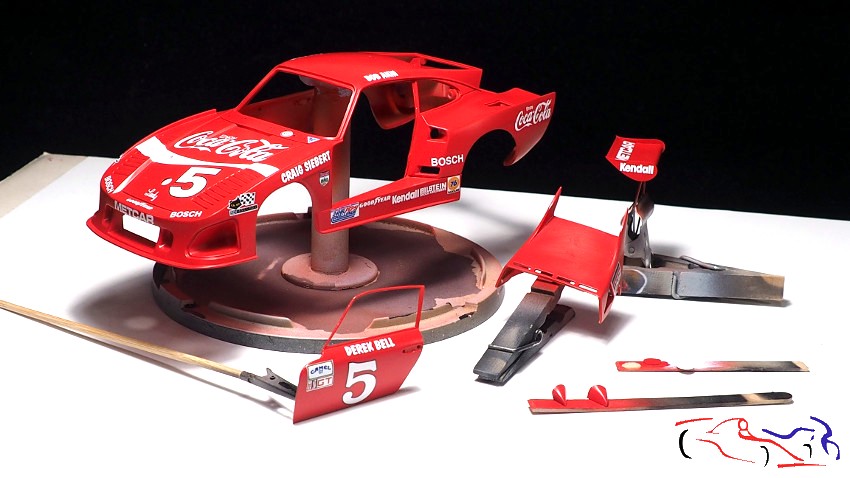 En este caso, he usado la laca Number5 que me enviaron para probar, y como me pareció muy buena en los test, así la utilicé en este coche. EL proceso de la laca el habitual en la proporción 3  1 : una capa muy fina sin que quede brillo e incluso con apariencia que tuviera polvo, una segunda más húmeda donde se vea brillo, y una tercera, con un poco más de disolvente, y dejando entre cada capa 5 minutos: 1 : una capa muy fina sin que quede brillo e incluso con apariencia que tuviera polvo, una segunda más húmeda donde se vea brillo, y una tercera, con un poco más de disolvente, y dejando entre cada capa 5 minutos:In this case, I used the Number5 lacquer that was sent to me for testing, and as it seemed very good in the tests, I used it on this car. The process of the lacquer is the usual 3 1 ratio: a very thin coat with no shine and even with a dusty appearance, a second wetter coat where you can see the shine, and a third, with a little more solvent, and leaving 5 minutes between each coat: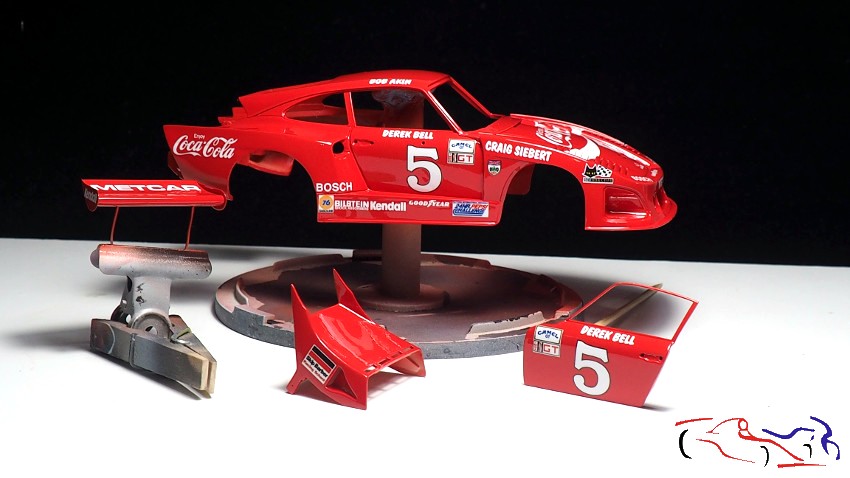 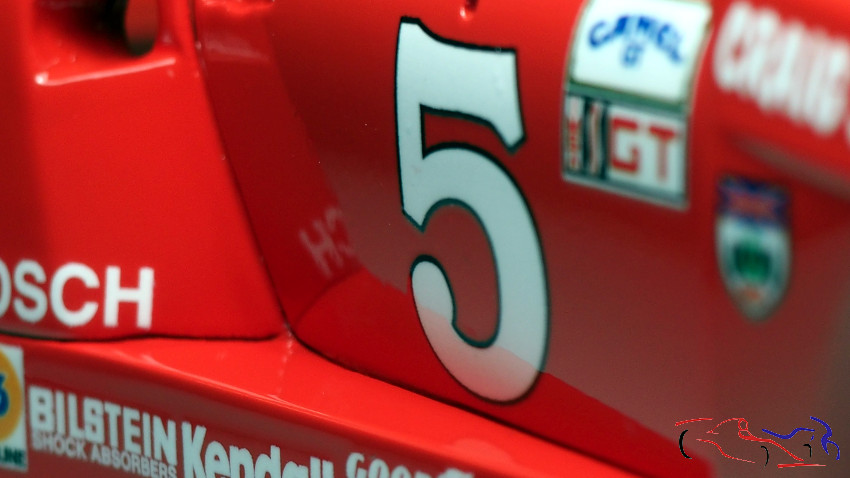 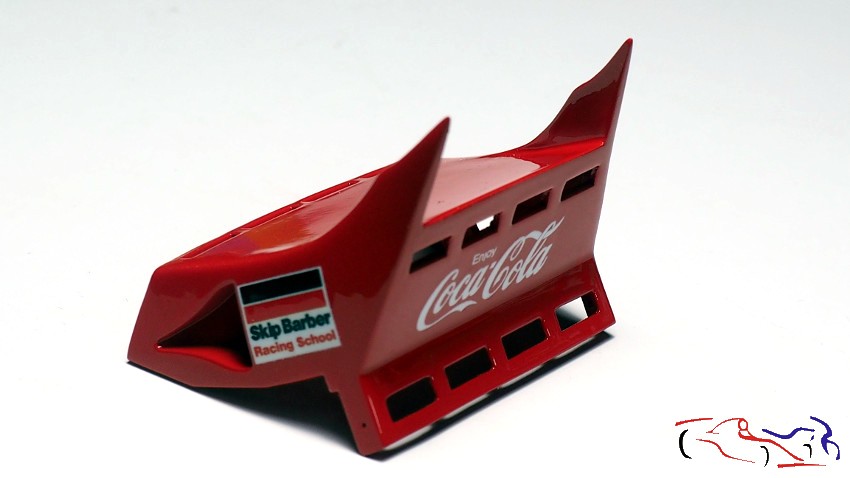 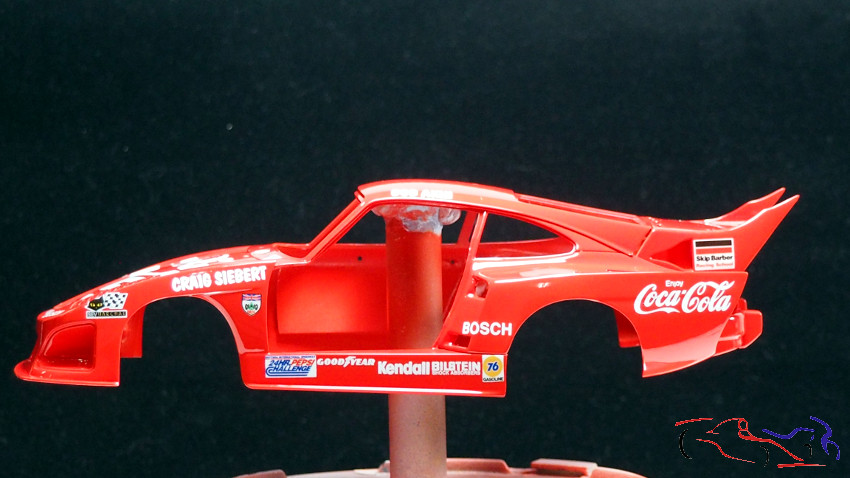   Y al lacar, es muy normal, que alguna pelusa, algún hilo, sea atraida por la laca, como me pasó a mi en alguna parte de la carrocería y en la puerta del conductor: And when lacquering, it is quite normal, that some lint, some thread, is attracted by the lacquer, as it happened to me in some part of the bodywork and in the drivers door:  Por tanto, es hora de pulir. En este proceso, también he utilizado un pulimento nuevo de Number5, testeado antes en otras superficies de prueba. Pero antes de eso, hay que lijar al agua todas las partes que se quieran pulir, con lija 3000 con agua. Este es el resultado: So its time to polish. In this process, I have also used a new polish from Number5, tested before on other test surfaces. But before that, all the parts to be polished have to be wet sanded with 3000 grit sandpaper with water. This is the result:  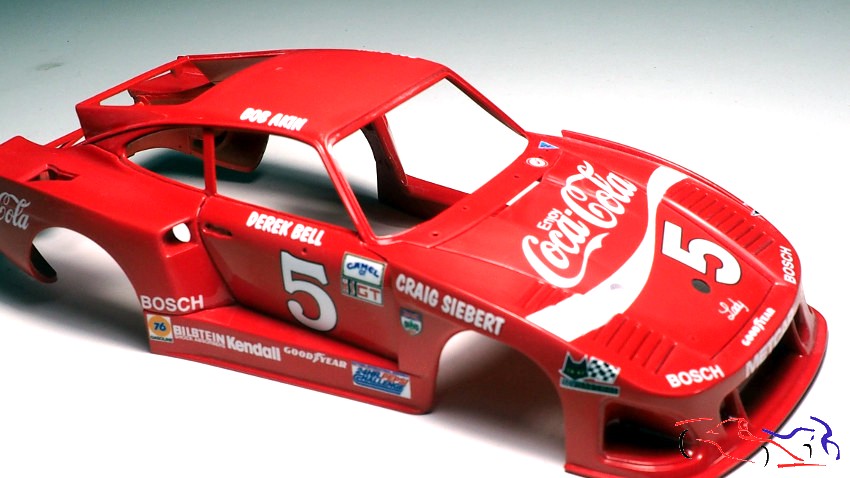 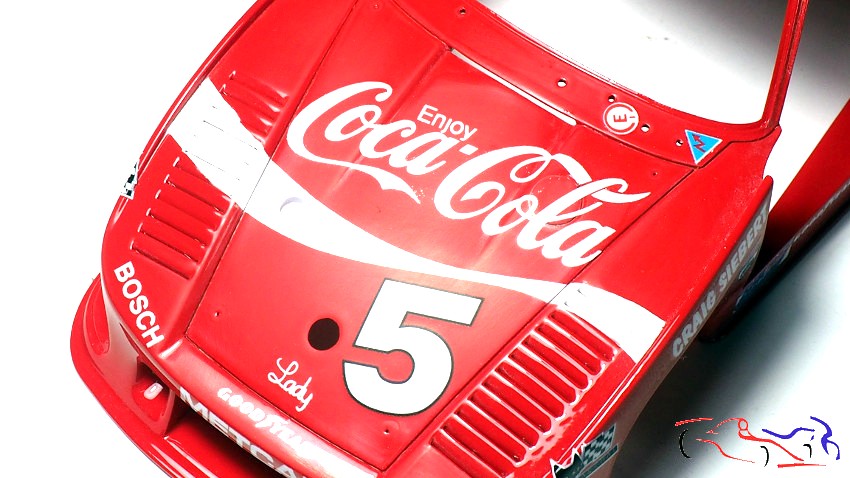 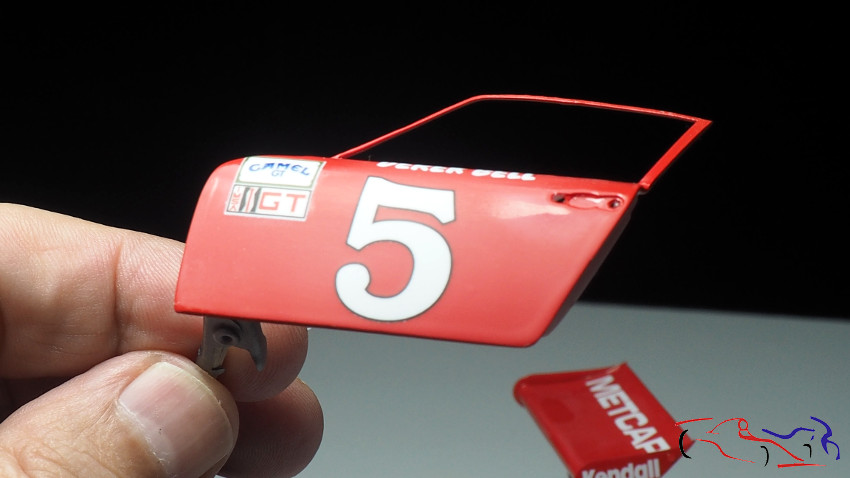  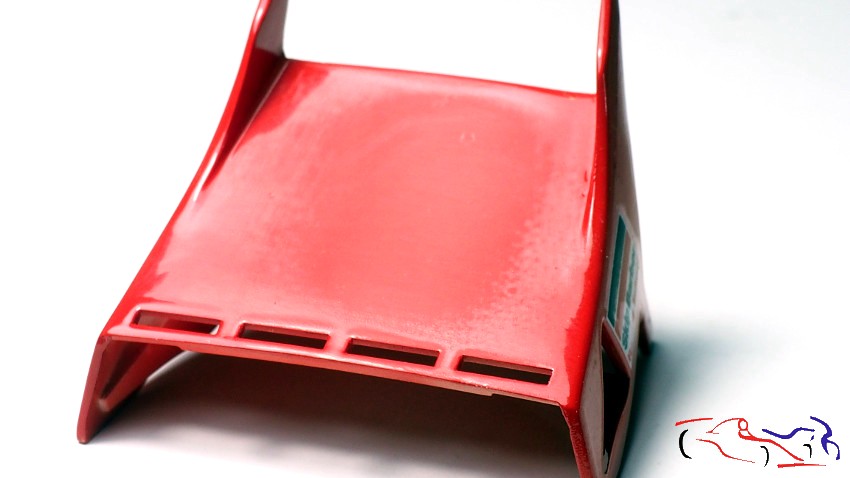 Una vez lijado y seco, pasamos a pulir. Tiene dos acabados: el medio y el fino. Primero muevo bien los botes, cojo con un bastoncillo de oidos un poco de pulimento medio, y lo voy extendiendo para la zona a pulir, y después pongo una boina de lana en el minitaladro, y le aplico una velocidad media, pasando por todos los sitios para quitar el pulimento. Al pasar, se ve que va apareciendo brillo muy rápidamente. Una vez aplicado el pulimento medio, aplico de igual forma el pulimento fino, con una boina distinta. El resultado aparece muy rápidamente y podéis ver el resultado en las siguientes fotos: Once sanded and dry, we move on to polishing. The polish has two finishes: medium and fine. First I move the cans well, I take a little bit of medium polish with a cotton swab, and I spread it on the area to polish, and then I put a wool beret on the mini-drill, and I apply it at medium speed, going over all the places to remove the polish. As you go through, you can see that a shine is appearing very quickly. Once the medium polish has been applied, I apply the fine polish in the same way, with a different beret. The result appears very quickly and you can see the result in the following photos: 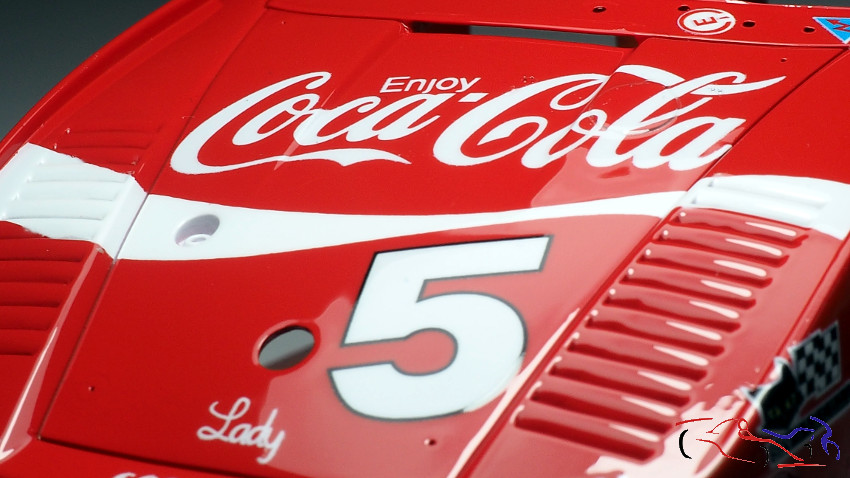 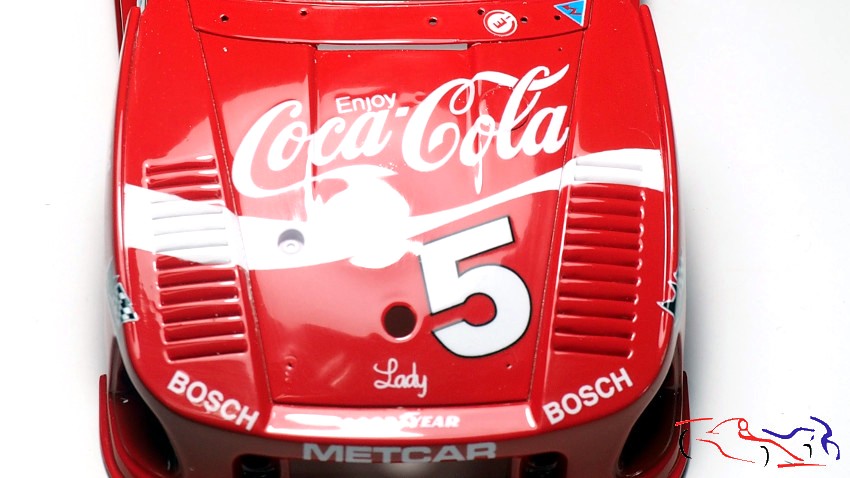 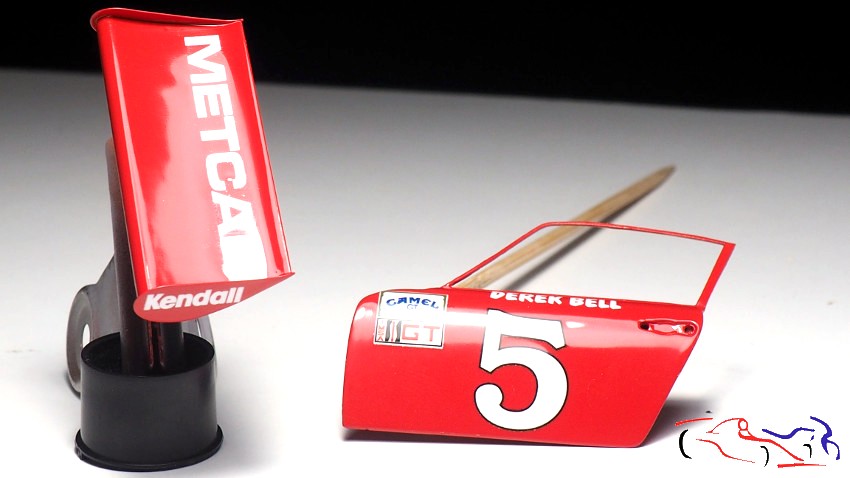 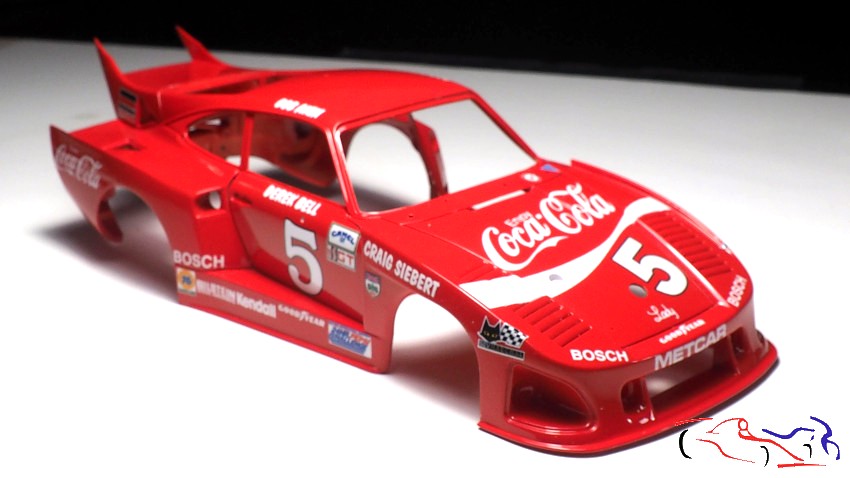 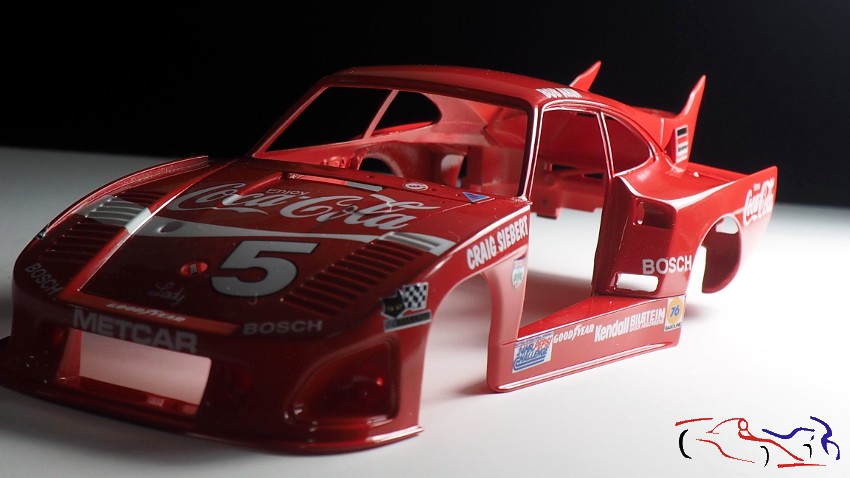 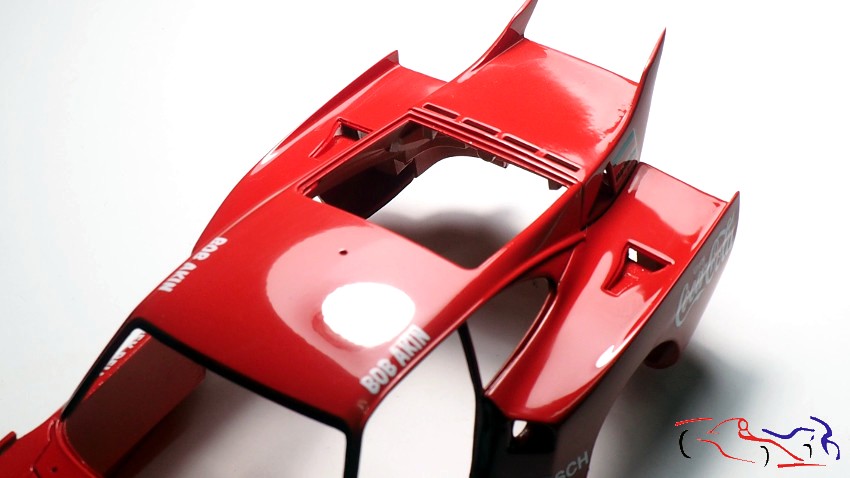 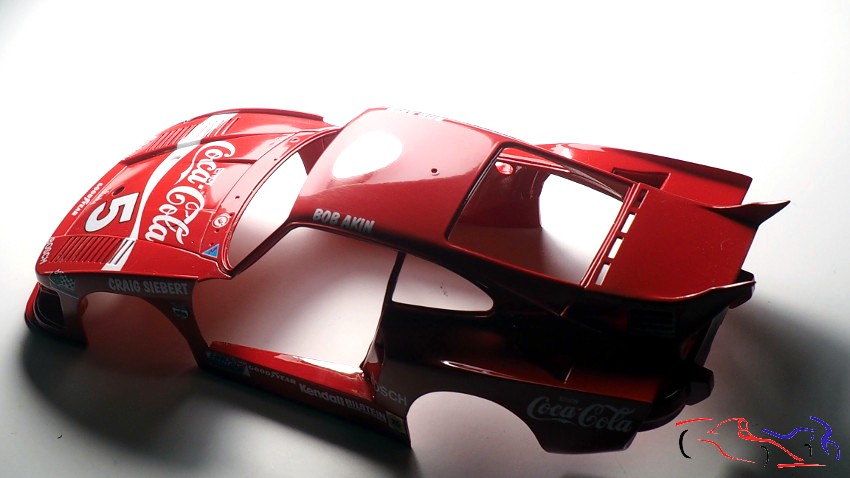 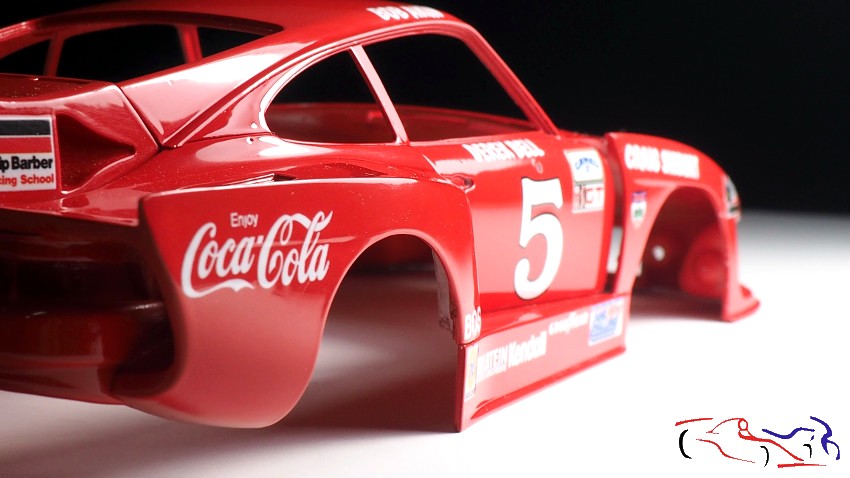 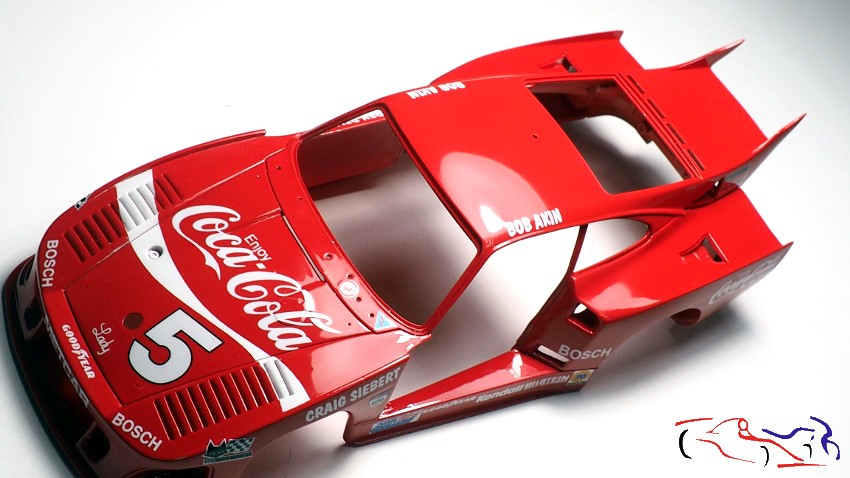 En el siguiente post, continuaremos con lo que no es carrocería! Gracias por mirar y comentar! In the next post, well continue with the non-bodywork! Thanks for watching and commenting! |
|
|
|
|
|
07-15-2021, 08:20 AM
|
#13 | |
|
AF Newbie
Join Date: Oct 2020
Location: Netherlands
Posts: 60
Thanks: 7
Thanked 8 Times in 7 Posts
|
Re: Porsche 935 K3 Coca Cola 1/24 Nunu
Very nice paint and decal job.
A Porsche in red looks different as the normal white ones but i like it. 
__________________
Thx for watching, Greetz Peter
|
|
|
|
|
|
07-16-2021, 02:10 AM
|
#14 | |
|
AF Regular
Join Date: Aug 2011
Location: Torino
Posts: 391
Thanks: 175
Thanked 62 Times in 58 Posts
|
Re: Porsche 935 K3 Coca Cola 1/24 Nunu
Looks fantastic Jesus! Really great job on this model as always!
|
|
|
|
|
|
07-16-2021, 02:50 AM
|
#15 | ||
|
AF Enthusiast
Thread starter
Join Date: Mar 2009
Location: Madrid
Posts: 650
Thanks: 109
Thanked 68 Times in 67 Posts
|
Re: Porsche 935 K3 Coca Cola 1/24 Nunu
Quote:
|
||
|
|
|
|
|
POST REPLY TO THIS THREAD |
 |
|
|


