|
|
|

|
|
| Search | Car Forums | Gallery | Articles | Helper | AF 350Z | IgorSushko.com | Corporate |
|
| Latest | 0 Rplys |
|
|||||||
| WIP - Motorbikes Post topics for any "Works In Progress" motobikes projects in this sub-forum. |
 |
 Show Printable Version | Show Printable Version |  Email this Page | Email this Page |  Subscribe to this Thread
|
|
|
Thread Tools |
 02-25-2011, 12:27 PM
|
#1 | |
|
AF Regular

Join Date: Jan 2004
Location: hong kong
Posts: 430
Thanks: 2
Thanked 5 Times in 3 Posts
|
Rossi in faith - Vale
Well, this time, it is not able only the bike any more. Here it comes Vale!
I just started off the figure kit and pre-assembled it. Hanging it on my WIP RC211V, the gesture looks amazing!   From the kit, Rossi's face is clearly scrupted just like those miniatures from Andrea of other 90mm figures! Amazed! Yet, the face is made of rubbers and I doubt if it will crack after I have completed the painting....  OK, let's get started~ The part was primed with surfacer and then Gunze matt black. 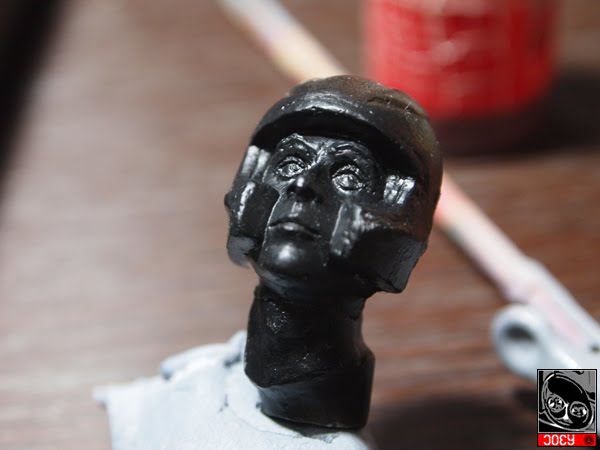 Then, Andrea flesh base was laid.  Then I first highlighted details of the eyes.  That's all for the preparision. Here are the result after a few nights of paintings. 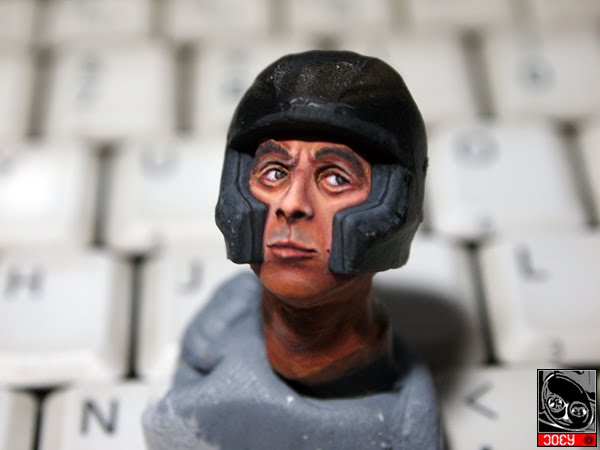  Unfortunately, I have broken both the visor parts as I was too careless smoothening the edges....... Anyway, further work will be done on the body....presumming I will be making the new visor on my own or I will just get a new box afterall....  |
|

|

|
|
02-26-2011, 12:23 AM
|
#2 | |
|
AF Enthusiast

Join Date: Dec 2004
Location: Germany
Posts: 3,431
Thanks: 28
Thanked 80 Times in 74 Posts
|
Re: Rossi in faith - Vale
Hi,
the painted face looks great, eyes are convincing
__________________
Micha       
|
|
|
|
|
|
03-20-2011, 12:24 AM
|
#3 | |
|
AF Regular
Thread starter
Join Date: Jan 2004
Location: hong kong
Posts: 430
Thanks: 2
Thanked 5 Times in 3 Posts
|
Re: Rossi in faith - Vale
Hi brothers!.Here is some of my updates for Vale.
I have broken both visors from my kit, but thanks to one of my friends who has given me one of his as replacement so I am nowing having a proper helmet made. You may seen from the pic, that when the viosr is assembled, the face can bearly be seen nomatter how well it is painted....>.< Anyway, I love and have enjoyed the painting of my favorite rider of all time!  Decals are put on on the helmet and the Cartograf decals are exceptionally great! Thin but strong and the sharps are all perfectly fitting!  The body of the figure is a nightmire! After a few days of sanding and scripting, I have finally managed to get it fixed and painted.  Decals are then put on and The figure is now more Rossi then before!  I have laid a layer of Testor dull coat to give a matt surface before I have some final touches with arcrylic paints.  |
|
|
|
|
|
03-20-2011, 02:29 AM
|
#4 | |
|
Forza Schumacher
 
Join Date: Mar 2001
Location: Tallinn
Posts: 6,695
Thanks: 9
Thanked 19 Times in 19 Posts
|
Re: Rossi in faith - Vale
That looks very good! Wrong bike, though

__________________
 Would love to resume my duties as AF's own official thread bastardizer!!!   1:29:53.435 || 207.316 || 310.596 |
|
|
|
|
|
03-20-2011, 03:45 AM
|
#5 | |
|
AF Regular

Join Date: Aug 2007
Location: Offshore
Posts: 170
Thanks: 1
Thanked 1 Time in 1 Post
|
Re: Rossi in faith - Vale
rarely see anyone building Vale..
nice progress!! the decal on helmet are SUPERB!! i don't think i have the artistic skill to paint the face |
|
|
|
|
|
03-22-2011, 01:47 PM
|
#6 | ||
|
AF Regular

Join Date: Sep 2010
Location: NE, Florida
Posts: 282
Thanks: 33
Thanked 5 Times in 5 Posts
|
Re: Rossi in faith - Vale

Quote:
|
||
|
|
|
|
03-24-2011, 07:21 AM
|
#7 | |
|
AF Newbie

Join Date: Feb 2007
Location: North East Scotland
Posts: 34
Thanks: 1
Thanked 0 Times in 0 Posts
|
Re: Rossi in faith - Vale
Great work, started work on my Tamiya Rossi figure last night, was surprised at the poorish fit, I guess Tamiya are not used to sculpting figures.
Now get yourself a Tamiya 2009 M1 for a nice diorama |
|
|
|
|
|
03-29-2011, 02:02 AM
|
#8 | |
|
AF Regular
Thread starter
Join Date: Jan 2004
Location: hong kong
Posts: 430
Thanks: 2
Thanked 5 Times in 3 Posts
|
Re: Rossi in faith - Vale
Thanks for all the comments above, brothers!
Vale is now completed and it pending for the M1 to get done and give the it a ride.   For the painting process, it is like another huge topic that will take a few more pages to detail. In fact, I have been learning how to paint AFV figures in scales like 1:35 of 1:16 a few years back. The way the AFV guys or I figure painters will handle a model or a figure is very different than ordinary Auto modelers. In auto, everything should be painted saturated and condensed so the color will be like the same all over one single surface; while in the world of AFV or figure painting, it is rarely the case. They trend to apply many different color tones in one single surface to archieve color contrast, shadows and highlights, etc. These are all done with some different paint materials, like oil paints for instance. For the Rossi face for example, I used some Acrylic paints brand "Andrea" whose is very different from the Tamiya acrylic in nature. The paint itself is solved with clean water and the color is hand painted as thin as possible so the shadows can be blended very smoothly. It took me a dizon of figures to practise until I finally realise how the technique works. And afterall, many of the local painters in HK shared their views and opinions in local forum so I can keep moving on. For a quick reference, it is usually great to start with some masters for their tutorials. And here is one from one of my favorite painters, Calvin Tan: http://zyclyon-tutorials.blogspot.com/2009/03/1_28.html |
|
|
|
|
|
03-29-2011, 10:40 AM
|
#9 | |
|
AF Regular
Join Date: Sep 2010
Location: NE, Florida
Posts: 282
Thanks: 33
Thanked 5 Times in 5 Posts
|
Re: Rossi in faith - Vale
Thanks Joeyko2000
|
|
|
|
|
|
08-14-2011, 08:41 PM
|
#10 | |
|
AF Regular
Thread starter
Join Date: Jan 2004
Location: hong kong
Posts: 430
Thanks: 2
Thanked 5 Times in 3 Posts
|
Re: Rossi in faith - Vale
After puuting up with Vale himself, I have actually started working on the M1 since then.
And this time, instead of tearing everything apart for showing all the machainical details, I am going to keep it a curbside build, and just to just some adequate highlights over the visible details. That is why I am bringing in the Top Studio details kit only with some of the many metal parts from either T2M or HD in the aspects of details.  First and foremost is the preparision. As usual, the chassis has been test-fitted and will be given some enhancement over the weidings and fillings.   I am not going too far to fill the inner wall of the main frame as it will not be visible at all with the cowlings fitted. But I will focus on the swing arms instead.  At the same time, I have also prepared the cowlings as well, filling and sanding those fittings is essential works when working on a bike project.  After some work, the weidings are prepared on the swingarms. I am actually working on another 2004 M1 at the same time too. Just to have the tasks leveraged so it ease a bit the duplicated effords.   Gunze GX-1 White and Ricebox pearl white layer has been applied on all the cowlings. This combo has been my favorite as they both deliver excellent covering and brilliant colors and effects.  The blue color is from Ricebox as well as to replicate the team color of the Yamaha factory.  The kit's decals are the very very best decal sheet I have ever been using in my modeling life! This Cartograf has been ever the best I have used! Grade AAA as I have never seen a better one! Haha~~ I enjoyed it so so much!  And at the very current stage, I have been preparing the clear coat for the cowlings. But I think it will still take another weekend before I can complete the coating works for the rest of the parts.  This is how the progress goes so far. THanks for reading and I welcome any comments and suggests from all of you fellows~~ JK |
|
|
|
|
|
11-15-2011, 11:17 AM
|
#11 | |
|
AF Regular
Thread starter
Join Date: Jan 2004
Location: hong kong
Posts: 430
Thanks: 2
Thanked 5 Times in 3 Posts
|
Re: Rossi in faith - Vale
Here is another quick update for the work so far.
The clear coat this time is quite nice and this time I am thinking I don't even need to do the polishing work at all, just leave the gloss from the 2K clear....  Some WIP pics for the chassis work....  After some long delay, the chassis is catching up now....  And as per tonight, I have got my first preassembly of the fairings on to the chassis. Really feel great when the figure first sit on the bike!   |
|
|
|
|
|
11-15-2011, 03:26 PM
|
#12 | |
|
AF Enthusiast
Join Date: May 2009
Location: Tucson, Arizona
Posts: 1,469
Thanks: 12
Thanked 126 Times in 120 Posts
|
Re: Rossi in faith - Vale
Joeyko2000 - stunning work on the Rossi figure - John
|
|
|
|
|
|
11-19-2011, 12:51 PM
|
#13 | ||
|
AF Regular
Thread starter
Join Date: Jan 2004
Location: hong kong
Posts: 430
Thanks: 2
Thanked 5 Times in 3 Posts
|
Re: Rossi in faith - Vale
Quote:
Finally here is the completed one. I am putting this into a diorama actually so it means much more to delicate the 100th GP victory~   |
||
|
|
|
|
11-19-2011, 01:14 PM
|
#14 | |
|
AF Enthusiast
Join Date: May 2009
Location: Tucson, Arizona
Posts: 1,469
Thanks: 12
Thanked 126 Times in 120 Posts
|
Re: Rossi in faith - Vale
joeyko2000 - please tell me how you made the welds line on the swing arm?? what did you use and the technique. Also take more pictures of the finished diorama and post them. This is a fantastic commemorative post more pictures - - - Please - John
|
|
|
|
|
| ||||||||||||||||||||||||||||||||||||||
|
POST REPLY TO THIS THREAD |
 |
|
|